Arduino Start Here Robot
Contest entry by Dane Edmonds. This is my first robot using Arduino , it uses a l239d motor driver and is basically my attempt at making a “start here” robot.
This is my first time using Arduino so I decided to build a robot that would help me learn arduino’s code , I wanted to start small and build up to harder things so I made the robot expandable , as I get better with coding I will add more things . So I hope other people who are new to arduino can learn from this robot to
Dane says: Arduino has meant a cheap and easy to use micro controller, giving people a chance to achieve their goals and has helped make school holidays less boring for me .
YouTube Video Available Here.
Parts list :
Things you can add :
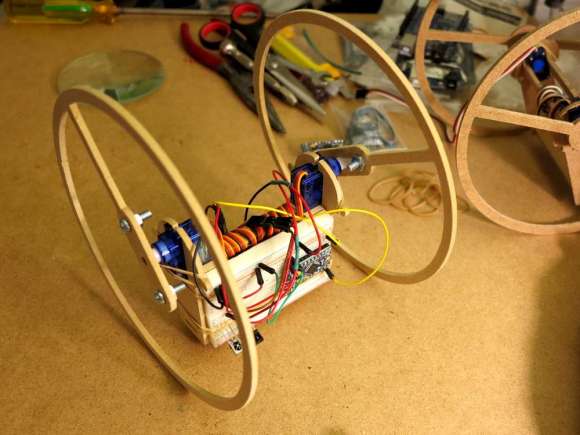
Build It! instructions:
- 1) cut thin scrap wood (about 8 millimeters thick) in to 2 squares of 13.5 cm x 13.5 cm
- 2) in one of the squares cut hole the same size as your servo base , about 1cm from one of the edges .
- 3) paint desired colour
- 4) using a hot glue gun glue the motors in place (as shown in top picture), with some small screws ,screw in the Arduino to the breadboard will have adhesive tape on the back, peel of plastic and stick in place.
- 5) using this walk through set up your motor controller http://letsmakerobots.com/node/2074
- 6) drill 2 holes in the back corners of the wood to fit your spacers and one above the Arduino (do the same for the 2nd piece of wood .
- 7) put your servo in place , and screw into wood
-
 made a pan/tilt system with a bit of scrap metal , (you can do the same if you wish but is not needed )
- 9) screw in your infrared sensers(as shown below) attach header pins (look on the sensor connect VIN and GND to the bread board power lines and OUT to a digital pin on your arduino.
Arduino Sketch
const int infra=3;

const int infra2=4;

  void setup()

 {

Serial.begin(9600);
pinMode(13,OUTPUT);
pinMode(12,OUTPUT);
pinMode (11,OUTPUT);
pinMode (10,OUTPUT);
pinMode (infra,INPUT);
pinMode (infra2,INPUT);

}

 void loop()    {
if (digitalRead(infra)== HIGH)
{         driveforward();

   }

if(digitalRead(infra) == LOW)

{

  stopmot();

  delay (500);

  reverse();

  delay (500);

 right();

delay (2000);

  }

  else if (digitalRead(infra2)== LOW)

   { stopmot();

 delay (500);

  reverse();

   delay (500);

 left();

delay (2000);

 }

         }

  void driveforward()

 {   digitalWrite(13,HIGH);

digitalWrite(10,HIGH);

 digitalWrite (11,LOW);

  digitalWrite (12,LOW);

 }

 void stopmot()

 {

digitalWrite(13,LOW);

 digitalWrite(12,LOW);

digitalWrite(11,LOW);

 digitalWrite(10,LOW);

 }

void reverse()

{

  digitalWrite(12,HIGH);

 digitalWrite(11,HIGH);

  digitalWrite (13,LOW);

  digitalWrite (10,LOW);

 }

 void right()

 {

digitalWrite (10,HIGH);

  digitalWrite (13,LOW);

 digitalWrite (12,LOW);

 digitalWrite (11,LOW);

 }

 void left()

 {

 digitalWrite (13,HIGH);

  digitalWrite (11,LOW);

 digitalWrite  (12,LOW);

  digitalWrite (10,LOW);

}