Posts | Comments

Planet Arduino

Archive for the ‘rainbowduino’ Category

Planning to make that carved a pumpkin last past Halloween night? Forget the tealight or LED candle—here’s an easy, no-solder project that will make it extra special. By default, this jack-o-lantern looks like it has a flickering flame, but get close enough to it and it goes crazy with color.

All you need is an LED matrix, a Rainbowduino to drive it, a PIR motion sensor to trigger the random colors, and a power source. [Alpha Charlie] kept the electronics from becoming pumpkin-flavored with some plastic bags. Since he used the PIR as the jack-o-lantern’s nose, there is a bit of plastic behind it to keep moisture from interfering.

[Alpha Charlie]’s build instructions are quite detailed, which makes this project even simpler if you’ve never used a PIR before. There are lots of ways you could build on this project to make it your own, like using trick-or-treater motion to trigger screams or spooky sounds, or add more sensors to make it more interactive. Watch it react after the break.

If you have nothing else at all to do between now and trick-or-treat time, you could bust out the soldering iron and recreate this 70-LED matrix jack-o-lantern. Blinkenlights too safe for your tastes? Fire-breather it is, then.


Filed under: Arduino Hacks, Holiday Hacks

In a well documented blog entry, [Loren Bufanu] presents a project that lit up a glass dance floor covering a swimming pool with RGB strips. We mentioned a video of his project in a Hackaday links but didn’t have any background information. Now we do.

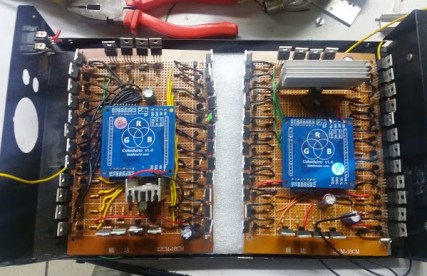
boards in boxThe project took around 450 meters of RGB strips controlled by two Rainbowduinos and driven by sixty-four power Mosfets, sixty-four bipolar transistors, and a few other components. Running just the white LEDs draws 8 amps of power.

The Rainbowduino is an ATmega328 Arduino compatible board with two MY9221 controllers. Each  controller handles 12 channels of Adaptive Pulse Density Modulation. In other words, it makes the LEDs flash nicely. [Loren] used the Rainbowduino instead of some alternatives because multiple R’duinos can coordinate their activities over I2C.

The software part of the project did not work as well as the hardware. The light patterns were supposed to follow the music being played. A PC software package intended to drive the R’duinos produced just a muddy mess. Some kludges, including screen captures (!), driven by a batch file tamed the unruliness.

It’s been awhile, but a similar disco dance floor, built by [Chris Williamson] but not over a pool, previously caught our attention. [Chris] is a principle in Terror Tech that recently got a mention on Sparkfun.

The video after the break fortunately does not make a big splash, but is still electrifying.


Filed under: Arduino Hacks, led hacks
Dec
17

Particle System Busy Box Keeps Baby Occupied

arduino hacks, Busy box, led hacks, particle system, rainbowduino, toy hacks Comments Off on Particle System Busy Box Keeps Baby Occupied 

Busybox

Any child born today has a bright future ahead of them—mostly consisting of watching glowing rectangles for 80 or 90 years. To give his progeny a jump-start on a lifetime of watching LEDs flicker, [Dan] created a busy box. It’s really just an Arduino, RGB LED matrix, and a programmed particle system, but if we’re fascinated by it, it will probably blow an infant’s mind.

The idea for this busy box originated with an earlier Hackaday post that used an 8×8 matrix of RGB LEDs to create a moving color cloud. [Dan] took this project as a jumping off point and created an infant’s busy box with four modes that are sure to be entertaining.

Inside the is a Rainboduino: an Arduino compatible board capable of driving an 8×8 RGB LED matrix. Also stuffed inside the busy box is a 9V battery, rocker switch for the power, and four arcade buttons that cycle through each mode. The first mode is some sort of ‘plasma cloud’ simulation, the next is a ‘painter’ light display. The final two modes spell out [Dan]‘s spawn’s name, and all the numbers and letters of the alphabet.


Filed under: Arduino Hacks, led hacks, toy hacks

Contest Entry by Joe Cochran
In another project, I created a way to control a 8×8 RGB Matrix using an Atari Joystick. While waiting for one of the components to arrive, I had an idea that a maze could be constructed on the RGB Matrix and a user could go through the maze with a joystick.

Most maze algorithms assume that the maze can have “paper-thin” walls. That is, that the occupiable spaces don’t occupy the same amount of space as the walls. However, with the RGB Matrix the walls have to be represented by a whole LED being turned on. So in essence each LED is marked as a “wall” or as an “occupiable space”
Joe has created a page that contains the detailed instructions on how to create your own JoyLite Maze. I am posting the link to it, rather than recreating it all again.

JoyLite Maze “How To”.

Joe Says:Arduino has been a fantastic opportunity to for me rediscover the creative process. I became a software developer because I get a lot of satisfaction from turning an idea into reality. When you get down to it though, professional software development ends up being little more than manipulating some bits in databases and RAM. Nothing tangible. Arduino has allowed me to move beyond the “cyberspace” and into the “real world”, opening the door to physical computing with motors, switches, lights and dials. And while I may be short on knowledge in regards to the electrical and mechanical engineering aspects of these projects, the Arduino community is so healthy, friendly and capable that they help make learning this stuff a real treat too.
Share/Bookmark


  • Newsletter

    Sign up for the PlanetArduino Newsletter, which delivers the most popular articles via e-mail to your inbox every week. Just fill in the information below and submit.

  • Like Us on Facebook