Posts | Comments

Planet Arduino

Archive for the ‘x10’ Category

Residential-grade commercial alarm systems are good at a few thingsĀ but terrible at others, like keeping pace with telephone technology. So what to do when a switch to VOIP renders your alarm system unable to call in reinforcements? Why not strip out the old system and roll your own value-added alarm and home automation system?

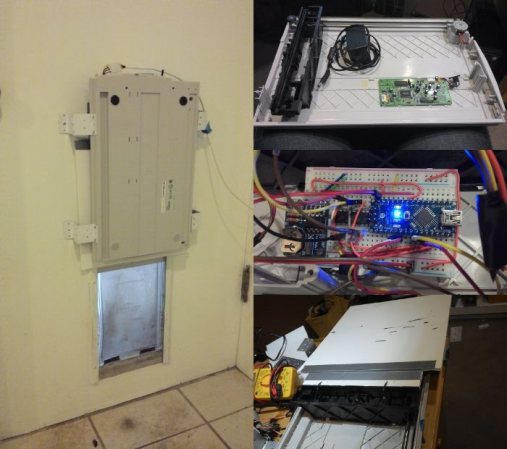
Generally, the hardest part about installing an alarm system is running the wires to connect sensors to the main panel, so [Bill Dudley] wisely chose to leverage the existing wiring and just upgrade the panel. And what an upgrade it is. [Bill]’s BOM reads like a catalog page from SparkFun or Adafruit – Arduino MEGA 2560, Ethernet shield, a sound board, stereo amplifier, X10 interface, and a host of relays, transformers, and converters. [Bill] is serious about redundancy, too – there’s an ESP8266 to back up the wired Ethernet, and a DS3231 RTC to keep the time just in case NTP goes down. The case is a bit crowded, but when closed up it’s nicely presentable, and the functionality can’t be beat.

Rehabilitating old alarm systems is a popular project that we’ve covered plenty of times, like this Arduino upgrade for a DSC 1550 panel. But we like the way [Bill] really went the extra mile to build add value to his system.


Filed under: Arduino Hacks, home hacks
Feb
01

The K9 Curfew Door

arduino hacks, doggy door, home hacks, x10 Comments Off on The K9 Curfew Door 

FPKUJYIHQMN5E6P.MEDIUM

[Kenbob] is an awesome pet owner. He has two small dogs that have free access to the backyard through a doggy door. It’s great during the day, but they have to close it at night to stop the dogs from bothering the neighbors. So he decided to make an automatic curfew based doggy door!

Before setting out on his project, he determined some design goals that had to be met. Namely, he couldn’t have it lock the dogs outside by accident! The hack makes use of an old large format flat-bed scanner that had stopped working a while ago. As it so happened, this scanner had just enough carriage travel to be able to actuate a cover for the doggy door. After reinforcing the sliding cover, he hooked it up to an Arduino Nano, a RTC and a H-Bridge motor driver in order to control it.

In order to add scheduling ability and to program the door remotely, he has also hooked it into his existing x10 control infrastructure in his house — not too shabby! It also features a manual 3-position switch to lock it open, closed, or to leave it on automatic. The question is, can a raccoon get in?

He’s been testing it for a few weeks and it works quite well, although he admits it is not the most rugged solution — lucky for him, his dogs aren’t the type to run headfirst into things. Stick around after the break to see it in action.


Filed under: Arduino Hacks, home hacks
Jan
04

Christmas Cheerlights

arduino, cheerlights, christmas, iobrdige, x10, xBee Comments Off on Christmas Cheerlights 

This year I joined a few other guys in the Cheerlights project.

CheerLights is an ioBridge Labs project that allows people's lights all across the world to synchronize, stay linked based on social networking trends. It's a way to connect physical things with social networking experiences and spread cheer at the same time. We are all connected.

Whenever anyone tweeted @cheerlights or #cheerlights and a color, my house lights (just the deck icicles) changed to that color.


I was a bit of a rebel and decided to change to the tweeted color just for 1 minute instead of just leaving the lights constantly to the selected color. After 1 minute the stockplus program for GE G-35 Color Effects Lights written by sowbug (https://github.com/sowbug/G35Arduino) took over.


I couldn't resist not using the random mode: these lights are just amazing, and the effects are REALLY cool.

My setup was wireless. I used an ioBrigde module, xbee radios and an arduino to accomplish this.


The other cool part about this year's Christmas lights is that they were programmed to start/stop via a cronjob. I used the ioBridge x10 board and a bunch of x10 devices to accomplish this.

Cronjob entry:

-bash-3.2$ crontab -l

30 15 * * * /oracle/start_cheerlights > /dev/null
00 21 * * * /oracle/stop_cheerlights > /dev/null

Bash script:


#!/bin/bash
#Upastairs
curl "http://www.iobridge.com/widgets/static/id=XXXXXXX&value=1"
#Downstairs
curl "http://www.iobridge.com/widgets/static/id= XXXXXXX&value=1"


*change value 1 for On and 0 for Off.


I also setup an IP webcam to keep an eye on my cheerlights remotely.
For more info on how you can build you own check http://www.cheerlights.com/

My Halloween project consisted of a dropping spider triggered by a PIR motion sensor mounted on a Jackolantern. The motion sensor triggered a dropping spider, lights, sounds, low laying fog and finally a tweet with a picture attached (http://twitter.com/ioalerts).

These are the parts that I used for this project:
  • ioBridge IO-204
  • x10 Firecracker CM17A
    • x10 Transeiver, Appliance and lamp modules
  • VHS tape
  • Plastic Jackolantern
    • 2 1K resistors
  • Checklane Yada Yada Yada (thanks Erick for the tip http://www.instructables.com/id/Arduino-controlled-Silly-String-shooter/)
    • 1 2N2222 tranisistor
    • 1 10k resistor
  • Fog Machine
  • Wireless webcam
  • Lights and accesories
    • Incandescent black light, strobe light, black light bulbs.


    Setup
    It's all pretty basic. The arduino controlled the PIR motion sensor, the servos for dropping spider reel, Jackolantern LED lights, toy with scary sound, and the X10 CM17A. Then the arduino sent a serial message to the ioBridge serial API telling to GET the URL of my site. Then on my site I had a bash script with a while loop looking for request coming from the ioBridge server, then the script played a sound, grab the picture from a wireless webcam and post it to twitter via twitpic's API using cURL.


    Arduino Sketch
    Here is the arduino sketch. I used the X10Firecracker and the Servo libraries as well as the PIR sensor example from the arduino playground.


    Spider Reel
    I end up using an VHS tape as a reel. I had to modify one servo to have continuous rotation. I used this guide to do so. The second servo just did the lift part.


    ioBridge Monitor
    To establish the arduino-ioBridge serial communication I was planning to use an RF solution, but due to time constraints I had to use a long speaker cable to connect the arduino TX to ioBridge's Serial Board RX with one wire and the second for GND.


    This is the bash script I used to trigger a sound as well as send a twitpic.

    I used my mac os x Apache 2 server. I had to give write permisions to the access_log so I could append a bogus line as a "break".


    #!/bin/bash 
    booCounter=$1
    while true;do
    status=`tail -n 1 /private/var/log/apache2/access_log | cut -f 1 -d "-"`
    if [ "$status" = "00.00.000.000 " ]
    then
    echo "Boo" >> /private/var/log/apache2/access_log
    afplay /full/path/Halloween/werewolf.mp3
    msg="Boo, victim $booCounter just got really scared"
    sleep 5
    curl -O http://www.mywebcam.com/IMAGE.JPG
    curl -F media=@/full/path/Halloween/IMAGE.JPG -F "username=username" -F "password=password" -F "message=$msg" http://twitpic.com/api/uploadAndPost
    let booCounter=booCounter+1
    fi
    done


    Fog Machine 
    I got this fog machine that comes with manual fog release switch.
     I just soldered the 125VAC/10A DPDT Plug-In Relay to the switch and connected to an X10 appliance module.


    Fog Chiller
    I made this low laying fog cooler following this instructable.


    Commnents/Notes
    I originally used a PING sensor but got better results using the PIR sensor instead. I had to decrease the sensing radius by creating a cone (pumpkin nose) around the sensor.
    The twitpic implementation could have been better. Camera placement and lighting were poor :(


    My Halloween project consisted of a dropping spider triggered by a PIR motion sensor mounted on a Jackolantern. The motion sensor triggered a dropping spider, lights, sounds, low laying fog and finally a tweet with a picture attached (http://twitter.com/ioalerts).

    These are the parts that I used for this project:
  • ioBridge IO-204
  • x10 Firecracker CM17A
    • x10 Transeiver, Appliance and lamp modules
  • VHS tape
  • Plastic Jackolantern
    • 2 1K resistors
  • Checklane Yada Yada Yada (thanks Erick for the tip http://www.instructables.com/id/Arduino-controlled-Silly-String-shooter/)
    • 1 2N2222 tranisistor
    • 1 10k resistor
  • Fog Machine
  • Wireless webcam
  • Lights and accesories
    • Incandescent black light, strobe light, black light bulbs.


    Setup
    It's all pretty basic. The arduino controlled the PIR motion sensor, the servos for dropping spider reel, Jackolantern LED lights, toy with scary sound, and the X10 CM17A. Then the arduino sent a serial message to the ioBridge serial API telling to GET the URL of my site. Then on my site I had a bash script with a while loop looking for request coming from the ioBridge server, then the script played a sound, grab the picture from a wireless webcam and post it to twitter via twitpic's API using cURL.


    Arduino Sketch
    Here is the arduino sketch. I used the X10Firecracker and the Servo libraries as well as the PIR sensor example from the arduino playground.


    Spider Reel
    I end up using an VHS tape as a reel. I had to modify one servo to have continuous rotation. I used this guide to do so. The second servo just did the lift part.


    ioBridge Monitor
    To establish the arduino-ioBridge serial communication I was planning to use an RF solution, but due to time constraints I had to use a long speaker cable to connect the arduino TX to ioBridge's Serial Board RX with one wire and the second for GND.


    This is the bash script I used to trigger a sound as well as send a twitpic.

    I used my mac os x Apache 2 server. I had to give write permisions to the access_log so I could append a bogus line as a "break".


    #!/bin/bash 
    booCounter=$1
    while true;do
    status=`tail -n 1 /private/var/log/apache2/access_log | cut -f 1 -d "-"`
    if [ "$status" = "00.00.000.000 " ]
    then
    echo "Boo" >> /private/var/log/apache2/access_log
    afplay /full/path/Halloween/werewolf.mp3
    msg="Boo, victim $booCounter just got really scared"
    sleep 5
    curl -O http://www.mywebcam.com/IMAGE.JPG
    curl -F media=@/full/path/Halloween/IMAGE.JPG -F "username=username" -F "password=password" -F "message=$msg" http://twitpic.com/api/uploadAndPost
    let booCounter=booCounter+1
    fi
    done


    Fog Machine 
    I got this fog machine that comes with manual fog release switch.
     I just soldered the 125VAC/10A DPDT Plug-In Relay to the switch and connected to an X10 appliance module.


    Fog Chiller
    I made this low laying fog cooler following this instructable.


    Commnents/Notes
    I originally used a PING sensor but got better results using the PIR sensor instead. I had to decrease the sensing radius by creating a cone (pumpkin nose) around the sensor.
    The twitpic implementation could have been better. Camera placement and lighting were poor :(


  • Newsletter

    Sign up for the PlanetArduino Newsletter, which delivers the most popular articles via e-mail to your inbox every week. Just fill in the information below and submit.

  • Like Us on Facebook