Posts | Comments

Planet Arduino

Archive for the ‘ultrasonic’ Category

Who wouldn’t want an autonomous drone to deliver cans of fizzy drink fresh from the fridge? [Alex Toussaint] did, and in thinking how such a machine might work he embarked on a path that eventually led him to create a fully functional ultrasonic 3D scanner. In writing it up he’s produced a straightforward description of how the system works, which should also be of interest to anyone curious about phased array radar. He starts with an easy-to-understand explanation of the principle behind phased array beam forming, and there follows his journey into electronics as he uses this ambitious project to learn the art from scratch. That he succeeded is testament to his ability as well as his sheer tenacity.

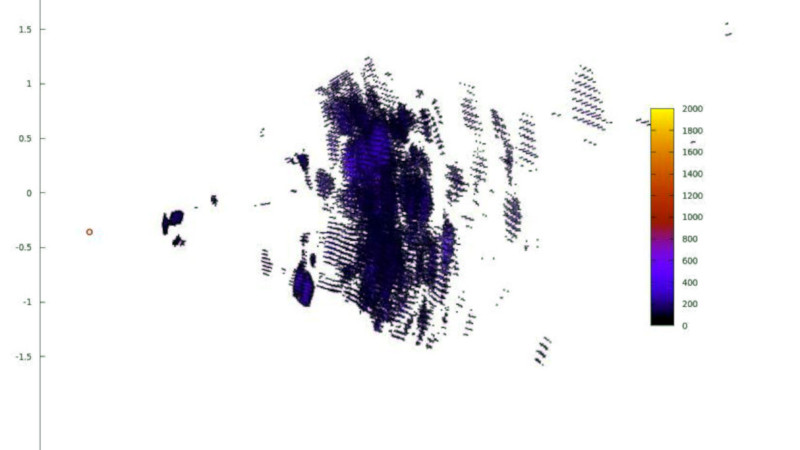
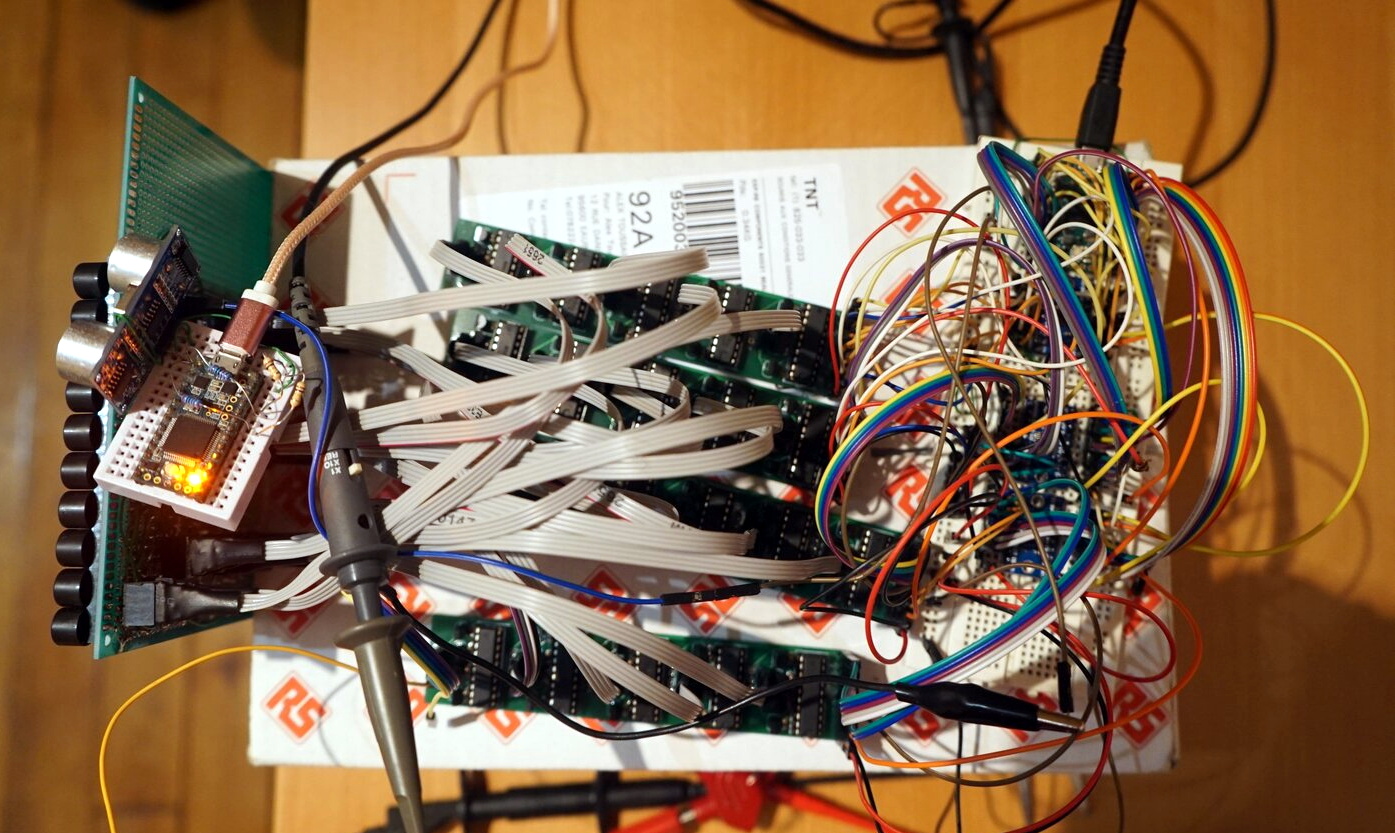
He finally arrived at a grid of 100 ultrasonic emitters controlled from an Arduino through a series of shift register boards. Using this he can steer his ultrasonic beam horizontally as well as vertically, and receive echoes from objects in three-dimensional space. The ornamental bird example he uses for his scanning tests doesn’t quite emerge in startling clarity, but it is still clear that an object of its size and rough shape is visible enough for the drone in his original idea to detect it. If you would like to experiment with the same techniques and array then all the resources can be found in a GitHub repository, meanwhile we’re still impressed with the progress from relative electronics novice to this. We hope the ideas within it will be developed further.

We’ve seen ultrasonic arrays before, but mainly used in levitation experiments.

Radars are simply cool, and their portrayal in movies and TV has a lot to do with that. You get a sweet glowing screen that shows you where the bad guys are, and a visual representation of your missiles on their way to blow them up. Sadly, or perhaps thankfully, day to day life for most of us is a little less exhilarating. We can make do with a facsimile of the experience instead.

The project consists of an Arduino Uno outfitted with an ultrasound module that can do basic range measurements on the order of tens of centimeters. The module is then placed on a servo and scanned through a 180 degree rotation. This data is passed back to a computer running a Python application, which plots the results on a Plan Position Indicator, or PPI – the sweeping display we’re all so familiar with.

While it’s unlikely you’ll be using such a setup to engage bandits, it could prove as a useful module for robot navigation or similar applications. We’ve seen ultrasonic transducers used for exactly that. Video after the break.

Want to take that annoyingly productive coworker down a notch? Yeah, us too. How dare they get so much done and be so happy about it? How is it possible that they can bang on that keyboard all day when you struggle to string together an email?

The Slippy Slapper is a useless machine that turns people into useless machines using tactics like endless distraction and mild physical violence. It presses your buttons by asking them to press buttons for no reason other than killing their productivity. When they try to walk away, guess what? That’s another slappin’. Slippy Slapper would enrage us by proxy if he weren’t so dang cute.

You’re right, you don’t need an Arduino for this. For peak inefficiency and power consumption, you actually need four of them. One acts as the master, and bases its commands to the other three on the feedback it gets from Slippy’s ultrasonic nostrils. The other three control the slappin’ servos, the speakers, and reading WAV files off of the SD card. Slap your way past the break to see Slippy Slapper’s slapstick demo.

Need to annoy a group of coworkers all at once? Slip a big bank of useless machines into the conference room while it’s being set up.

[MJKZZ] sends in this entertaining little tutorial on building a small automated cannon out of a syringe.

He starts the build off by modifying an arc lighter, the fancy kind one might use to light a fire on a windy day, so that it can be controlled by a micro-controller. The arc is moved to the needle end of the syringe with a careful application of wires and hot glue. When the syringe is filled with a bit of alcohol and the original plunger is pressed back in a small spark will send it flying back out in a very satisfying fashion.

Of course it wouldn’t be a proper hack without an Arduino added on for no reason other than the joy of doing so. [MKJZZ] adds an ultrasonic sensor into the mix which, when triggered appropriately by an invading object fires the arc lighter using a reed relay.

He demonstrates the build by eliminating an intruding coke can on his work bench. You can see it in the video after the break. All in all a very fun hack.

We don’t think [bleepbit] will take offense when we say the “poor man’s theremin” looks cheesy — after all, it was built in a cheese container. Actually, it isn’t a bad case for a simple device, as you can see in the picture and the video below. Unlike a traditional theremin, the device uses ultrasonics to detect how far away your hand is and modifies the sound based on that.

There are also two buttons — one to turn the sound off and another to cycle through some effects. We liked how it looked like a retro cassette, though. The device uses a cheap Arduino clone, but even with a real Arduino, the price wouldn’t be too bad. However, the price tag quoted doesn’t include a few connectors or the speaker that appears in the schematic. There’s a note that the model built uses a jack instead of a speaker, but it would be nice to include both and use the kind of jack that disconnects the speaker when you plug speakers or headphones in.

The code is simple and there are four possible effects you can cycle through with one of the buttons. Unlike a real theremin, you can trigger this one with anything the ultrasonic sensor can see. The Arduino audio quality is not superb, of course, but it is still a fun rainy day project.

We couldn’t help but think that a 32-bit Arduino could have used one of the sophisticated audio libraries. However, there are other libraries that might improve things even with the 8-bit processor.

Granted, this isn’t a true theremin, but we’ve seen plenty of those, too. We’ve even used the same sensors to control a PC.

Infrared certainly has its uses, but if you’re trying to locate objects, ultrasonic detection is far superior. It’s contact-less, undetectable to the human ear, and it isn’t affected by smoke, dust, ambient light, or Silly String.

If you have one ultrasonic sensor and a microcontroller, you can detect plenty of useful things, like the water level in a rain barrel or the distance traveled by a tablet along a rail. If you have two sensors and a microcontroller, you can pinpoint any object within a defined range using trigonometry.

[lingib]’s dual sensor echo locator uses two HY-SRF05s, but the cheap and plentiful HC-SR04s will work, too. Both sensors are arranged for maximum beam overlap and wired up to an Arduino Uno. One sensor’s emitter is blocked with masking tape, so all it does is listen.

When the system registers the object, it shows up as a red dot on a grid inside a Processing sketch along with a bunch of details like the object’s coordinates, its distance from each sensor, and the area of the triangle formed by the two sensors and the object. [lingib] reports that the system is quite accurate and will work for much larger playgrounds than the 1 meter square in the demo after the break.

Don’t want to detect objects? Ultrasonic sensors are cheap enough to hack into other things, like this one-way data communications module.

Thanks for the tip, [Setvir].

Some of the best hacks are the ones which seem perfectly obvious in hindsight; a solution to the problem that’s so elegant, you wonder how it never occurred to you before. Of course we also love the hacks that are so complex your eyes start to water, but it’s nice to have a balance. This one, sent in by [Eduardo Zola] is definitely in the former group.

In the video after the break, [Eduardo] demonstrates his extremely simple setup for using ultrasonic transducers for one-way data communication. Powered by a pair of Arduinos and using transducers salvaged from the extremely popular HC-SR04 module, there’s a good chance a lot of readers can recreate this one on their own bench with what they’ve got lying around. In this example he’s sending strings of text from one computer to another, but with a little imagination this can be used for all sorts of projects.

For the transmitter, the ultrasonic transducer is simply tied to one of the digital pins on the Arduino. The receiver is a bit more complex, requiring a LM386 amplifier and LM393 comparator to create a clean signal for the second Arduino to read.

But how does it work? Looking through the source code for the transmitter and receiver, we can see it’s about as basic as it gets. The transmitter Arduino breaks down a given string into individual characters, and then further converts the ASCII to eight binary bits. These bits are sent out as tones, and are picked up on the receiving end. Once the receiver has collected a decent chunk of tones, it works through them and turns the binary values back into ASCII characters which get dumped over serial. It’s slow, but it’s simple.

If you’re looking for something a bit more robust, check out this guide on using GNU Radio with ultrasonics.

[ChrisN219] has an antique Coke machine that used to hold glass bottles. Now it holds around 30 tall boy cans of his favorite post-work suds. The only problem is that [Chris] has no idea how many cans are in it without opening up the door or keeping tally on a nearby slate board. Enter the Arduino.

He wanted to make something completely non-invasive to the machine (phew!) while using as many parts he already had as possible. The result is a simple circuit that uses an ultrasonic sensor mounted inside the machine to ping the depths, and a Nano in a nifty 3D printed box up top to do some math and display the number of cans remaining as a simple bar graph. The sensor reads one bay, and the code multiplies by two to get the total. It was touch and go there for a minute as he wasn’t sure that the HC-SR04s would get a good response from the cylindrical cans. Not only did they give a good reading, the first test was quite accurate.

[Chris] recently finished Mk. II, which replaces the momentary (and the Coke logo) with a second HC-SR04. The first version required the push of a button to do inventory, but now he simply walks up to the machine and knows at a glance if it’s time to make a beer run.

Okay, so maybe you don’t have cool old Coke machine problems. But surely you can find something that needs pinging, like an inconvenient rain barrel.

We love the doors on Star Trek’s Enterprise. We should have known they were human-operated though because they were too smart. They would wait for people, or fail to open when someone was thrown against them during a fight. [SieuweE] has a much more practical automatic door that he calls ArduDoor.

You might guess from the name it uses an Arduino. It also uses a windshield wiper motor which is perfect since it is high-torque and low speed. You might even be able to pick one up for little or nothing if you frequent the junkyards.

The downside is that it takes 12A of current to operate the motor at 12V, however that’s the price to pay for a high-torque motor. [SieuweE] is using an ATX power supply to run it which isn’t terribly convenient, but is easy to source and use.

The Arduino and ultrasonic sensor are pretty standard fare, but the welded door opening mechanism is where the real work lies in this project. Of course, your door will vary so you might have to get a little creative if you want to duplicate the ArduDoor.

Of course, you could do a lot in addition to (or instead of) the ultrasonic. [SieuweE] says he’ll have the door Cortana-controlled soon. We were thinking of things like Bluetooth detection or even using OpenCV or some other method to recognize your face approaching the door.

(more…)

[B. Aswinth Raj] wanted to control a VLC player with hand gestures. He turned to two common ultrasonic sensors and Python to do the job. There is also, of course, an Arduino. You can see a video of the results, below.

The Arduino code reads the distance from both sensors — one for the left hand and the other for the right. This allows the device to react to single hand gestures that get closer or further away from one sensor as well as gestures involving both hands. For example, raising your left hand and moving it closer or further away will adjust the volume. The right hand controls rewind and fast forward. Raising both hands will start or stop playback.

Of course, since the Arduino is reading the gestures you could change them to suit you. We might have mounted the sensors further back (or, perhaps, added more sensors) so you could use trigonometry to triangulate the hand’s exact position. Well, perhaps not exact, but you could get an idea of the hand’s motion from right to left as well as forward and backward.

On the host computer side, Python receives serial data from the Arduino and then simulates keystrokes to get the desired result. Of course, this is also highly customizable.

By coincidence, we did a similar project a few years ago using one sensor and the Arduino’s ability to appear like a USB keyboard. We’ve also seen 8 sensors making piano music.


Filed under: Arduino Hacks


  • Newsletter

    Sign up for the PlanetArduino Newsletter, which delivers the most popular articles via e-mail to your inbox every week. Just fill in the information below and submit.

  • Like Us on Facebook