Posts | Comments

Planet Arduino

Archive for the ‘video game’ Category

“Avant-garde” is a French term that translates literally to “advance guard,” as in the vanguard that leads an army into battle. In the arts, the term describes people or works that are experimental and push the boundaries of their medium. Emily Velasco, of the Emily’s Electric Oddities YouTube channel, used an Arduino Nano to build a bizarre video game and “avant-garde” is the best way to describe it.

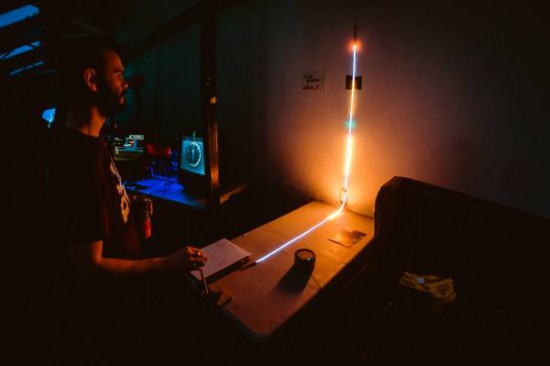
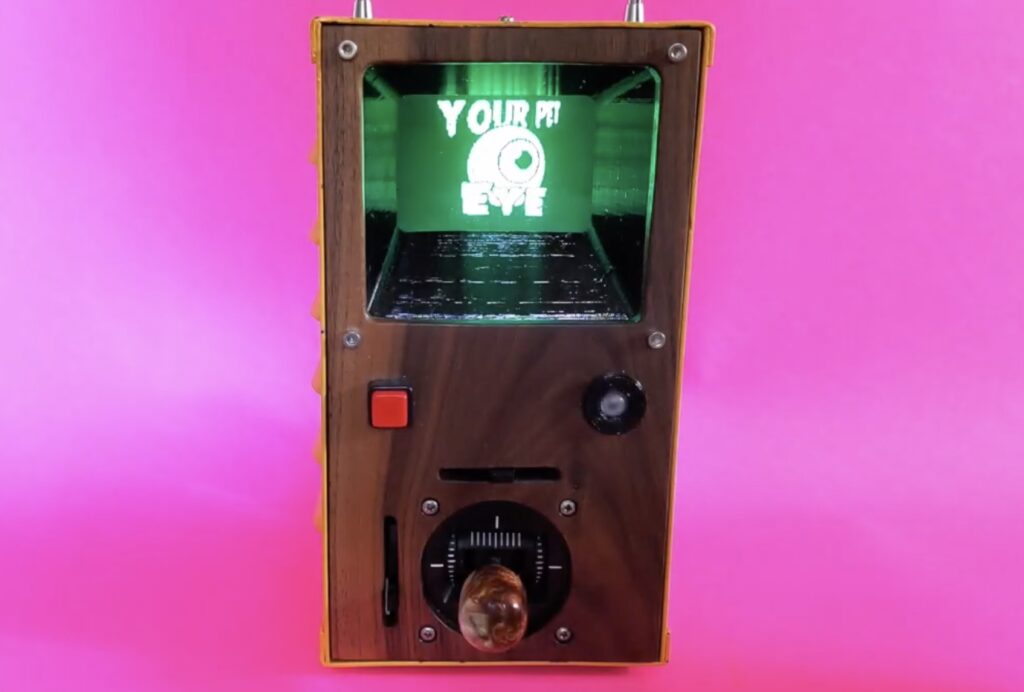
This handheld device runs a video game that charges players with the care of a pet eyeball. A CRT (cathode-ray tube) screen displays that eyeball in beautifully low-res monochrome graphics. An Arduino generates the composite video signal for the CRT screen using the TVout Arduino library. The Nano, CRT screen, and controls are housed within a retro-style enclosure that Velasco made out of an old motor controller case and a custom walnut wood face plate.

The only user input controls are a joystick and a button. The player can move the joystick to direct the eyeball’s gaze and push the button to make it blink. The eye’s pupil even reacts to the ambient light in the room, which the Arduino monitors through a light sensor. The game doesn’t have a goal in the traditional sense. The player isn’t given any quests or objectives. Their only job is to control the eyeball. Velasco described her creation as “the worst fake video game,” but we prefer to say that it is avant-garde and that the masses simply won’t understand its genius.

The post You take care of a pet eyeball in this bizarre video game appeared first on Arduino Blog.

Watching the advancement of technology is interesting enough by looking at improved specifications for various components as the years go by. But clock speeds, memory size, and power consumption are all fairly intangible compared to actual implementation of modern technology when compared to days of yore. For example, this $40 microcontroller can do what a video game console was able to do in the 80s for a tenth of the (inflation adjusted) price.

The NESDUE is an emulator for NES games which runs completely on an Arduino Due. The Arduino does have some limitations that have to be worked around to get the Nintendo to work, though. For one, it needs to be overclocked to be playable and it also needs a workaround to get past the memory limit of 96 kB of RAM. From there, a small screen is wired up along with a controller (from a Super Nintendo) and the gaming can begin.

This is an impressive feat for an Arduino platform to accomplish, especially with the amount of memory tweaking that has to happen. This might be the most advanced gaming system available that runs everything on an Arduino, right up there with the Arduinocade which can provide an arcade-like experience straight from the Arduino as well.

[Javier] has put in his time playing Final Fantasy X. In the game, there’s a challenge where you have to dodge 200 consecutive lightning strikes by pressing a button at just the right time. [Javier] did this once, but when he bought a new PS Vita handheld, he wanted the reward but couldn’t bear the drudgery of pressing X when the screen lights up 200 times.

4987021466110559532

So he did what anyone would do: hooked up a light-dependent resistor to an Arduino and rubber-banded a servo to press the X button for him. It’s a simple circuit and a beautiful quick hack, all the more so because it probably only took him a half hour or so to whip up. And that’s a half hour better spent than dodging lightning strikes. According to his screen-shot, he didn’t stop at 200 dodges, though. He racked up 1,568 dodges, with a longest streak of 1,066. You can watch a video on his blog and pull the code out of his GitHub.

Why do this? Because that’s what simple computers are for. We hate these silly jumping mini-games with a passion, so we applaud anyone who cheats their way around them. And while not as hilarious as this machine that cheats at Piano Tiles, [Javier]’s hack gets the job done. What other epic video game cheats are we missing?


Filed under: Arduino Hacks, handhelds hacks, playstation hacks

If you’re wondering what the difference is between the good ol’ Arduino Uno and one of the new-school Arduinos like the Arduino Due, here’s a very graphic example: [DrNCX] has written a stunning Pacman clone for the Due that seems to play just like the arcade. (Video embedded below the break.)

001The comparison between the Uno and Due isn’t quite fair. The Due runs on an 84 MHz, 32 bit ARM Cortex-M3 processor. It’s in a different league from the Uno. Still, we view this as an example of the extended possibilities from stepping up into a significantly faster micro. For instance, the video is output to both an ILI9341 TFT screen and external 8-bit VGA at once.

Besides using some very nice (standard) libraries for the parts, it doesn’t look like [DrNCX] had to resort to any particular trickery — just a lot of gamer-logic coding. All the code is up on GitHub for you to check out.

Can the old Arduinos do this? For comparison, the best Pacman we’ve seen on an AVR platform is the ATmega328-based RetroWiz, although it is clocked twice as fast as a stock Uno. And then there’s Hackaday Editor [Mike Szczys]’s 1-Pixel Pacman, but that’s cheating because it uses a Teensy 3.1, which is another fast ARM chip. People always ask where the boundary between an 8-bit and 32-bit project lies. Is a decent Pacman the litmus test?


Filed under: Arduino Hacks

dsc09451

Developed by Robin Baumgarten during a 48-hour game jam,  Line Wobbler is a one-dimensional dungeon crawler game running on Arduino Uno. Robin was inspired watching a cat interacting with a door stopper and having fun!

The game is played using a unique wobble controller made out of a door-stopper spring and a several meter long ultrabright LED strip display. All the movement is controlled by bending the Wobble controller left and right, while enemies are attacked by wobbling:

Using a spring, an accelerometer and a rigid surface, the Wobble controller is a tactile and surprisingly precise joystick with a unique ‘wobble’ action (pull it back and let go to make it oscillate back and forth rapidly). It is this wobble action that is core to the experience and the game we have created for it. Initially made out of a shoe-tree, I’m now using door-stopper springs, since they’re easier to use. Fun fact: the original inspiration for the controller came from this cat video.

Since it was created, it’s been exhibited during Experimental Gameplay Workshop at GDC 2015, at Burning Man 2015 and other city around the world (London, Chicago and Oslo). Line Wobbler won also two prizes at the AMAZE Awards 2015 in Berlin and has been nominated as a finalist for the IndieCade 2015 awards last October!

pong

Everyone knows Pong, the first commercially successful arcade video game machine  originally release by Atari in 1972. In those years the game helped to establish the video game industry and nowadays is often used by makers to experiment with creating game consoles with Arduino.

Roberto Melzi recently shared on the Arduino forum a new version of Pong made with Arduino Uno:

Thanks to the VGAx library done by Smaffer, based on the previous work done by Nick Gammon, I have done a little color game for an Arduino Uno working for a VGA monitor. See for details here:

The target was to use an Arduino Uno board without special shields and supporting IC.
the fundamental components are a button, a potentiometer, few resistors and DSUB15 connector.

vga_pong_on_arduino_uno__youtube

Tale a look at the video to see it in action:

pongschematic

Follow the step-by-step guide on Instructables to build one yourself.

Apr
18

Let’s go german with Arduino video Tutorials – auch auf Deutsch

arduino, controllers, Esplora, game controllers, german, languages, supertux, tutorial, video, video game Comments Off on Let’s go german with Arduino video Tutorials – auch auf Deutsch 

Arduino Esplora Video Tutorial

(Den Text auf Deutsch findet Ihr weiter unten)

Today we are announcing the first of a series of video tutorials in german created in collaboration with our friend Max, founder of MaxTechTV and published on Arduino channel on Youtube.

The tutorial of this month explains how to turn your Arduino Esplora into a customized computer gamepad to play any of your videogames. And it’s just the beginning to start the real fun of personalizing the controller: what about configuring it to start a special weapon with a shout using the microphone, included in the board? The options are endless! (here’s the tutorial in english)

For this example we configured the code to be suitable for SuperTuxKart, an open-source racing game we love to play during our breaks!

Enjoy the video below and share with us your new projects made with Esplora, or other Arduino boards, joining our official Flickr Group.

————————————————-

Wir freuen uns heute das erste Video einer Reihe von Videotutorials auf deutsch veröffentlichen zu können. Die Tutorials werden in Zusammenarbeit mit unserem Freund Max, Gründer von MaxTechTV produziert und auf dem Arduino YouTube-Kanal veröffentlicht .

Das Tutorial des Monats April erklärt wie man den Arduino Esplora  in ein individuelles Gamepad für den Computer verwandeln kann, um jedes beliebige Videospiel damit zu steuern. Und das ist nur eine von vielen tollen Möglichkeiten den Controller zu personalisieren und anzupassen: Wie wäre es das eingebaute Mikrofon zu nutzen, um über einen Sprachbefehl eine ‘Special Weapon’ abzufeuern ? Die Möglichkeiten sind endlos! (Hier das Tutorial auf Englisch)

Für dieses Beispiel haben wir den Code angepasst, um damit das open-source Spiel SuperTuxKart zu steuern, ein Rennspiel, das wir auch gern mal in unseren Pausen spielen.
Viel Spaß mit dem Video! Ihr könnt Eure Projekte mit dem Esplora oder einem anderen Arduino Board in unserer offiziellen Flickr Gruppe teilen.


————————————————- Ankündigung

Du sprichst deutsch und möchtest uns dabei unterstützen einen Teil der Arduino Dokumentation in deine Sprache zu übersetzen? Wir haben schon angefangen und hier kann man unseren Fortschritt beobachten: http://arduino.cc/de/Main/Products.

Wenn Du uns helfen willst, schreibe Max (max @ maxtechtv.de) und er wird Dir erklären wie Du in das Gemeinschafts-Übersetzungsprojekt eingebunden werden kannst. Danke!


Feb
05

Space invaders played on a 16×2 character display

arduino hacks, character lcd, Piezo, space invaders, video game, wii nunchuk Comments Off on Space invaders played on a 16×2 character display 

character-lcd-space-invaders

This Space Invaders game does more with less. [Rjk79] managed to make a video game using a two-line character display. The game consists of a wave of invaders on the top line, with the defender cannon on the bottom. The invader isn’t just stationary, but randomly moves to the left and the right. The image above captured a little bit of motion blur from the defender moving into position before firing on the enemy.

An Arduino board controls the 16×2 HD44780 character display. The game also includes sounds generated by the piezo buzzer seen on the breadboard. All the way to the right you can see the Wii Nunchuk breakout board which provides directional control and the firing trigger. If you want to recreate this one for yourself [Rjk79] is sharing the source code on Pastebin. There’s also a demo video found after the jump.

If you don’t have a character LCD on hand you might try this other Space Invaders clone that uses an 8×8 led matrix.

Space invaders on 16x2 Character LCD


Filed under: arduino hacks
Jan
14

Arduino Esplora Video Game

arduino, Arduino Esplora, video game, Video Games Comments Off on Arduino Esplora Video Game 

Screen shot 2013-01-14 at 8.08.15 AMIt’s the project the Arduino Esplora seemingly was designed to create: a handheld video game. Mike Barela added a 1.8″ display from Adafruit, and adapted the code created by another maker named R0D0T. I was looking for a game that was more than the basics to show off the Esplora [...]

Read the full article on MAKE

Jan
10

Prototyping a low-resolution handheld gaming rig

8x8, arduino hacks, handhelds hacks, shift register, TPIC6B595, video game Comments Off on Prototyping a low-resolution handheld gaming rig 

low-res-arduino-gaming

[Jason] has been hard at work on this Arduino-based low-res gaming platform. He even had a fab house deliver circuit boards to pull everything together. It’s a little small in his hands, and the graphics are limited to the 8×8 pixels provided by the display. But it still looks like a lot of fun and the code was written to make adding new games quite painless.

The board hosts an ATmega328 which drives the bi-color LED display using a pair of TPIC6B595 shift registers. Control is provided by a collection of buttons to either side of the display. The unit is powered by three AAA batteries held in a pack soldered to the back side of the PCB.

The image above shows [Jason] giving a Space Invaders game a try. The clip after the break shows respectable action, sound from a piezo buzzer, and it even scrolls your score at the end of the game. But you’re not limited to just one title. Adding new games is as easy as implementing a class in a new header file. You can get a feel for how this is set up by viewing the source code repo.

This reminds us of the Pixel Bros low-res system.


Filed under: arduino hacks, handhelds hacks


  • Newsletter

    Sign up for the PlanetArduino Newsletter, which delivers the most popular articles via e-mail to your inbox every week. Just fill in the information below and submit.

  • Like Us on Facebook