Posts | Comments

Planet Arduino

Archive for the ‘servo’ Category

Oh, dominoes — the fun of knocking them down is inversely proportional to the pain of setting them all up again. [DIY Machines] is saving loads of time by automating the boring part with a remote control domino-laying machine. If only it could pick them back up.
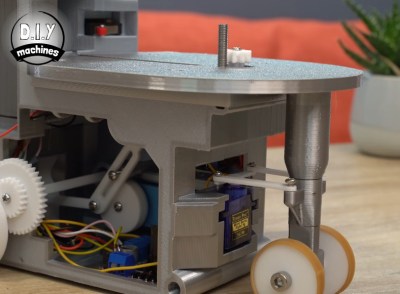
This machine can be driven directly over Bluetooth like an R/C car, or programmed to follow a predetermined path via Arduino code. Here’s how it works: an Arduino Uno drives two servos and one motor. The 1:90 geared motor drives the robot around using a 180° servo to steer. A continuous servo turns the carousel, which holds nearly 140 dominoes. We love that the carousel is designed to be hot-swappable, so you can keep a spare ready to go.

[DIY Machines] really thought of everything. Every dozen or so dominoes, the machine leaves a gap in case one of the dominoes is tipped prematurely. There are also a couple of accessories for it, like a speedy domino loading stick and a fun little staircase bridge to add to your domino creations. Though all the machine files are freely available, [DIY Machines] requests a small donation for the accessories files. Check out the complete build video after the break, followed by a bonus video that focuses on upgrading the machine with an HM10 Bluetooth module for controlling it directly with a phone.

This certainly isn’t the first domino-laying device we’ve seen, though it might be the most accessorized. [Matthias Wandel]’s version uses only one motor to move and deal the dominoes.

What is it about useless machines that makes them so attractive to build? After all, they’re meant to be low-key enraging. At this point, the name of the game is more about giving that faceless enemy inside the machine a personality more than anything else. How about making it more of a bully with laughter and teasing? That’s the idea behind [alexpikkert]’s useless machine with attitude — every time you flip a switch, the creature of uselessness inside gets a little more annoyed.

In this case the creature is Arduino-based and features two sound boards that hold the giggles and other sounds. There are three servos total: one for each of the two switch-flipping fingers, and a third that flaps the box lid at you. This build is wide open, and [alexpikkert] even explains how to repurpose a key holder box for the enclosure. Check out the demo after the break.

We love a good useless machine around here, especially when they take a new tack. This one looks like any other useless machine, but what’s happening inside may surprise you.

A few years ago, YouTubing madman [Colin Furze] took an old bumper car and made a 600-horsepower beast of a go-kart that managed to clock 100MPH with a headwind. This isn’t that. It’s a miniaturized, remote-control homage to [Colin]’s go-kart that is equally awesome.

[Forsyth Creations] started by CAD-modeling the chassis right on top of a still from the video. The entire body is 3D-printed in four large pieces, which took several days because each piece took around 24 hours. Inside the car there’s an Arduino brain driving a motor in the back and a servo in the front. This bad boy runs on a couple of rechargeable battery packs and can be controlled with either a Wii balance board or a PS2 controller. This thing really moves, although it doesn’t quite reach 100MPH. Watch it zoom around in the video after the break.

Got a Segway lying around that just doesn’t do it for you anymore? You could always turn it into a go-kart. Never had a Segway to begin with? Just roll your own.

A while back, [Kutluhan Aktar] was trying to hack their chickens, quails, and ducks for higher egg production and faster hatching times by using a bit of classical conditioning. That is, feeding them at the same time every day while simultaneously exposing them to sound and light. Once [Kutluhan] slipped enough times, they hatched a plan to build an automatic feeder.

This fun rooster-shaped bird feeder runs on an Arduino Nano and gets its time, date, and temperature info from a DS3231 RTC. All [Kutluhan] has to do is set the daily feeding time. When it comes, a pair of servos and a pan-tilt kit work together to invert a Pringles can filled with food pellets. A piezo buzzer and a green LED provide the sound and light to help with conditioning. Scratch your way past the break to see it in action.

If [Kutluhan] gets tired of watching the birds eat at the same time every day, perhaps a trash-for-treats training program could be next on the list.

Via r/duino

We would be preaching to the choir if we told you that fear is the action killer when it comes to the challenge of new projects in uncharted territory. Everyone who reads Hackaday knows that it takes mettle to forge through the self-doubt as we push ourselves to new engineering heights.

[JBV Creative] hears the voice, too: the one that says you can’t build that thing, it’s too difficult/useless. He knows that both creativity and anti-creativity stem from the same source — the powerful human mind that dreams up these projects in the first place.

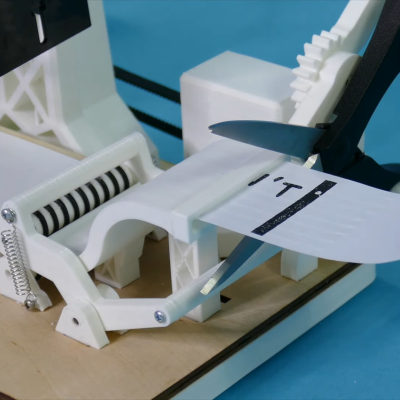
The Encouragement Machine combines the two in a piece that engineers art from garbage, aka negative thoughts. It works by first acknowledging the most basal of discouraging thoughts — an important step of the process — and then it simply trims away the negativity.

This machine uses a stepper motor to feed receipt paper underneath a custom stamp that says YOU CAN’T DO IT. Then it passes the paper through a pair of servo-driven scissors that snip off the apostrophe-t.

Ironically or not, [JBV Creative] ran into a few issues with this build, but managed to muster up enough moxie to work through the problems without encouraging slips of paper. We have to wonder how much more smoothly the next project will go given all the positivity he now has on-demand.

[JBV] doesn’t delve into the electronics much, but it looks like an Arduino and a motor driver to us. We totally dig the design — it looks like an electrical substation or rocket launch pad that happens to have a Ferris wheel. Step right up and check out the build video after the break.

Generic encouragement is great all-purpose attitude adjuster, but what if you want more specific sentiments? Here’s an affirmation mirror that will help you believe whatever you program into the scrolling display.

We’ve all been there. A big bag of resistors all mixed up. Maybe you bought them cheap. Maybe your neatly organized drawers spilled. Of course, you can excruciatingly read the color codes one by one. Or use a meter. But either way, it is a tedious job. [Ishann’s] solution was to build an automatic sorter that directly measures the value using a voltage divider, rather than rely on machine vision as is often the case in these projects. That means it could be modified to do matching for precise circuits (e.g., sort out resistors all marked 1K that are more than a half-percent away from one nominal value).

There is a funnel that admits one resistor at a time into a test area where it is measured. A plate at the bottom rotates depending on the measured value. In the current implementation, the resistor either falls to the left or the right. It wouldn’t be hard to make a rotating tray with compartments for different values of resistance. It looks like you have to feed the machine one resistor at a time, and automating that sounds like a trick considering how jumbled loose axial components can be. Still, its a fun project that you probably have all the parts to make.

An Arduino powers the thing. An LCD screen and display control the action. If you want some practice handling material robotically, this is a great use of servos and gravity and it does serve a practical purpose.

We have seen many variations on this, including ones that read the color code. If you ever wanted to know where the color code for resistors came from, we took a trip to the past to find out earlier this year.

We all have our new and interesting challenges in lockdown life. If you’ve had to relocate to ride it out, the chances are good that even your challenges have challenges. Lockdown left [Kanoah]’s sister in the lurch when it came to feeding her recently-adopted pet rat, so he came up with a temporary solution to ensure that the rat never misses a meal.

Most of the automated pet feeders we see around here use an auger to move the food. That’s all fine and good, but if you just need to move a singular mass, the screw seems like overkill. [Kanoah]’s feeder is more akin to a pellet-pushing piston. It runs on a Metro Mini, but an Arduino Nano or anything with enough I/O pins would work just fine. The microcontroller starts counting the hours as soon as it has power, and delivers pellets four times a day with a servo-driven piston arm. [Kanoah] has all the files up on Thingiverse if you need a similar solution.

There many ways of solving the problem of dry pet food delivery. Wet food is a completely different animal, but as it turns out, not impossible to automate.

[Harrison] has been busy finding the sweeter side of quarantine by building a voice-controlled, face-tracking M&M launcher. Not only does this carefully-designed candy launcher have control over the angle, direction, and velocity of its ammunition, it also locates and locks on to targets by itself.

Here comes the science: [Harrison] tricked Alexa into thinking the Raspberry Pi inside the machine is a smart TV named [Chocolate]. He just tells an Echo to increase the volume by however many candy-colored projectiles he wants launched at his face. Simply knowing the secret language isn’t enough, though. Thanks to a little face-based security, you pretty much have to be [Harrison] or his doppelgänger to get any candy.

The Pi takes a picture, looks for faces, and rotates the turret base in that direction using three servos driven by Arduino Nanos. Then the Pi does facial landmark detection to find the target’s mouth hole before calculating the perfect parabola and firing. As [Harrison] notes in the excellent build video below, this machine uses a flywheel driven by a DC motor instead of being spring-loaded. M&Ms travel a short distance from the chute and hit a flexible, spinning disc that flings them like a pitching machine.

We would understand if you didn’t want your face involved in a build with Alexa. It’s okay — you can still have a voice-controlled candy cannon.

After this pandemic thing is all said and done, historians will look back on this period from many different perspectives. The one we’re most interested in of course will concern the creativity that flourished in the petri dish of anxiety, stress, and boredom that have come as unwanted side dishes to stay-at-home orders.

[Hunter Irving] and his brother were really missing their friends, so they held a very exclusive hackathon and built a terrifying telepresence robot that looks like a mash-up of Wilson from Castaway and that swirly-cheeked tricycle-riding thing from the Saw movies. Oh, and to make things even worse, it’s made of glow-in-the-dark PLA.

Now when they video chat with friends, TELEBOT is there to make it feel as though that person is in the room with them. The Arduino Uno behind its servo-manipulated vintage doll eyes uses the friend’s voice input to control the wind-up teeth based on their volume levels. As you might imagine, their friends had some uncanny valley issues with TELEBOT, so they printed a set of tiny hats that actually do kind of make it all better. Check out the build/demo video after the break if you think you can handle it.

Not creepy enough for you? Try building your own eyes from the ground up.


[a-RN-au-D] was looking for something fun to do with his son and dreamed up a laser blaster game that ought to put him in the running for father of the year. It was originally just going to be made of cardboard, but you know how these things go. We’re happy the design went this far, because that blaster looks fantastic.

Both the blaster and the target run on Arduino Nanos. There’s a 5mW laser module in the blaster, and a speaker for playing the pew pew-related sounds of your choice. Fire away on the blaster button, and the laser hits a light-dependent resistor mounted in the middle of the target. When the target registers a hit, it swings backward on a 9g servo and then returns quickly to vertical for the next shot.

There are some less obvious features that really make this game a hit. The blaster can run in 10-shooter mode (or 6, or whatever you change it to in the code) with a built-in reload delay, or it can be set to fully automatic. If you’re short on space or just get sick of moving the target to different flat surfaces, it can be mounted on the wall instead — the target moves forward when hit and then resets back to flat. Check out the demo video we loaded up after the break.

No printer? No problem — here’s a Node-RED shooting gallery that uses simple wooden targets.


  • Newsletter

    Sign up for the PlanetArduino Newsletter, which delivers the most popular articles via e-mail to your inbox every week. Just fill in the information below and submit.

  • Like Us on Facebook