
01
There is a lot of seven-segment display in the market and it’s widely used into the electronics as well as in electrical product. we saw this module many time nearby appliances like radio, weighing machine , counters and many other places. So, for now we are making a tutorial on how to use TM1637 with Arduino. here in this article I will share all the things code , circuit and step by step instruction for the same.
4-digit seven-segment display can show the 4 digits simultaneously by writing a small code. not need to write the raw code there are many libraries available that help to program this component easily. there is 4 pin to control this module. this is also known as the TM1637 module. This time we are making 10 number clock . where it will show 10 then 9 or so on. So to make and learn this project collect the given below components.
TM1637 module can be easily use there is a library available with predefined function. Only you have to call that function and it will start work. TM1637 with Arduino is a good option for your numeric seven segment display.
Components Required:-
- Arduino Uno
- Breadboard
- 4 digit seven segment display tm1637
- jumper wires
4 Digit seven segment Display | TM1637
This is a tutorial to learn how to use 4 digit Seven Segment Display with Arduino. with the help of this article you can use this module with your other projects such as school bell, smart automatic parking project and more.
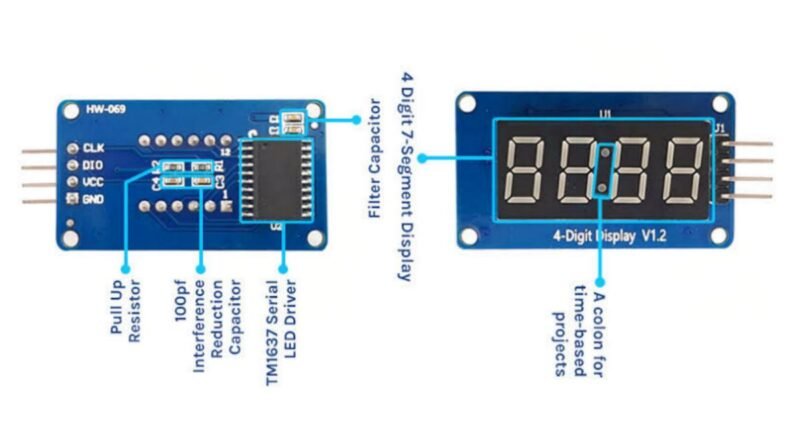
This TM1637 is a popular display driver chip designed for driving 7-segment displays, widely used in electronic projects and applications. This TM1637 integrated circuit simplifies the control of 4-digit 7-segment LED displays, making it an excellent choice for projects where numerical or alphanumeric information needs to be displayed.
The TM1637 chip is known for its simplicity and ease of use, making it accessible for both beginners and experienced electronics enthusiasts. It communicates with microcontrollers using a straightforward 2-wire serial interface, typically consisting of a data line (DIO) and a clock line (CLK). This simplicity makes it compatible with a variety of microcontrollers, including popular ones like Arduino.
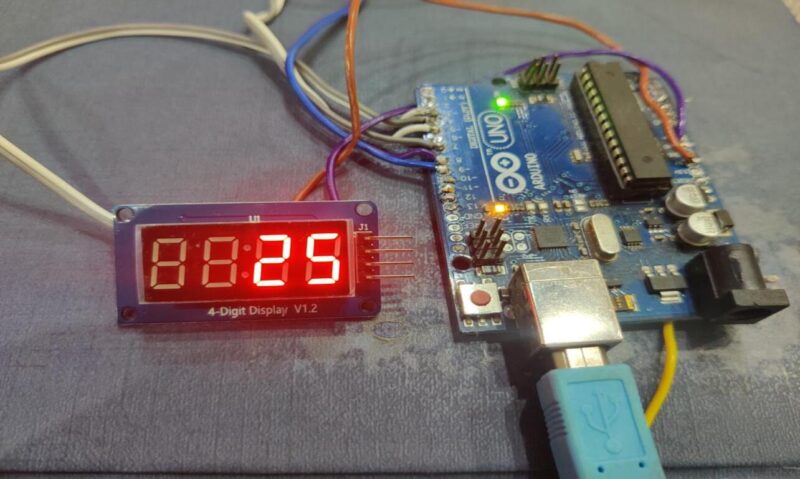
After collecting all the elements Let’s start with the Circuit diagram.
TM1637 with Arduino Circuit Diagram

There are only 4 pins to connect together
Connect TM1637 clk pin to Arduino pin 3
Connect TM1637 D0 pin to Arduino pin 4
Connect 5v pin of TM1637 to the Arduino 5V pin and Gnd to Gnd.
TM1637 with Arduino Code
#include <TM1637Display.h>

#include <Adafruit_Sensor.h>

// Define the connections pins

#define CLK 3

#define DIO 4

// Create display object of type TM1637Display

TM1637Display display = TM1637Display(CLK, DIO);

void setup() {

  // Set the display brightness (0-7)

  display.setBrightness(5);

  // Clear the display

  display.clear();

  pinMode(5, INPUT_PULLUP);

  pinMode(7, INPUT_PULLUP);

  pinMode(8, OUTPUT);

  pinMode(2, OUTPUT);

  pinMode(9, OUTPUT);

  pinMode(11, OUTPUT);

  pinMode(10, INPUT_PULLUP);

   pinMode(A2, OUTPUT);

    pinMode(A3, OUTPUT);

  pinMode(12, INPUT_PULLUP);

  pinMode(A1, INPUT_PULLUP);

  digitalWrite(2, LOW);

  Serial.begin(9600);

 // digitalWrite(A3, LOW);

}

void loop() {

int z= digitalRead(5);

int x= digitalRead(7);

int c= digitalRead(12);

int b= digitalRead(A1);

Serial.print(z);

Serial.print("    ");

Serial.print(x);

Serial.print("    ");

Serial.print(c);

Serial.print("    ");

Serial.println(b);

delay(200);

if(b==0 && c==0 && z==0 && x==0)

{

//digitalWrite(A3, LOW);

for (int i = 60; i >= 0; i--) {

display.showNumberDec(i);

 digitalWrite(A3, LOW);

  delay(1000);

//   Serial.print(a);

  int a = digitalRead(10);

  Serial.print("a ki value");

}

while(1)

{

digitalWrite(A3, HIGH);

delay(1000);

}

}

else

{

  display.showNumberDec(0000);

 // digitalWrite(2, HIGH);

  }

if(z==1 && x==0 )

{

for (int i = 30; i >= 0; i--) {

 display.showNumberDec(i);

digitalWrite(8, HIGH);

delay(1000);

int z=digitalRead(5);

int x=digitalRead(7);

if(z==0)

{break;}

}

 //digitalWrite(8, LOW);

digitalWrite(2, HIGH);

delay(1000);

}

else

{

  display.showNumberDec(0000);

  //digitalWrite(2, HIGH);

  }

if(z==0 && x==1 )

{

for (int i = 10; i >= 0; i--) {

 display.showNumberDec(i);

digitalWrite(9, HIGH);

delay(1000);

int x=digitalRead(7);

if(x==0)

{break;}

}

digitalWrite(9, LOW);

delay(500);

}

else

{

  display.showNumberDec(0000);

  // digitalWrite(2, HIGH);

  }

if(x==0 && z==0 && c==1)

{

for (int i = 180; i >= 0; i--) {

 display.showNumberDec(i);

 int a = digitalRead(10);

  if(a==0)

  {break;}

  digitalWrite(11, LOW);

  delay(1000);

}

digitalWrite(11, HIGH);

delay(1000);

}

else

{

  display.showNumberDec(0000);

 // digitalWrite(2, HIGH);

  }

if(c==0 && z==0 && x==0)

{

for (int i = 120; i >= 0; i--) {

  int a = digitalRead(10);

  if(a==0)

  {break;}

 display.showNumberDec(i);

  digitalWrite(A2, LOW);

  digitalWrite(A3, LOW);

  delay(1000);

}

while(1)

{

digitalWrite(A2, HIGH);

digitalWrite(A3, HIGH);

delay(100);

}

}

}
Here we have given the code but to upload the code you need to install a library first of all and there is the link to download the TM1637 Arduino library. After installing the library. upload the given code to the arduino.
Still if you have any doubt or problem you can ask in the comment section. with this TM1637 with Arduino tutorial you can learn how to make your own clock or stopwatch and timer. we have made a timer clock too. for the timer clock we will upload the article soon.
Advantage of TM1637 Display
- There is no complex connections or wiring you have to connect only 4 wire to on the display.
- There is no need of complex programming there is a library with a lot of pre defined functions.
- it can work with 5 voltage so the integration of TM1637 with Arduino is easy no external power required
- You can display more features. it have 4 digits and 1 ration sign
- It can easily make a small digital clock with inbuild ratio led
- TM1637 support I2C communication which is faster and reliable communication.
The post How to operate TM1637 with Arduino | 4 digit seven segment display appeared first on Techatronic.

