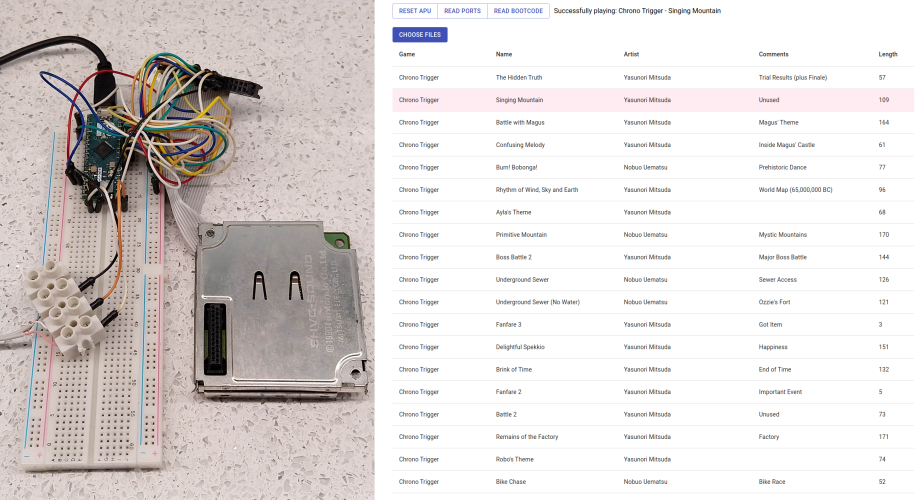
Listening to those classic 16-bit sounds from the ’90s video game era brings back a wave of nostalgia for those who grew up with a console. On the Super Nintendo Entertainment System, outputting sound was accomplished by an integrated circuit called the SNES Audio Processing Unit (APU for short), which was responsible for taking SNES SPC files and transforming them into waveforms. Mauri Mustonen — who goes by Kazooie on YouTube — wanted to isolate this chip to play authentic music from his favorite tracks on his browser without needing to boot up the entire SNES console.
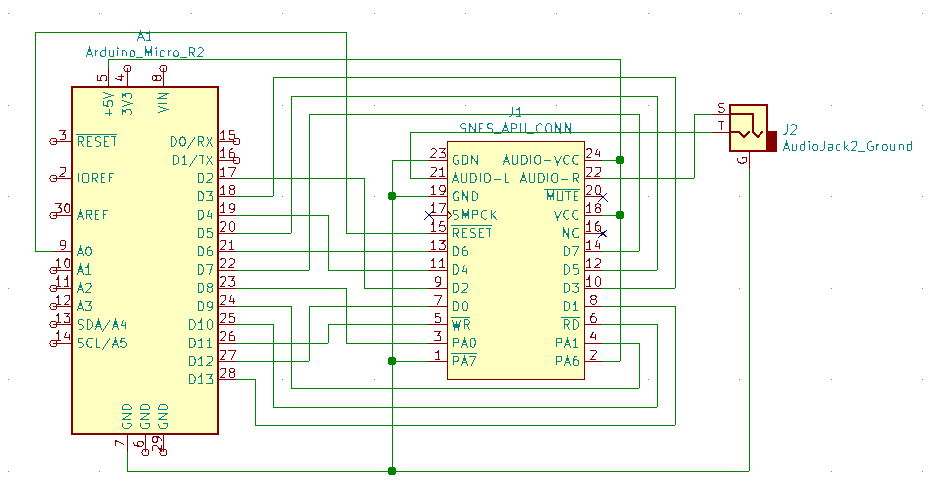
The system he came up with has an Arduino Micro at its heart that is connected to the SNES APU via series of wires. Some of these links are for putting the APU into read or write mode, while others set the desired port and address for where the song data should be written. Data is sent or received over a set of eight parallel data lines.
There is a web-based frontend written in Python that allows a user to select their songs of choice, which are transferred to the Arduino over USB and then sent to the APU via its parallel lines. From there, the IC runs a bootloader that begins playing the audio files.
You can read more about how this system works and check out the code here on GitHub, or you can see Mustonen’s demo video below.
It wasn’t too long ago that one could conjecture that most hackers are not avid video game players. We spend most of our free time taking things apart, tinkering with microcontrollers and reading the latest [Jenny List] article on Hackaday.com. When we do think of video games, our neurons generally fire in the direction of emulating a console on a single board computer, such as a Raspberry Pi or a Beaglebone. Or even emulating the actual console processor on an FPGA. Rarely do we venture off into 3D programs meant to make modern video games. If we can’t export an .STL with it, we’re not interested. It’s just not our bag.
Oculus Rift changed this. The VR headset was originally invented for 3D video games, but quickly became a darling to hackers the world over. Virtual Reality technology is far bigger than just video games, and brings opportunity to many fields such as real estate, construction, product visualization, education, social interaction… the list goes on and on.
The Oculus team got together with the folks over at Unity in the early days to make it easy for video game makers to make content for the Rift. Unity is a game engine designed with a shallow learning curve and is available for free for non-commercial use. The Oculus Rift can be integrated into a Unity environment with the check of a setting and importing a small package, available on the Oculus site. This makes it easy for anyone interested in VR technology to get a Rift and start pumping out content.
Hackers have taken things a step further and have written scripts that allow Unity to communicate with an Arduino. VR is fun. But VR plus physical reality is just down right exciting! In this article, we’re going to walk you through setting up your Oculus Rift and Unity game engine to communicate with the outside world via an Arduino.
Off the Shelf Options
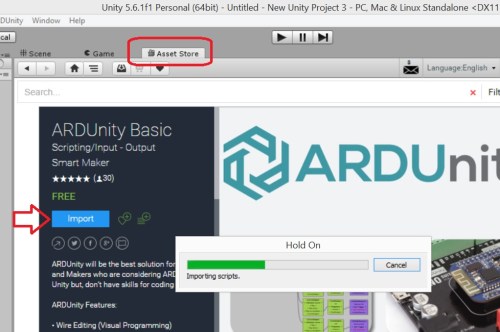
If you head over to the Unity Asset page and run a search for Arduino, you get a few options. Sadly, searches for Raspberry Pi do not yield any fruit. There are a few generic serial communication options such as Simple Serial and SD Serial, but these options are not free and do not, at face value, appear to be well supported. Unidino looks promising, but it’s thirty bucks and there’s not much activity on the forum. The obvious choice to play around with on a rainy day is ARDunity. There’s a free version that still has plenty of capability to experiment with, and it’s well supported and documented. It’s written in more of a WYSIWYG style that can be off-putting to coders, but it will have to suffice until someone bangs out more advanced version.
Getting Started
We’re assuming that you already have Arduino and Oculus setup on your PC. If you don’t have an Oculus Rift, we recommend to go to the Oculus site and install the software anyway. It will allow you to test the Unity/Arduino communication through the Oculus run-time even if you don’t have the hardware. This way when you do get a headset, you won’t have to do anything. Just execute the .exe and you’ll see your work in VR. Note that they used to prevent the software from installing on computers that did not meet the minimum requirements. Oculus has since toned down this nuisance, and now allows the software to be installed on most computers, including laptops!
Setting up Unity is straight forward – simply go to the site and download the installer. The latest version at the time of this article is 5.6.1. You’ll want to grab the personal version – it’s about five Gigabytes, so give it some time to download. Once installed, head over to the Oculus site and grab the Unity tools import package.
Open Unity and open a new project. Then head back to the Unity Asset store and install the ARDunity Basic Import package. This will open Unity, and you should see a tab called Asset Store. Click on the tab and then import the package. Then go to Edit–>Project Settings–>Player and set the API compatibility level to .NET 2.0. This will clear the error you see in the bottom of the screen. Then under Other Settings, be sure to select the Virtual Reality Supported option.
Now import the Oculus package by going to Asset–>Import Package–>Custom Package and point towards the Oculus package you downloaded earlier. Restart the Unity program if needed.
Putting It All Together
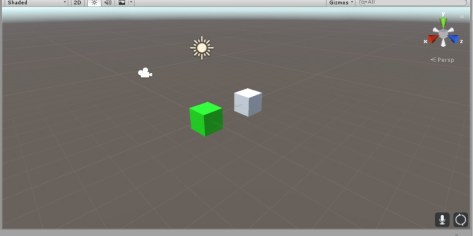
At this point, everything should be set to get Unity talking to your Arduino through the Oculus Rift. Put an LED on D2 and note your comm port. From the Project tab (lower left), expand the folders ARDunity–>Examples–>LED–>Digital. Double click the last example – ReactingTrigger(DigitalLED).unity.
That will load the example. You should now see two cubes in the view window, and a new folder called ARDunity under the hierarchy tab on the top left. Click on ARDunity and you’ll see the inspector tab (far right) change to include a button that says “Export Sketch”. Hit the button and it will export the Arduino sketch to a place of
View of scene after opening LED example
your choosing. The .ccp and .h files will be generated automatically, along with some other dependencies. I shouldn’t have to tell you to have a look around, but don’t forget to compile and upload it after you’ve had your fill.
Just below the Export Sketch button will be the Comm Serial (Script) window. Search for and select the comm port for you Arduino. After you find your comm port, hit the little play button on top of the main scene window. Once you do this, you’ll see a “Connect” button appear where the Export Sketch was. Go ahead and connect. Now click on the Scene tab above the main viewing window. This will allow you to manipulate the cubes. Go ahead and grab the white cube and run it into the green one. If you did everything right, you’ll see your LED light when the two cubes collide.
The gears in your noggin should be turning right about now… if you can toggle IO from within a game engine; there is some seriously cool stuff you can do! But we’ve only scratched the surface. Let’s get this working in Virtual Reality!
Enter the Rift
In order to enter the virtual world, you need a couple of things. One is a character controller and the other is something to walk on. Hit the play button again if you haven’t already. This will disconnect everything and allow you to edit the world. Go to Game Object–>3D Object–>Plane and adjust the plane so the two cubes are hovering above it. Then un-collapse the ARDuino and expand the OVR folder to OVR–>Prefabs. Select the OVRPlayerController.prefab and drag it into the main hierarchy in the upper left. You’ll see the player controller appear in the main scene window. Drag it away from the cubes, and then under the inspector tab on the right hand side, de-select the Use Profile Data option in the OVR Player Controller (Script) section.
Now, select ARDuino under the hierarchy tab, press play and then connect. If you have an Oculus Rift connected, you should be able to put it on and run into the green cube and light the LED on the Arduino. If you don’t have one, just use the arrow keys to do the same.
Conclusion
So where can you go with this? The biggest thing that jumps out to us is haptic feedback. Imagine instead of a cube, you have a wall or table or something of that nature. Have the Arduino trigger some type of feedback when you touch or bump into the object.
Dig into the code and let us know of any bugs or improvements. Be sure to follow some other examples as well, and check out the video below for a demonstration. If you’ve done anything cool with Unity, show us in the comments.
Making retro video games on today’s micro controllers brings many challenges, especially when using only the micro controller itself to handle the entire experience. Complex graphics, sound, game logic and input is taxing enough on the small chips, toss in NTSC color graphics and you have a whole different bear on your hands.
[rossum] set out making the Arduinocade retro game system using an overclocked Arduino Uno, and not much more. Supporting 4 voice sound and IR game controllers, the system also boasts 27 simultaneous colors all in software. These colors and the resolution feel like they’re impossible without a graphics chip to offload some of the work. While doing all of this the ATmega328p is also playing some faithful reproductions of classic arcade games.
The uses a couple of interesting tricks. Color is generated with NTSC color artifacts, where the screen is really black and white, but thanks to a delay or two in the signal generation the bits are out of phase from the reference “color burst” signal and appear on-screen as unique colors. This approach was used in the 8 bit Apple II personal computers to generate its colors, and also on the early IBM PC’s with CGA cards to drastically increase color depth. In this case, the chip is overclocked with a 28.6363 MHz crystal (a multiple of NTSC timing) and the SPI hardware leveraged to shift out all the necessary pixels. Check out how great it looks and sounds after the break.
It’s good to see an old trick on a new project and we are off to play some games!
You’ve amassed a small fortune in diamonds, wood, coal, iron, food, and the other resources you need. You’ve spent hours building the perfect Minecraft fortress to stockpile your goods. But who will watch your stash while you’re on another server? In this project guide, you’ll learn to use Arduino coding […]
[Bob’s] Pac-Man clock is sure to appeal to the retro geek inside of us all. With a tiny display for the time, it’s clear that this project is more about the art piece than it is about keeping the time. Pac-Man periodically opens and closes his mouth at random intervals. The EL wire adds a nice glowing touch as well.
The project runs off of a Teensy 2.0. It’s a small and inexpensive microcontroller that’s compatible with Arduino. The Teensy uses an external real-time clock module to keep accurate time. It also connects to a seven segment display board via Serial. This kept the wiring simple and made the display easy to mount. The last major component is the servo. It’s just a standard servo, mounted to a customized 3D printed mounting bracket. When the servo rotates in one direction the mouth opens, and visa versa. The frame is also outlined with blue EL wire, giving that classic Pac-Man look a little something extra.
The physical clock itself is made almost entirely from wood. [Bob] is clearly a skilled wood worker as evidenced in the build video below. The Pac-Man and ghosts are all cut on a scroll saw, although [Bob] mentions that he would have 3D printed them if his printer was large enough. Many of the components are hot glued together. The electronics are also hot glued in place. This is often a convenient mounting solution because it’s relatively strong but only semi-permanent.
[Bob] mentions that he can’t have the EL wire and the servo running at the same time. If he tries this, the Teensy ends up “running haywire” after a few minutes. He’s looking for suggestions, so if you have one be sure to leave a comment.
Planet Arduino is, or at the moment is wishing to become, an aggregation of public weblogs from around the world written by people who develop, play, think on Arduino platform and his son. The opinions expressed in those weblogs and hence this aggregation are those of the original authors. Entries on this page are owned by their authors. We do not edit, endorse or vouch for the contents of individual posts. For more information about Arduino please visit www.arduino.cc
You are currently browsing the archives for the Video Games category.


 time of this article is 5.6.1. You’ll want to grab the personal version – it’s about five Gigabytes, so give it some time to download. Once installed, head over to the Oculus site and grab the