Posts | Comments

Planet Arduino

Archive for the ‘Makers’ Category

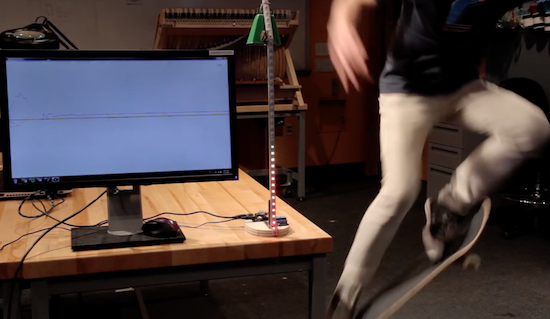
In skateboarding, the ollie is a fundamental trick used to leap onto, over or off obstacles, or over gaps of unfriendly terrain such as grass or stairs. But how do you know just how sick your ollie actually was? Josh Sheldon has a solution.

The Maker has built a device that judges the sickness of your ollie and visualizes your score, rewarding the best ones with the chiming of a cowbell. Sheldon describes the project as something “like one of those hammer games at carnivals, but instead of trying to hit that thing with a hammer as hard as you can, the goal is to land the sickest ollie.”

The aptly named Sick Ollie Machine consists of two parts: a stand with LEDs and the skateboard itself. Underneath the board is an Arduino Uno, a 9V battery, and an accelerometer. The stand is equipped with another Arduino, a relay, and an RGB LED strip that goes up mast, as well as a solenoid on top. When the relay closes, the solenoid hits the bell. Both units also contain a wireless transmitter, allowing them to communicate with one another.

Watch Sheldon discuss his project in more detail below!


“Since there isn’t a supermoon everyday, make one for your bedside table!” This is exactly what G4lile0 set out to do using a 3D printer, an Arduino and some open-source tools.

The result was a moon phase clock consisting of a 3D-printed model and an LED strip to create the lunar phases. The lights are driven by an Arduino that precisely calculates which phase to show, as well as controls a 0.96″ OLED display revealing the date and time. Other electronics include an RTC module, a DTH11 sensor, a buzzer, and three push buttons.

The clock also features several modes, including an alarm, a wake-up light, a lamp, a thermometer, and a hygrometer. It can even help set the mood or start your next lunar rave with its relaxation and party-like special effects.

You can read all about this project on Thingiverse and find its code over on GitHub.

After an accident, Ethan Kadish was paralyzed. His friend, 14-year-old Jacob Smilg, came up with a simple device to help him communicate.

Several years ago, Kadish was struck by lightning, and lost control over his body. Communication with the world took the form of eye blinks for “yes” and “no,” which gave Smilg an idea for a revolutionary, Arduino Uno-based gadget that could help him communicate with people not familiar with this method.

It uses two pads, which Kadish can press with his head. When pressed, the device displays “yes” or “no” on a small LED screen. This allows him to have conversations in a more natural way, which, as seen in the video below around 4:00 it appears to make him very happy!

You can read more about the project on Make:, and keep up with Kadish’s story and progress on the Team Ethan blog. More pictures and videos can be found on Smilg’s Facebook page.

In order to convince his kids to stay in bed just a little longer, Maker Ralph Crutzen has created a “wakeup light” using an Arduino Mega and an RGB LED strip.

Those of us that have toddlers know that they can wake up very early. If you’d like to get some more sleep without leaving them unsupervised to dangerously play with your electronics and power tools, then a “wakeup light” could be a good solution.

Crutzen’s system uses an Arduino Mega with a real-time clock to control a strip of LEDs, along with an LCD display to change settings. Besides a reminder to kids to “please stay in bed a few minutes longer,” perhaps a similar setup could be used as alternative alarm clock for adults as well.

You can find instructions for this build on Instructables, or check out the project’s code on GitHub. Finally, if you’d like to print an enclosure to protect humans and electronics, Crutzen used this design.

Imgur user “Bodaciousbus” set up his apartment window fans to only circulate air when not filled with smoke.

Living in a communal area like an apartment or condo has its benefits, but there are several hassles to deal with as well. One in particular are neighbors who smoke right outside. If you’d like to leave a window open for ventilation, perhaps in combination with a fan, this can be quite annoying.

Bodaciousbom solved this issue with a series of fans connected to a smoke detector sensor and an Arduino. If the air is OK, the fans are allowed to blow, pushing homemade flaps out of the way and ventilating the apartment. There is also a series of LEDs to show the current status of the outside air.

I’m still a rookie with Arduino, but an experienced tinkerer. This project took me a couple of hours to complete, but overall was not too bad. I can relax now, knowing that my window fan will only run when the air outside is free of cigarette smoke (among other things).

Are you faced with a similar problem? Be sure to check out the project in more detail here.

We’ve already seen an Altoids tin enhanced with a laser for your cat’s entertainment, so why not a yogurt tub?

If you’re looking for a way to keep your kitty busy, but would rather not actually have to get up and wave a laser around, this setup allows you to use the Blynk app to turn on and manipulate a laser right from your phone.

Keeping things simple, the enclosure for this project is a yogurt tub, and the laser manipulator is two Arduino-driven servos stuck together with tape. A computer provides power as well as Wi-Fi control, though with a Wi-Fi shield and battery it should be able to be used independently.

Now obviously the end result isn’t the most practical device you’ll ever build, but this was a great way for me to learn the fundamentals of programming Arduino and it can help you to learn too.

Looking for a new way to play with your feline friend? You can check out the project’s Instructables page, as well as the recent Altoids tin laser assembly here.

Using a rather large custom PCB, Hari Wiguna made a Sudoku board using discreet LED displays and a physical keypad.

Most people, buy a book and play Sudoku with a pencil or perhaps just get an app. Those that are really dedicated buy a standalone game, but this wasn’t good enough for Wiguna, who made his own electronic board not out of a normal LCD screen, but from 27 three-character LED modules to display the game on a glowing grid. Input is done via a keypad, which uses the grid layout to allow for two-button selection of any square.

Though extremely impressive, it doesn’t yet have a puzzle generator. Wiguna would welcome any contributions for this code-wise!

You can find out more about this project on his pageon GitHub, as well as in his detailed YouTube videos below.

Inspired by The Goonies movie and The Room game, Guido Bonelli has constructed a piece of Arduino-controlled interactive furniture to entertain his guests.

After what appears to be a massive amount of work involving 3D printing, laser cutting, wiring, and programming, Bonelli has come up with a puzzle box that shouldn’t need any explanation. Using button presses and other interactions with it, participants are able to unlock a treasure box in the bottom, a working wooden safe!

Additionally, the box tells time in a very unique way. It has an hourglass that is automatically flipped to indicate minutes, and Roman numerals at the top to reveal hours. You can see how it works and how it was assembled in the videos below!

I wanted to create a unique piece of furniture for my home which my guests could interact with. This time however, I wanted it to be something which I wouldn’t have to explain how it worked. Instead, I wanted mysterious scriptures scribed all over the sculpture to intrigue my guests.

At the heart of GoonieBox is of course an Arduino… Effortlessly whisking away my artistically written 0’s and 1’s into a symphony of movement, sound and game play. Taking approximately 800 hours of build time, GoonieBox is my greatest accomplishment by far in the world of Arduino.

You can find more information on the project’s Hackster.io posting, or check out the author’s interesting Dr.Duino product page.

With an accelerometer and capacitive sensing, even a beginner can produce some great tunes with this DIY device.

If you like making beautiful music, but would rather not actually practice this skill, perhaps this thumb piano and controller by producer/DJ Rob Blazey would be a good instrument to pick up. His project, called “Kalimbo,” employs an Arduino to translate manipulations of metal rods, along with movement of the piano itself, into Open Sound Control (OSC) messages. These are then be used to produce music.

You first hear its awesomeness around the 1:00 mark in the video seen below. Even just moving it around sounds good, but it becomes incredible when he really starts playing just before 2:00!

Inside the instrument there is an Arduino with an accelerometer and a capacitive sensing wire, which is connected to the insulated bridge at the back, so touching the edge of that bridge acts as a trigger or switch or can control things more precisely depending on how hard you press it.

Intrigued? You can find more background on this project in mrblazey’s video description.


  • Newsletter

    Sign up for the PlanetArduino Newsletter, which delivers the most popular articles via e-mail to your inbox every week. Just fill in the information below and submit.

  • Like Us on Facebook