Posts | Comments

Planet Arduino

Archive for the ‘peripherals hacks’ Category

Even for those of us who are fans of retrocomputing, it’s fair to say that not everyone plays their old-school games on real old-school hardware. The originals are now fragile and expensive, and emulators are good enough that if the gaming experience is all you’re after there’s little point in spending all that cash.

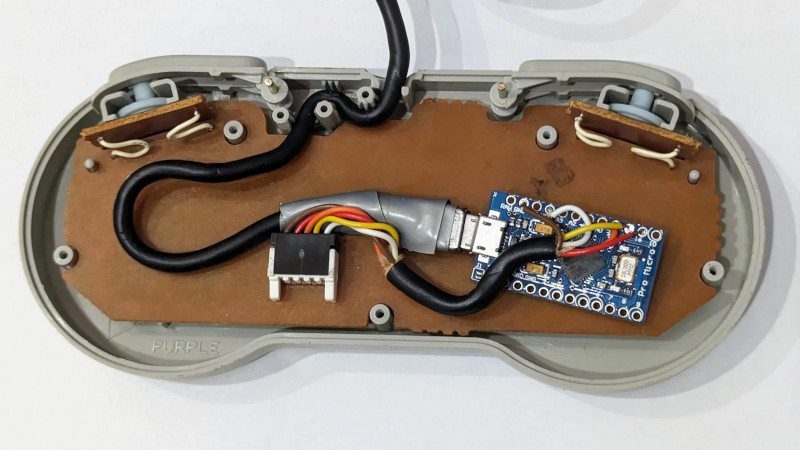
There’s one place in which the originals sometimes have the edge though, the classic controllers are the personal interface with the game. So when [Dome] found a SNES controller in an Akibahara shop, of course he picked it up. How to make it talk to a PC? Tuck an Arduino Pro Micro inside it, of course!

What we like about this project is that instead of ripping out the original electronics it instead hooks the Arduino board onto the original serial interface. We might have made a Nintendo socket to USB box to keep the original cable, but either way, the SNES (technically Super Famicom, because it’s a Japanese market unit) original stays true to its roots. The Arduino polls the clock line at the speed of the console, reads the result, and translates it to a USB interface for the computer. There’s a full run-down of the code and how it was made, should you wish to try.

Of course, if you don’t always have a PC handy, you could also put the whole computer in the controller.

The lovely thing about a hobby like keyboard building is that the melting pot of designs manages to never turn into a nasty porridge. Rather, it remains a tasty chili that keeps getting more flavorful with time. It’s a simple recipe, really; someone becomes dissatisfied enough with their peripherals to do something about it, often trying various designs until they either settle on one, or come up with yet another awesome variant that suits their needs — and possibly someone else’s down the line.

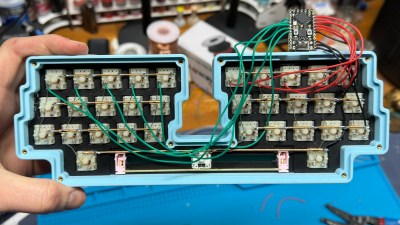
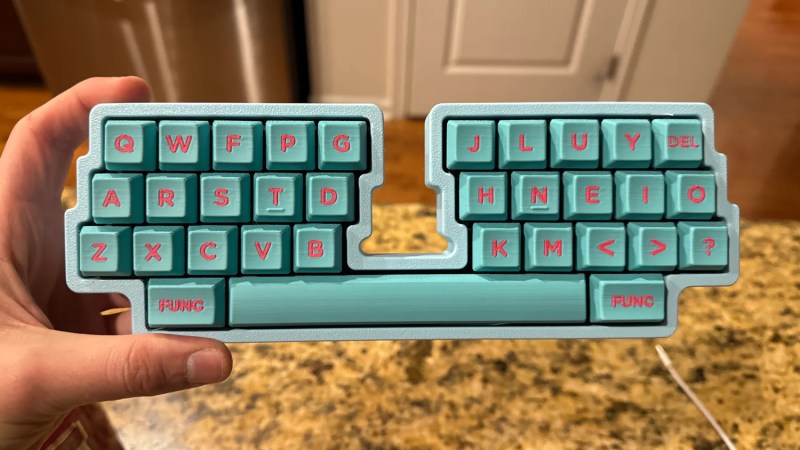
The inimitable [Joe Scotto] has happened upon the katana layout, which has an inverse left-hand row stagger that lends symmetry to the design, and Scotto-ized it into a 33-key build that he says is the best-sounding one yet with lubed Gateron Milky Yellows.

The case and the keycaps are both 3D-printed, and as with all Scotto builds, it is beautifully hand-wired. This one uses an RP2040 Pro Micro, but an ATMega Pro Micro will work, too.

Everything is available on GitHub, and [Joe] promises a typing test soon, as well as a gasket version that foregoes the integrated plate.

Do you need a fast keyboard? Like, ridiculously fast? Then you should use an FPGA.

Via KBD and Make:

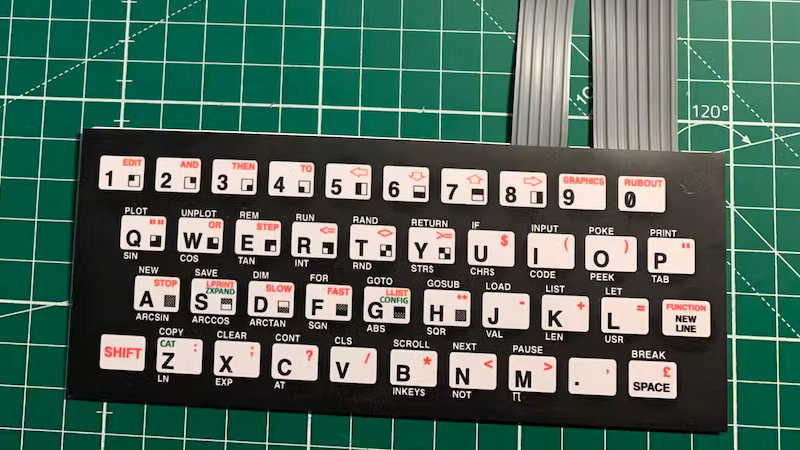
For British kids of a certain age, their first experience of a computer was very likely to have been in front of a Sinclair ZX81. The lesser-known predecessor to the wildly-successful ZX Spectrum, it came in at under £100 and sported a Z80 processor and a whopping 1k of memory. In the long tradition of Sinclair products it had a few compromises to achieve that price point, the most obvious of which was a 40-key membrane keyboard. Those who learned to code on its frustrating lack of tactile feedback may be surprised to see an Arduino project presenting it as the perfect way to easily hook up a keyboard to an Arduino.

Like many retrocomputing parts, the ZX81 ‘board has been re-manufactured, to the joy of many a Sinclair enthusiast. It’s thus readily available and relatively cheap (we think they can be found for less than the stated 20 euros!), so surprisingly it’s a reasonable choice for an Arduino project. The task of trying to define by touch the imperceptible difference in thickness of a ZX81 key will bring a true retrocomputing experience to a new generation. Perhaps if it can be done on an Mbed then someone might even make a ZX81 emulator on the Arduino.

We’re great fans of the ZX81 here at Hackaday, for some of us it was that first computer. Long may it continue to delight its fans!

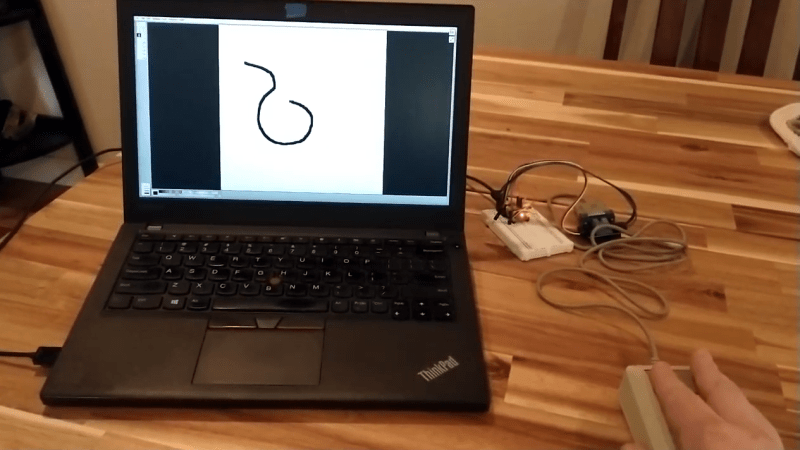
Need to hook a classic Mac mouse up to your modern machine with the help of a DIY USB adapter? [John Floren] has you covered. [John]’s solution uses a board with an ATmega32U4 microcontroller on it to connect to the Mac mouse on one end, and emulate a USB HID (Human Interface Device) on the other. A modern machine therefore recognizes it like it would any other USB input device.

Why is this necessary? The connector on the classic Mac mouse may look like a familiar DE-9 connector, but it is not an RS-232 device and wouldn’t work if it were plugged into a 9-pin serial port. The classic Mac mouse uses a different pinout, and doesn’t have much for brains on the inside. It relies on the host computer to read its encoders and button states directly.

This project is actually a bit of an update to a piece of earlier work [John] did in making a vintage Depraz mouse work with modern systems. He suspected that it wouldn’t take much to have it also work with a classic Mac mouse, and he was right — all it took was updating the pin connections and adding some pull-up resistors. The source code and design files are on GitHub.

Even if one does not particularly want to use a classic Mac mouse for daily work, there’s definitely value in this kind of thing for those who deal in vintage hardware: it allows one to function-check old peripherals without having to fire up a vintage machine.

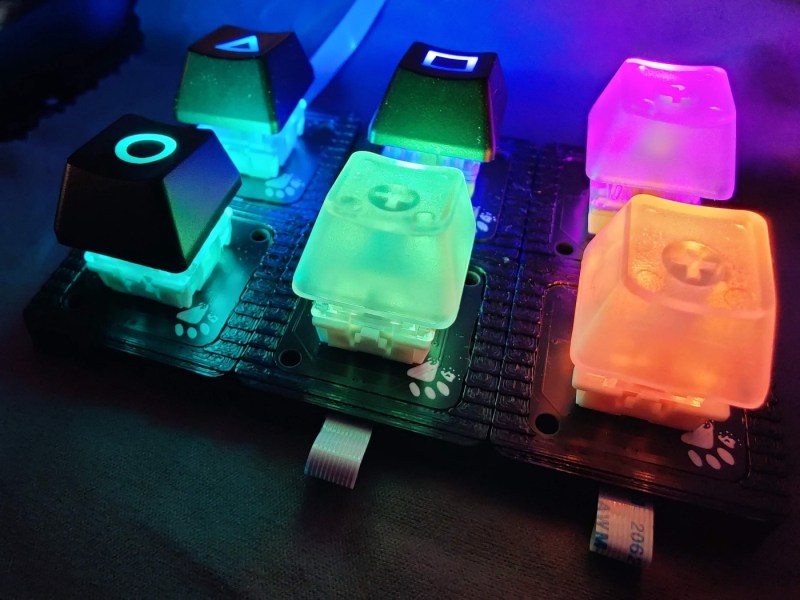
[Gili Yankovitch] has always wanted some kind of macro keypad for all those boss-slaying combos he keeps up the sleeve of his wizard robe while playing WoW. Seventeen years later, he finally threw down the gauntlet and built one. But really, this is an understatement, because Paws is kind of the customizable macropad to end all customizable macropads.

This thing is completely bespoke, and yet cookie cutter at the same time — but we mean that in the best possible way. Paws can be made in any shape or form, and quite easily. How is this even possible, you ask? Well, every single key has its own microcontroller.

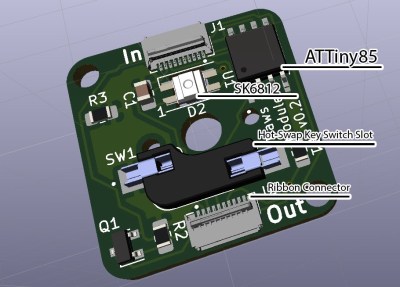
Yep, each key has an ATtiny85 and a cute little ribbon cable, and these form a token ring network that talks to an Arduino, which provides the keyboard interface to the computer. To make things even easier, [Gili] built a simple programming UI that automatically recognizes the configuration and number of keys, and lets the user choose the most important bit of all — the color of the LED.

[Gili] wanted to combine all the skills he’s learned since the worst timeline started in early 2020 — embedded software, CAD, electronics, and PCB design. We’d like to add networking to that list, especially since he figured out a nice workaround for the slowness of I²C and the limitations of communication between the ‘tiny85s and the Arduino. Though [Gili] may have started out with a tall order, he definitely filled it. Want to get your paws on the design files? Just claw your way over to GitHub.

If your customization interests lie more toward what program is in focus, be sure to check out Keybon, which was one of the many awesome winners of our Odd Inputs and Peculiar Peripherals contest.

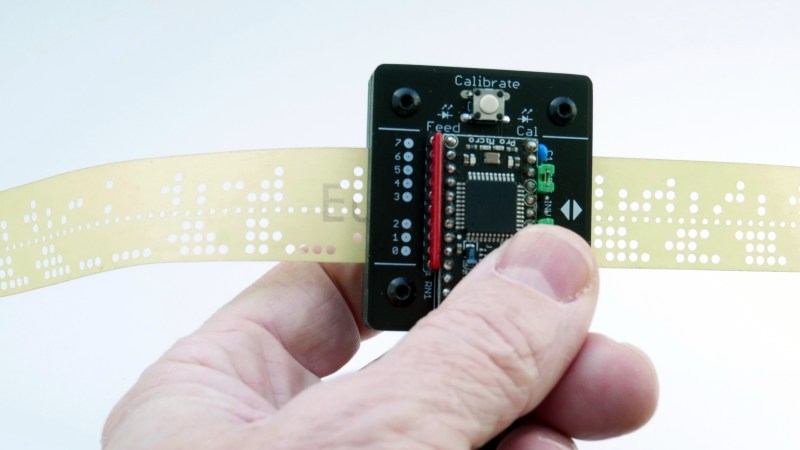
Input devices consisting of optical readers for punched paper tape have been around since the earliest days of computing, so why stop now? [Jürgen]’s Paper Tape Reader project connects to any modern computer over USB, acting like a serial communications device. Thanks to the device’s automatic calibration, it works with a variety of paper materials. As for reading speed, it’s pretty much only limited to how fast one can pull tape through without damaging it.

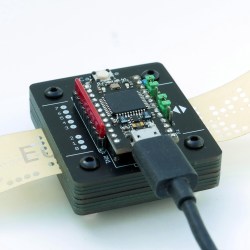
Stacked 1.6 mm PCBs act as an enclosure, of sorts.

While [Jürgen]’s device uses LEDs and phototransistors to detect the presence or absence of punched holes, it doesn’t rely on hardware calibration. Instead, the device takes analog readings of each phototransistor, and uses software-adjusted thresholds to differentiate ones from zeros. This allows it to easily deal with a wide variety of tape types and colors, even working with translucent materials. Reading 500 characters per second isn’t a problem if the device has had a chance to calibrate.

Interested in making your own? The build section of the project has all the design files; it uses only through-hole components, and since the device is constructed from a stack of 1.6 mm thick PCBs, there’s no separate enclosure needed.

Paper tape and readers have a certain charm to them. Cyphercon 4.0 badges featured tape readers, and we’ve even seen the unusual approach of encoding an I2C byte stream directly onto tape.

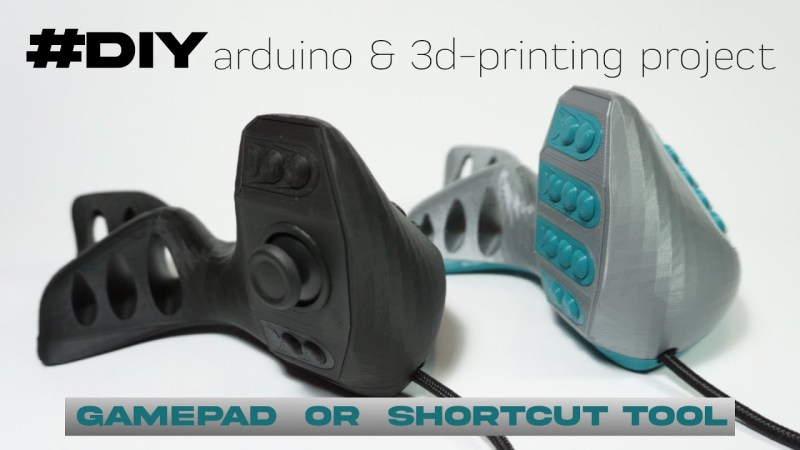
Are you completely over the idea of the keyboard in any flattish form and looking for something completely different for inputting your data? Or do you want a mega macropad for 3D design, GIMP or Inkscape work, or to use while relaxing with a nice first-person shooter? Then this ergonomic, double-fistable keyboard/controller mashup named CAT may be what you’re looking for.

Inside each of these slinky felines is pretty much what you’d expect to find — 25 or so switches and an Arduino Pro Micro. Interestingly enough, the switches are all lever-action and not push buttons. There are two breeds of CAT available to build or buy: one has 25 buttons, and the other has a joystick or trackball on the thumb between two upper and two lower buttons. You could have one type for each hand!

More information is available on the Lynx Workshop site, which is where you’ll also find tutorials and instructions for everything from the 3D printing to the electronics to the assembly and coding. There is even a bonus 3D modeling tutorial. Don’t want to invest the time to make your own CAT? These kitties are also available for pre-order. Claw past the break to check them out in action.

Looking for something with regular keyswitches? Oh, we have plenty of those.

An input device combining a joystick with several knnobs and buttons

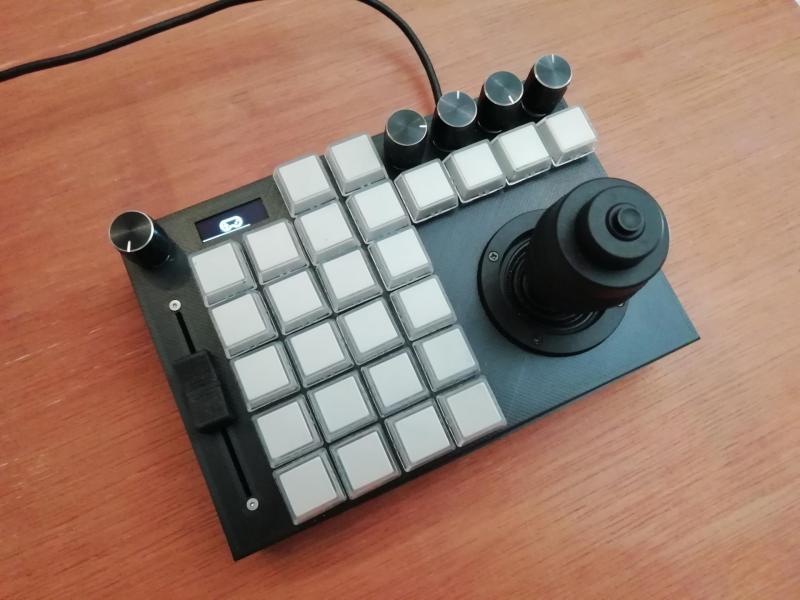
While most computer users make do with just a keyboard and mouse, power users often have multiple additional input devices. Gamers use joysticks or dedicated mice, CAD engineers have specialized gadgets for manipulating 3D objects, while graphic designers might want programmable macro buttons to automate various tasks. [Sascha Nitsch] didn’t fancy cluttering his desk with a whole bunch of input devices and therefore decided to combine as many functions as possible into the CIMDIT: a Completely Insane Multi Device Input Thingy.

The main components making up the CIMDIT are a 3-axis joystick module, which can double as a 3D CAD mouse, and a set of buttons, knobs and sliders to enable various functions. One rotary encoder is used to choose an operating mode, while four others can be used as programmable inputs. A small OLED display shows which mode is currently selected, but can also be used to display notifications from various programs.

An Arduino Pro Micro provides a USB interface to a PC and reads out the various input units. The entire design is modular, so it can be customized to any desired combination of analog and digital inputs. [Sascha] made a neat 3D printed enclosure to hold the 3-axis module along with 26 buttons, five rotary encoders and one analog slider. KiCAD files for the PCBs and the FreeCAD source for the enclosure are available under an open-source license on [Sascha]’s Git repo.

The same thing applies to the software driving the CIMDIT, though adding functionality to it might turn out to be tricky: [Sascha] had to perform some serious code optimization to fit everything into the Arduino’s 32 kB of program flash. The Git repo also includes a convenient tool to create key mappings to be programmed into the controller, saving you from having to compose a binary file by hand.

Love macro keypads? Check out these cool examples with gesture detection, an e-ink display or simply beautiful wooden keys.


  • Newsletter

    Sign up for the PlanetArduino Newsletter, which delivers the most popular articles via e-mail to your inbox every week. Just fill in the information below and submit.

  • Like Us on Facebook