Posts | Comments

Planet Arduino

Archive for the ‘python’ Category

The Consumer Electronics Show in Las Vegas is traditionally where the big names in tech show off their upcoming products, and the 2020 show was no different. There were new smartphones, TVs, and home automation devices from all the usual suspects. Even a few electric vehicles snuck in there. But mixed in among flashy presentations from the electronics giants was a considerably more restrained announcement from a company near and dear to the readers of Hackaday: Arduino is going pro.

While Arduino has been focused on the DIY and educational market since their inception, the newly unveiled Portenta H7 is designed for professional users who want to rapidly develop robust hardware suitable for industrial applications. With built-in wireless hardware and the ability to run Python and JavaScript out of the box, the powerful dual-core board comes with a similarly professional price tag; currently for preorder at $99 USD a pop, the Portenta is priced well outside of the company’s traditional DIY and educational markets. With increased competition from other low-cost microcontrollers, it seems that Arduino is looking to expand out of its comfort zone and find new revenue streams.

That’s a Lot of Pins

The Portenta H7 is obviously a far cry from the relatively dinky 8-bit Arduinos that we’ve all got filling up our parts drawers. Developed for high performance edge computing applications, the new board is powered by a 32-bit STM32H747XI that utilizes both an ARM Cortex M7 and an M4 running at 480 MHz and 240 MHz respectively. The two cores can work independently, allowing for example one core to run interpreted Python while the other runs code compiled in the Arduino IDE. When they need to work together, the cores can communicate with each other via a Remote Procedure Call (RPC) mechanism.

The new 80-pin connectors on the Portenta

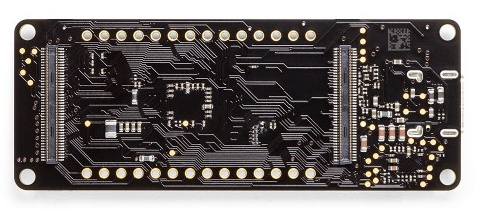
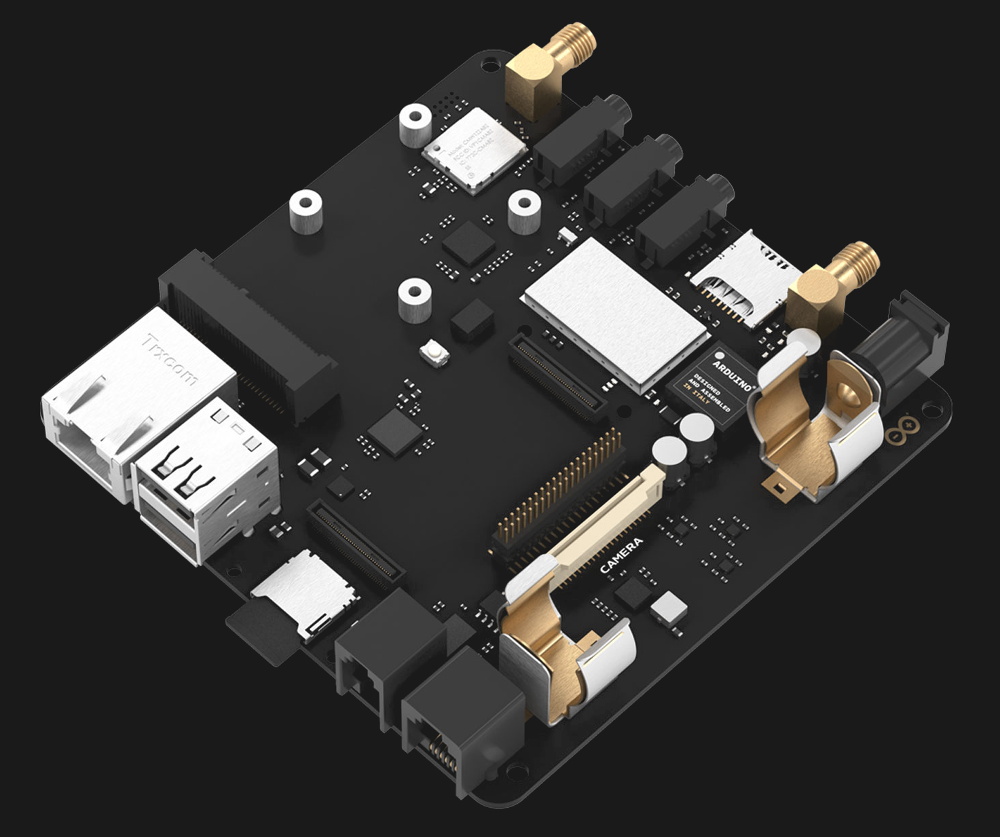
Outwardly, the new board doesn’t look far removed from the modern Arduino form factor we’re used to. The USB connector has been upgraded to a Type-C, but the Portenta still retains the dual rows of pads ready for hand-soldered headers — that’s their more recent pinout that they call the Arduino MKR form factor.

If you look on the back of the board however, you’ll see that they’ve added two 80-pin high density connectors. According to the product page, these are intended to allow the Portenta to simply be plugged into a device as a removable module. The idea being that devices in the field can easily have their Portenta swapped out for an upgraded model. Some digging into the product page documentation section turns up a schematic that lists the connectors as Hirose DF40C-80DP-0.4V(51).

The base model Portenta features 8 MB SDRAM and 16 MB NOR flash, but it can be custom ordered with up to 64 MB of memory and 128 MB of flash should you need it. It’s also possible to delete various interfaces from the board when ordering, so if you don’t want network connectivity or the NXP SE050C2 crypto chip, they can simply be left off. However as of this writing it is unclear as to what minimum order quantity is necessary to unlock this level of customization, or or how much these modifications will change the unit cost.

Year of the Arduino Desktop?

The Portenta Carrier Board

The Portenta H7 is an impressive enough piece of hardware on its own, but when it’s plugged into the optional Carrier Board, things really start to get interesting. The Carrier Board provides full size connectors for all of the onboard peripherals, and according to documentation, turns the Portenta into an eNUC-class embedded computer. There’s even support for DisplayPort to connect a monitor, and miniPCI for expansion cards.

With a fully loaded Portenta H7 slotted into the Carrier Board, it would seem you have the makings of a low-power ARM “desktop” computer. Albeit one that wouldn’t outperform the Raspberry Pi Zero, and which costs several times more.

The Arduino press release and product page doesn’t make any mention of what kind of software or operating system said computer would run, so presumably that’s left as an exercise for the customer. While not particularly well suited to it, the ARM Cortex-M family of processors is capable of running the Linux kernel, so spinning up a “real” OS image for it should be possible. Of course with a maximum of just 64 MB of RAM, you’ll want to keep your performance expectations fairly low.

Where Does Portenta Fit?

We can’t even speculate what a maxed out Portenta would cost, and there’s no pricing or release date for the Carrier Board. But even at $99, the base model Portenta H7 would be a tough sell for hackers and makers who are used to buying dual-core ESP32 boards at 1/10 of the price, or the Teensy 4.0 which has a 600 MHz Cortex-M7 at 1/4 of the price. Which is fine, since this board isn’t intended for the traditional core Arduino audience.

Seeing the carrier board, we can’t help but notice some parallels here with the Raspberry Pi Compute Module. With connections broken out to a SODIMM header, the idea of the Computer Module was to help bridge the gap between the DIY community and the commercial one by offering up a Raspberry Pi in a more rugged form factor that would be easier to integrate into end-user products. But since it wasn’t any cheaper than the stock Pi, there wasn’t a whole lot of incentive to switch over. We haven’t seen consumer products advertising “Raspberry Pi Inside!” so it’s hard to tell if there has been any meaningful adoption from industry.

One has to wonder why any company that has the resources to integrate such an expensive board into their products wouldn’t just come up with their own custom design around the Portenta’s STM32H747XI chip, which even in single quantities, can currently be had for less than $15. The difference may end up coming down to the world-renowned community that surrounds the Arduino brand, and the company’s efforts to modernize their toolchain.

Sometimes, a project comes along that makes a good reference design for anyone doing similar work. In this particular case, it’s a DIY USB polygraph-like machine by [Juangg] using an Arduino and sensors on the hardware side, and a Python front end for data visualization. It’s even complete with 3D printed enclosure and sensor elements.

[Juangg] designed it to use three sensors: a pulse sensor, a breath sensor, and one to measure Galvanic Skin Response (GSR). The pulse sensor uses a piezo element pressed against a fingertip to detect changes in pressure resulting from blood flow. It can be picky about placement, but finding sweet spot can yield remarkably good readings. The breath sensor works on a similar principle but uses a 3D printed fixture to hold the sensor between a strap and the subject’s chest, so that breathing in and out can be detected. The GSR sensor is a voltage divider used to measure small changes in skin conductivity. How well does it all work? That depends on what one is looking to get out of it, but the documentation and design files are available from the project page and the GitHub repository if anyone wants a reference for similar work.

The polygraph may have a mixed reputation, but it makes a good project that demonstrates just how messy biometrics can be from an engineering perspective. And in case you missed it, here’s a reminder that Wonder Woman and the polygraph have much more in common than you might realize.

[Zoltán] sends in his very interesting implementation of a NumPy-like library for micropython called ulab.

He had a project in MicroPython that needed a very fast FFT on a micro controller, and was looking at all of the options when it occurred to him that a more structured approach like the one we all know and love in CPython would be possible on a micro controller too. He thus ended up with a python library that could do the FFT 50 times faster than the the pure Python implementation while providing all the readability and ease of use benefits that NumPy and Python together provide.

As cool as this is, what’s even cooler is that [Zoltan] wrote excellent documentation on the use of the library. Not only can this documentation be used for his library, but it provides many excellent examples of how to use MicroPython itself.

We really recommend that fans of Python and NumPy give this one a look over!

As outlined in this Circuit Digest write-up, with the right hardware, you can now control your computer using hand gestures. While interesting, this kind of technology can be a little expensive. But if you’d like to augment your notebook or laptop via simple gesture capabilities without breaking the bank, B. Aswinth Raj has your answer in the form of an Arduino Uno and two ultrasonic sensors.

His system places the two sensors at the top of a screen, which are read by the Uno. This data is then passed on to a Python program running on the host computer that allows for actions such as play/pause, fast-forward, and volume control while watching videos.

Given the nature of the setup, there’s no reason why more sensors or programming couldn’t be added for further control, perhaps as shortcut “keys” for your favorite design software package! You can read more about the project here, and see a demo of it below.

[B. Aswinth Raj] wanted to control a VLC player with hand gestures. He turned to two common ultrasonic sensors and Python to do the job. There is also, of course, an Arduino. You can see a video of the results, below.

The Arduino code reads the distance from both sensors — one for the left hand and the other for the right. This allows the device to react to single hand gestures that get closer or further away from one sensor as well as gestures involving both hands. For example, raising your left hand and moving it closer or further away will adjust the volume. The right hand controls rewind and fast forward. Raising both hands will start or stop playback.

Of course, since the Arduino is reading the gestures you could change them to suit you. We might have mounted the sensors further back (or, perhaps, added more sensors) so you could use trigonometry to triangulate the hand’s exact position. Well, perhaps not exact, but you could get an idea of the hand’s motion from right to left as well as forward and backward.

On the host computer side, Python receives serial data from the Arduino and then simulates keystrokes to get the desired result. Of course, this is also highly customizable.

By coincidence, we did a similar project a few years ago using one sensor and the Arduino’s ability to appear like a USB keyboard. We’ve also seen 8 sensors making piano music.


Filed under: Arduino Hacks

If there’s one thing that Hollywood knows about hackers, it’s that they absolutely love data visualizations. Sometimes it’s projected on a big wall (Hackers, WarGames), other times it’s gibberish until the plot says otherwise (Sneakers, The Matrix). But no matter what, it has to look cool. No hacker worth his or her salt can possibly work unless they’ve got an evolving Venn diagram or spectral waterfall running somewhere in the background.

Inspired by Hollywood portrayals, specifically one featured in Avengers: Age of Ultron, [Zack Akil] decided it was time to secure his place in the pantheon of hacker wall visualizations. But not content to just show meaningless nonsense on his wall, he set out to create something that was at least showing actual data.

[Zack] created a neural network to work through multi-label classification data in Python using the scikit-learn machine learning suite. The code takes the values from the neutral network training algorithm and converts them to RGB colors by way of an Arduino. Each “node” in the neutral network is 3D printed in translucent filament, and fitted with an RGB LED module. These modules are then connected to each other via side-glow fiber optic tubes, so that the colors within the tubes are mixed depending on the colors of the nodes they are attached to. This allows for a very organic “growing” effect, as colors move through the network node-by-node.

In the end this particular visualization doesn’t really mean anything; the data it’s working on only exists for the purposes of the visualization itself. But [Zack] succeeded in creating a practical visualization of machine learning, and if you’re the kind of person who needs to keep tabs on learning algorithms, some variation of this design may be just what you’re looking for.

If AI isn’t your thing but you still want a wall of RGB LEDs, maybe you can use this phased array antenna visualizer instead. If you’re really hip, maybe you’ll go the analog route and put a big gauge on the wall.


Filed under: Arduino Hacks, led hacks

What do you do when someone gives you a Wurlitzer 3100 jukebox from 1969, but keeps all the records? If you are like [Tijuana Rick], you grab an Arduino and a Rasberry Pi and turn it into a really awesome digital music player.

We’ll grant you, making a music player out of a Raspberry Pi isn’t all that cutting edge, but restoration and integration work is really impressive. The machine had many broken switches that had been hastily repaired, so [Rick] had to learn to create silicone molds and cast resin to create replacements. You can see and hear the end result in the video below.

[Rick] was frustrated with jukebox software he could find, until he found some Python code from [Thomas Sprinkmeier]. [Rick] used that code as a base and customized it for his needs.

There’s not much “how to” detail about the castings for the switches, but there are lots of photos and the results were great. We wondered if he considered putting fake 45s in the machine so it at least looked like it was playing vinyl.

Of course, you don’t need an old piece of hardware to make a jukebox. Or, you can compromise and build out a replica.


Filed under: Arduino Hacks, Raspberry Pi
Image © Barry Osborne 2017. Used with permission.


This post uses the Raspberry Pi sense hat to display the AuroraWatch UK alert status. It assumes you already have Raspbian installed on a Raspberry Pi, networking configured and enabled, and the sense hat fitted to the Pi.

The current status level is easily obtained from the AuroraWatch UK API with a custom python module. First, ensure you have the necessary python modules installed from the Raspbian software archive:

sudo apt-get update
sudo apt-get install python-lxml python-requests python-six

Then install two custom python modules. We will install them into the user profile, so run these commands as the user pi:

pip install --user --no-deps atomiccreate
pip install --user --no-deps aurorawatchuk

Finally, download the python script which fetches the status and displays it on the sense hat (I used bit.ly to shorten the original GitHub URL):

wget https://bit.ly/awuk-status-on-sense-hat -O awuk_sense_hat.py

The AuroraWatch UK status can then be displayed on the sense hat with this simple command:

python awuk_sense_hat.py

The program will monitor the current status and set the LED colours to show the status level (green, yellow, amber or red). For more information about the AuroraWatch UK status level meaning and interpretation see http://aurorawatch.lancs.ac.uk/alerts/. If you don't have a sense hat (I don't) it is even possible to try this with the sense hat emulator.

Credits

The geomagnetic activity status is courtesy of AuroraWatch UK and uses data from the SAMNET and AuroraWatchNet magnetometers.See also the AuroraWatch UK conditions of use for the API.

Thanks to Barry Osborne for testing the software with a real Raspberry Pi sense hat, and for providing the photograph.
Material necessari: 
-Joystick: Per moure una fitxa del Pong.
-Python: Per carregar el joc del Pong.
-Arduino: Per configurar el joystick.
-Ordinador: Per poder fer el projecte.
Procediment:
Importar libreria serial
Variable "score"
Variable del que arriba del port serie

Variables de x i y rectangle
Variables de x i y bola

Creem una variable per reduir a números (-1,0,1)

Velocitat--> variable només amb números
Velocitat bola--> sempre la mateixa, però canvia de sentit quan toca la paret o un objecte.

Quan la bola toqui una de les parets dels costats suma +1 al score del que ha marcat el punt.


  • Newsletter

    Sign up for the PlanetArduino Newsletter, which delivers the most popular articles via e-mail to your inbox every week. Just fill in the information below and submit.

  • Like Us on Facebook