Posts | Comments

Planet Arduino

Archive for the ‘hexapod’ Category

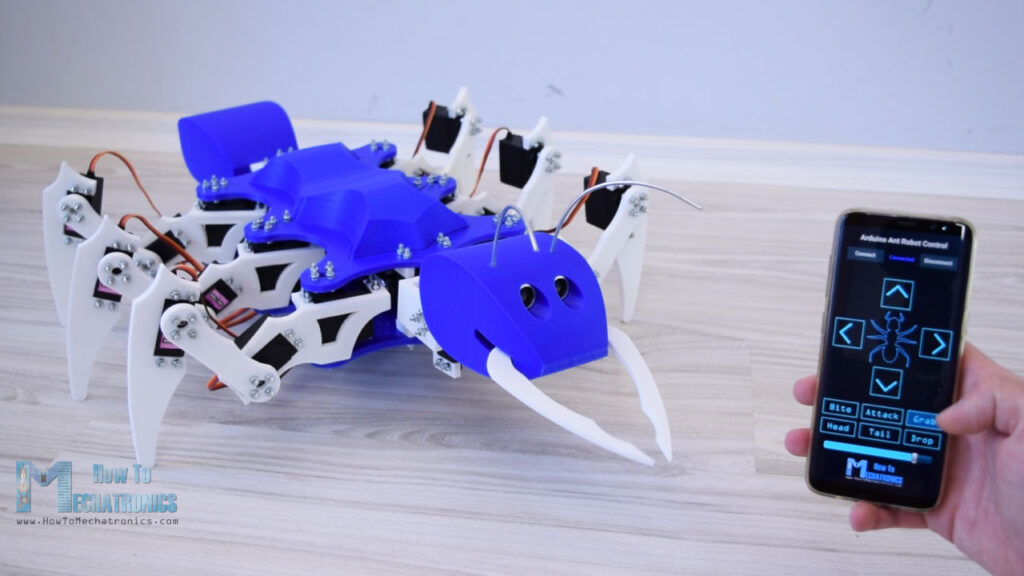
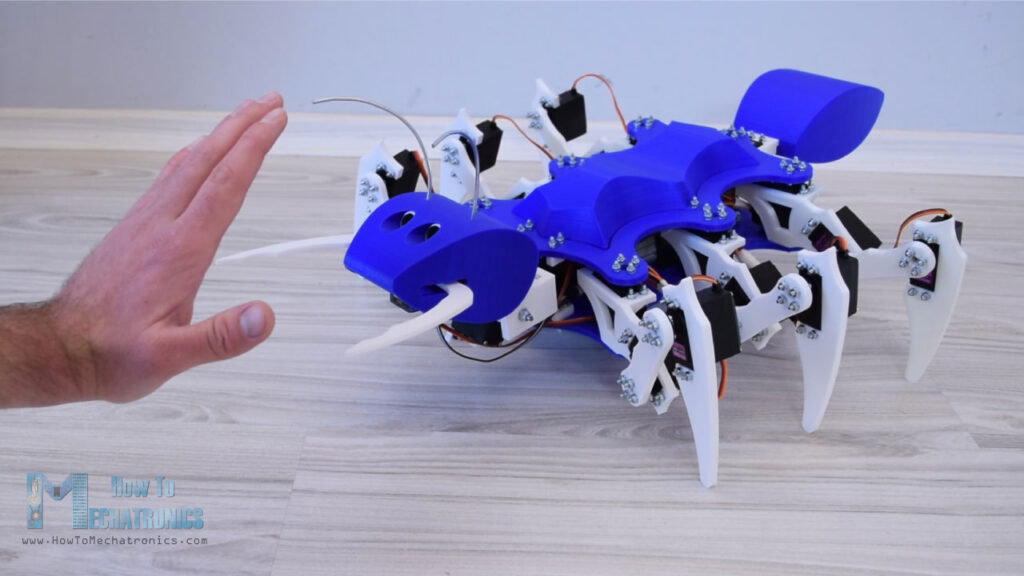
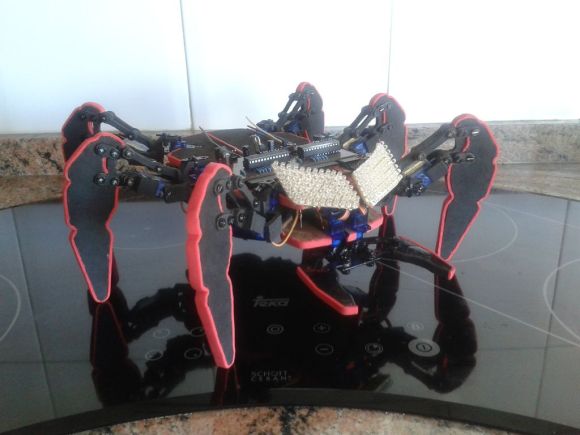
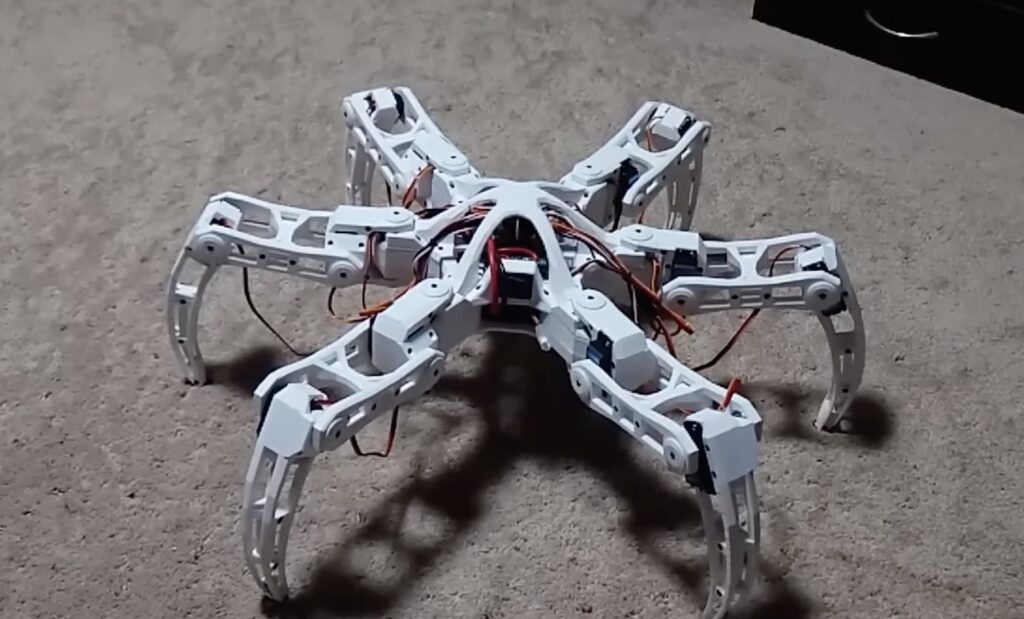
While robots can get around on two legs (or even none), it is difficult to get a smooth and efficient gait. Moving up to four legs improves the situation a bit, but each of those legs will still need multiple joints and careful balance for the robot to move in a stable manner. Once you increase the leg count to six, you can achieve some very good gaits, which is why hexapod robots are so popular. To experiment with six legs, Aecert Robotics built this nimble DIY hexapod robot from scratch.

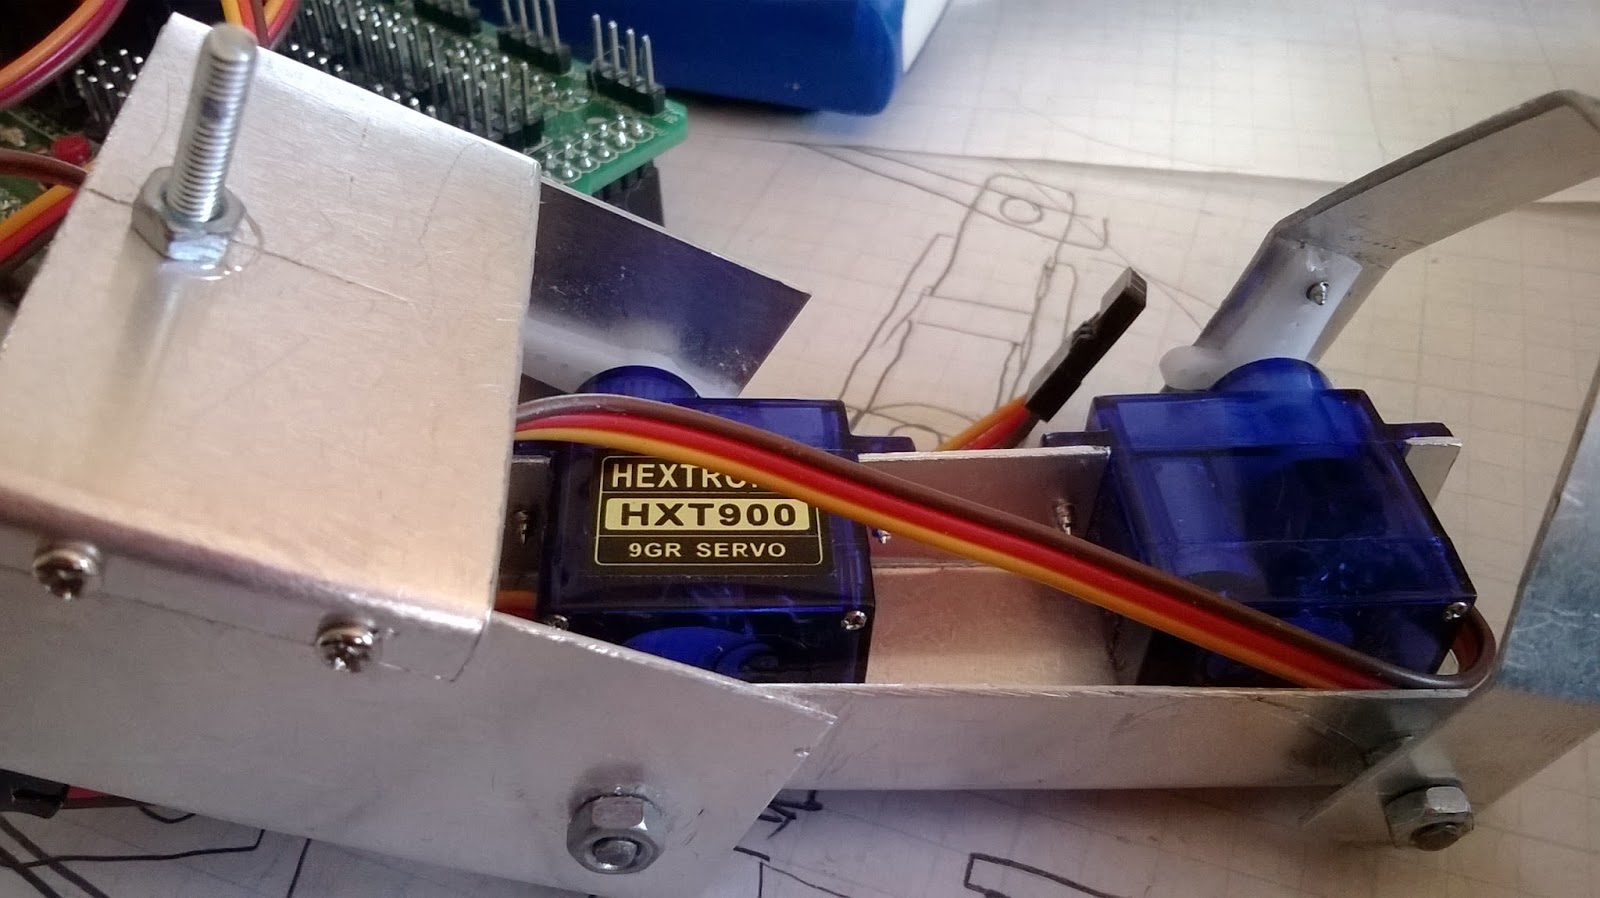
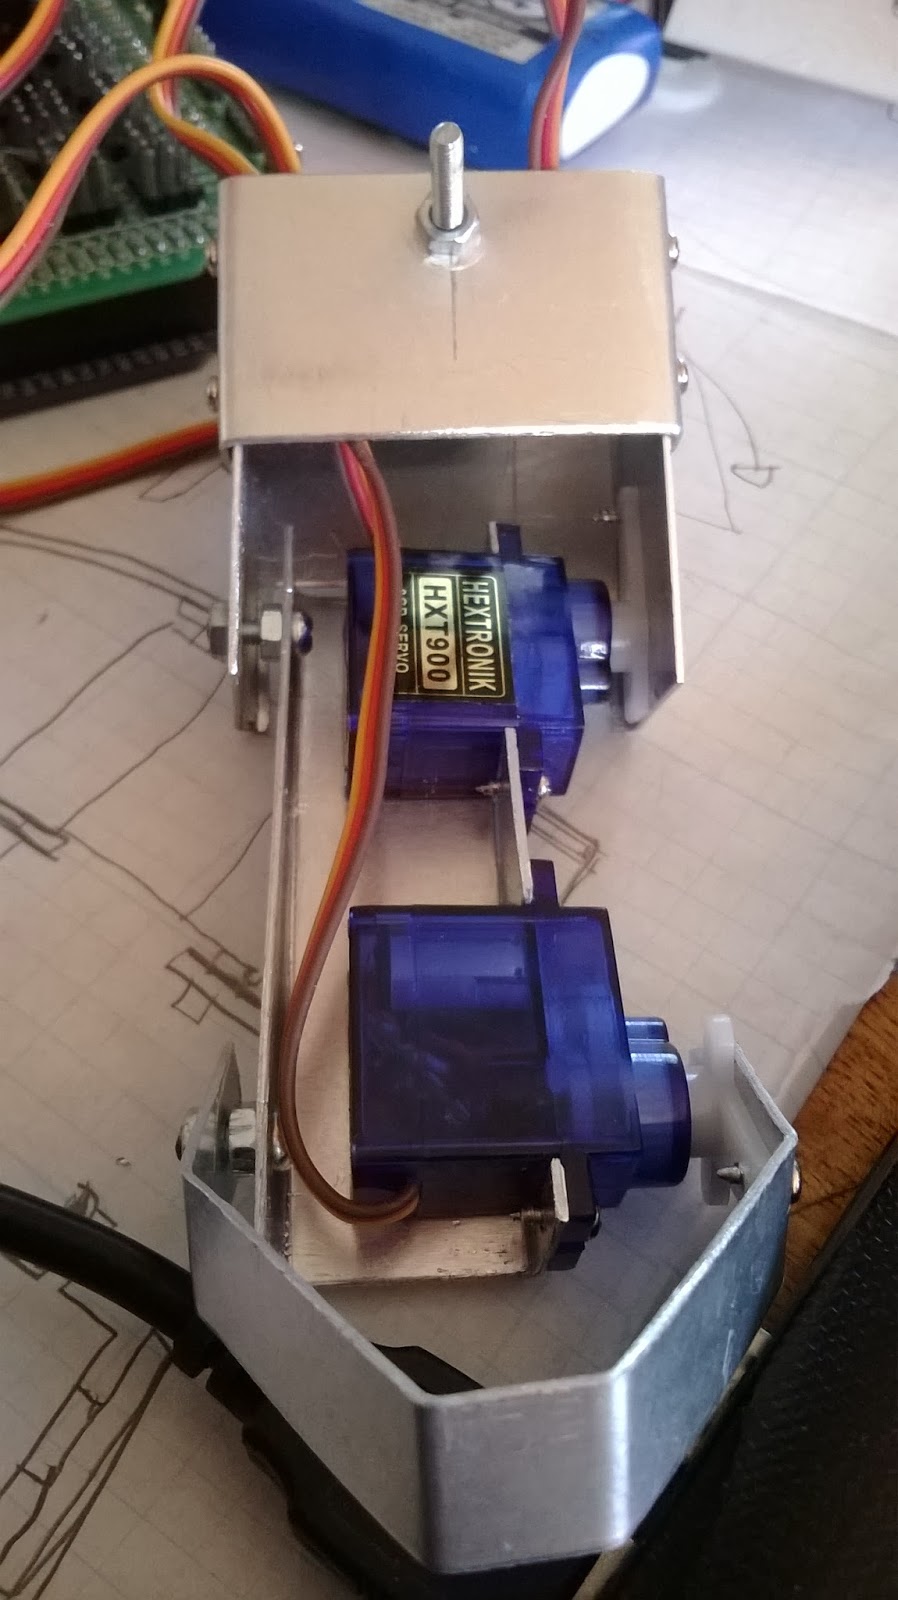
As you can see in the detailed video, this robot is quite agile. If you watch carefully, you can see that three legs lift and three legs remain in contact with the ground for each step. That keeps the robot very stable, as it can balance easily on the tripod formed by the three legs touching the ground. Each leg has three joints: a “hip” joint that pivots the leg horizontally, a “knee” joint that pivots vertically, and an “ankle” joint that also pivots vertically. Servo motors directly actuate all of those joints, meaning there are 18 servos in total.

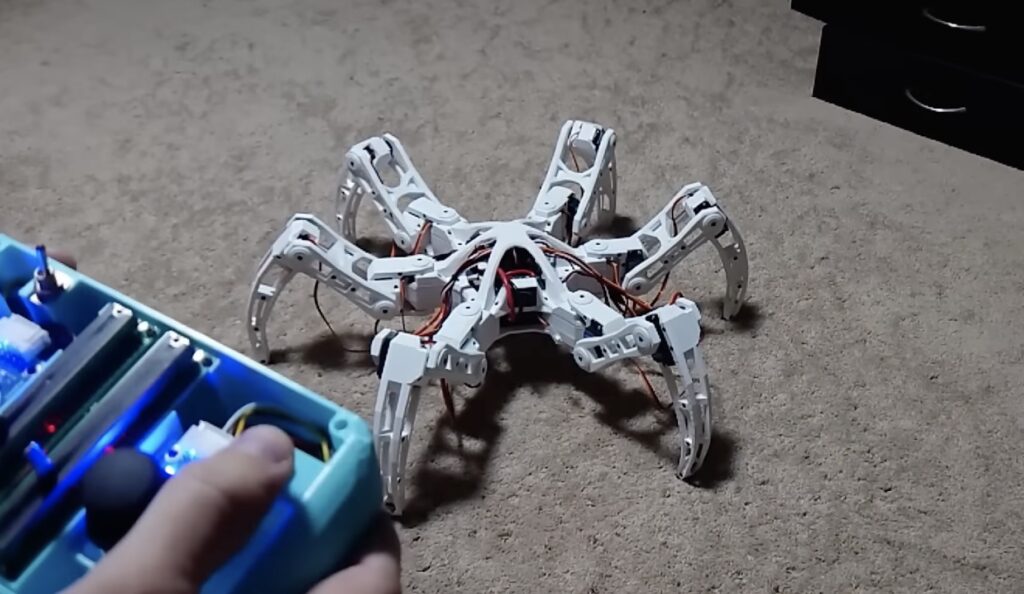
To control those servo motors, Aecert Robotics used an Arduino Mega 2560 board. A custom PCB shield made the connections much easier and tidier. The hexapod’s body and all of the legs were 3D printed. Aecert Robotics can control the robot via radio, using a custom controller based on an Arduino Uno. The two Arduino boards communicate via nRF24L01 radio transceiver modules. With the controller, Aecert Robotics can move the robot forward, backwards, left, and right. But the controller will also let the operator extended all the legs simultaneously. That means that they can make the robot hop in place by rapidly extending all of the legs at the same time.

The post A very nimble DIY hexapod robot appeared first on Arduino Blog.

Six-legged robots are nothing new, but if you’d like inspiration for your own, it would be hard to beat this 22 servo-driven, 3D-printed hexapod from Dejan at How To Mechatronics. 

The ant-inspired device features three metal geared servos per leg, as well as a pair to move the heat, another for the tail, and a micro servo to activate the mandibles.

To control this large number of servos, Dejan turned to the Arduino Mega, along with a custom Android app and Bluetooth link for the user interface. While most movements are activated by the user, it does have a single ultrasonic sensor buried in its head as “eyes.” This allows it to lean backwards when approached by an unknown object or hand, then strike with its mandibles if the aggressor continues its advance. 

As the name suggests, the hexapod has six legs but in addition to that, it also has a tail or abdomen, a head, antennas, mandibles and even functional eyes. All of this, makes the hexapod look like an ant, so therefore we can also call it an Arduino Ant Robot.

For controlling the robot I made a custom-built Android application. The app has four buttons through which we can command the robot to move forward or backwards, as well as turn left or right. Along with these main functions, the robot can also move its head and tail, as well as it can bite, grab and drop things and even attack.

You can see it in action and being assembled in the video below, and build files are available here.

Oct
22

Rana: A Biologically Inspired Hexapod

arduino, hexapod, rana, Robotics, Woodworking Comments Off on Rana: A Biologically Inspired Hexapod 

Rana, which is Italian for “frog,” is really an interesting six-legged robot design. The locomotion, which according to their writeup, has never been used before and combines the walking methods of an ant and a frog. This kind of locomotion, as opposed to three-servo based ‘bots that simply rock back […]

Read more on MAKE

Apr
25

HexDrake — A Low Cost 2-DOF Hexapod

arduino hacks, hexapod, Hexapod robot, hexdrake, robots hacks Comments Off on HexDrake — A Low Cost 2-DOF Hexapod 

hexdrake low cost hexapod

[David's] been making robots since he was 16. After conquering the basics, he wanted to build something a bit more interesting than a simple wheeled-robot — he wanted to buy a hexapod but they were too expensive — so he decided to design his own low-cost version!

It’s made out of hand-cut wood, SG90 servos, an Arduino and a 16-channel servo controller. A 2.4GHz remote control sends commands to the Arduino which then communicates to the USC servo controller, allowing for intricate control of the 14 servos that make up the HexDrake.

He’s also added a few LED arrays for the eyes of his robot, which in the future will be animated to give expression to his little hexapod.

It’s an extremely well built little bot, and [David's] made a very in-depth Instructable for anyone who would like to follow in his footsteps. Stick around after the break to see it scurry around!

For something a bit scarier and bigger, check out this 16lb beast of a Hexapod! No where near low-cost though…


Filed under: Arduino Hacks, robots hacks
Dec
29

Ardupod scratch built hexapod squat and rotate code using analogue joystick

analogue, arduino mega, hexapod, scratch build Comments Off on Ardupod scratch built hexapod squat and rotate code using analogue joystick 

Round variant much simpler made fro two plastic plates


Ardupod scratch built hexapod squat and rotate code using analogue joystick


Dec
21

HEXAPOD CHASSIS TAKES SHAPE

arduino mega, chassis, hexapod Comments Off on HEXAPOD CHASSIS TAKES SHAPE 


Dec
19

Hexapod legs in build and hooked up to Arduino Mega should be fun to tinker with

arduino mega, hexapod, PC, servos Comments Off on Hexapod legs in build and hooked up to Arduino Mega should be fun to tinker with 

Leg one took an hour and a half, the next 3 took less than an hour to build. They are 0.75 mm aluminum sheet


Have as s-ramp working on the axes make the movement quite smooth. 
Using cheap hextronik HTX900's on the legs and HK939 MG's son the shoulders, have more servos on the way  as I suspect I will trash a few.  


Design inspired by Hexy

Will use an Xbee or HK 900MHx telemetery transceiver for base link. I'm thinking cams and linear interpolation  like a Trio motion system like the one I worked on in the wheel motion system shown below.


This one has some good explanations and design insight


May
20

Two Arduino-based Kickstarter projects worth a look

arduino, Enviroment, Fablab, Hardware, hexapod, kickstarter, leonardo Comments Off on Two Arduino-based Kickstarter projects worth a look 

SmartCitizen kit
Some weeks ago I read an article on the New York Times talking about Kickstarter. The author was exploring the logic of the platform and especially in which way backers shouldn’t really be considered like investors. They aren’t because their main aim is not looking for the project that will give them the greatest return on their money.

Kickstarter as a phenomenon is made much more comprehensible once you realize that it’s not following the logic of the free market; it’s following the logic of the gift […] People contribute to them because they’re friends who know the artist personally; they’re fans engaged in a highly personal if unidirectional relationship with the artist [creator]; or simply because they’re intrigued by the project and want some sense of participation in it.

Here we are then, highlighting  two Arduino-based projects because we are intrigued by them and hope you like them too.

Smart Citizen

After successfully putting the Smart Citizen Kit in the hand of over 150 users around Barcelona in Spain, the team – organized by Fablab Barcelona and involving collaborations from all over the world – is ready for the next, and most crucial step and they need your help. The Smart Citizen Kit infact is an Open-Source Environmental Monitoring Platform consisting of arduino-compatible hardware, data visualization web API, and mobile app, empowering communities to collect data of what’s actually happening in their environment.

GOAL: $50,000

PROJECT ENDS: June 16, 2013
Check out what are their plans in the video!


Bot Logic Hexapod

Many hexapods can’t sense they’ve reached the edge of a surface without a lot of additional hardware expense and complexity and this kit solves the problem! BOT-LOGIC is an easy-to-assemble hexapod kit & controller that enables servos to also act as sensors to control the force applied as well as measuring force at set positions. Robots are thus enabled to sense surface edges and uneven servo load as well as measure and maintain gripper force.

GOAL: $10,000

PROJECT ENDS: July 10, 2013

Check the details in the video below:

Point presse

Tout d'abord, un point people, l'information du développement de Bleuette à plutôt bien circulée et Bleuette s'est retrouvée sur plusieurs sites importants :

La vidéo sur Vimeo à été vue plus de 6000 fois.

Plutôt plaisant de voir que ça intéresse du monde mais j'attends avec grande impatience le moment ou un autre Bleuette pointera le bout de son nez en PLA... ;)

Évolutions

Nouvelle carte fille

La shield Bleuette permet le pilotage des servos et le contrôle de la tension / courant consommé par les servos, pour pouvoir ajouter des capteurs multiples, il est tout à fait possible d'utiliser les broches libres des ports de l'Arduino mais il n'y en a pas assez pour tous les capteurs voulus sur Bleuette, du coup, le besoin d'une nouvelle carte d'extension s'est fait sentir et voici ce qu'elle permet :

  • 8 entrées supplémentaires multiplexées utilisant que 4 entrées / sorties (3 d'adressage et une sortie)
  • Connection pour une carte GY-27 contenant un accéléromètre et un compas
  • Un module Bluetooth JY-MCU
  • Une connection pour une guirlande de led RGB à base de LPD8806
  • Un mosfet pour pouvoir piloter un élément de puissance (je ne sais pas vraiment quoi pour le moment...)

Voici le schéma de principe et le PCB associé (cliquez dessus pour agrandir) :
Schéma de principe de la carte d'extension de Bleuette PCB de la carte d'extension de Bleuette

Le schéma de principe au format est Eagle se trouve par ici : sensor.sch et le PCB : sensor.brd

Comme vous pouvez le voir, le PCB n'est pas dense du tout, du coup, il est simple à réaliser avec des moyens modestes.

Mécanique

Pas de grande nouveauté pour la partie mécanique sauf pour les pieds, ces derniers ont été imprimés en PLA Flex permettant d'avoir un peu de souplesse et trempé dans du PlastiDip afin d'avoir un meilleur grip en plus d'un super rendu !

Avant trempage dans le PlastiDip et après :
Les pieds de Bleuette

Tous les éléments d'un pied de Bleuette, on aperçoit l'interrupteur poussoir, le piston et le cylindre et le pied recouvert de PlastiDip :
L'ensemble des pièces constituant un pied de Bleuette

Le tout assemblé :
Vue d'un pied

Le fichier source au format OpenSCAD des pieds de Bleuette est disponible, comme tout le reste de Bleuette sur GitHub / Bleuette.

Le cerveau

J'ai subi beaucoup de soucis avec la carte Arduino, notamment des problèmes de programmation, m'obligeant à recommencer la phase 3-4 fois de suite des fois...
Tous ces ennuis m'ont conduit à radicalement changer ma manière de développer avec Arduino, notamment en utilisant Ino, un outils en ligne de commande pour compiler, programmer, etc, bref, un remplaçant du mal aimé environnement par défaut d'Arduino.

Les problèmes de liaison avec la carte Leonardo m'ont également conduit à une solution radicale, j'ai embarqué un Raspberry Pi dans Bleuette auquel est relié la carte Leonardo, ainsi, c'est le Raspberry Pi qui programme la carte Arduino, ça complique un peu mais au moins, je suis moins gêné...

À force d'utiliser ce système, ce qui devait arriver arriva et j'ai donc décidé de créer une carte fille pour le Raspberry Pi qui permettra de piloter Bleuette directement avec cette dernière.
Bien entendu, je ne laisse pas tomber pour autant le dèveloppement sur Arduino, disons que celui ci sera la version simplifiée.

Bleuette embarquant un Raspberry Pi :
Bleuette embarquant un Raspberry Pi

D'ici peu, je publierai un article expliquant toutes les caractéristiques de la carte d'extension pour Raspberry Pi.

Mar
25

Des nouvelles de Bleuette

arduino, Bleuette, diy, hexapod, hexapode, planet, Raspberry, RaspberryPi, Robot, Robotique Comments Off on Des nouvelles de Bleuette 

Point presse

Tout d'abord, un point people, l'information du développement de Bleuette à plutôt bien circulée et Bleuette s'est retrouvée sur plusieurs sites importants :

La vidéo sur Vimeo à été vue plus de 6000 fois.

Plutôt plaisant de voir que ça intéresse du monde mais j'attends avec grande impatience le moment ou un autre Bleuette pointera le bout de son nez en PLA... ;)

Évolutions

Nouvelle carte fille

La shield Bleuette permet le pilotage des servos et le contrôle de la tension / courant consommé par les servos, pour pouvoir ajouter des capteurs multiples, il est tout à fait possible d'utiliser les broches libres des ports de l'Arduino mais il n'y en a pas assez pour tous les capteurs voulus sur Bleuette, du coup, le besoin d'une nouvelle carte d'extension s'est fait sentir et voici ce qu'elle permet :

  • 8 entrées supplémentaires multiplexées utilisant que 4 entrées / sorties (3 d'adressage et une sortie)
  • Connection pour une carte GY-27 contenant un accéléromètre et un compas
  • Un module Bluetooth JY-MCU
  • Une connection pour une guirlande de led RGB à base de LPD8806
  • Un mosfet pour pouvoir piloter un élément de puissance (je ne sais pas vraiment quoi pour le moment...)

Voici le schéma de principe et le PCB associé (cliquez dessus pour agrandir) :
Schéma de principe de la carte d'extension de Bleuette PCB de la carte d'extension de Bleuette

Le schéma de principe au format est Eagle se trouve par ici : sensor.sch et le PCB : sensor.brd

Comme vous pouvez le voir, le PCB n'est pas dense du tout, du coup, il est simple à réaliser avec des moyens modestes.

Mécanique

Pas de grande nouveauté pour la partie mécanique sauf pour les pieds, ces derniers ont été imprimés en PLA Flex permettant d'avoir un peu de souplesse et trempé dans du PlastiDip afin d'avoir un meilleur grip en plus d'un super rendu !

Avant trempage dans le PlastiDip et après :
Les pieds de Bleuette

Tous les éléments d'un pied de Bleuette, on aperçoit l'interrupteur poussoir, le piston et le cylindre et le pied recouvert de PlastiDip :
L'ensemble des pièces constituant un pied de Bleuette

Le tout assemblé :
Vue d'un pied

Le fichier source au format OpenSCAD des pieds de Bleuette est disponible, comme tout le reste de Bleuette sur GitHub / Bleuette.

Le cerveau

J'ai subi beaucoup de soucis avec la carte Arduino, notamment des problèmes de programmation, m'obligeant à recommencer la phase 3-4 fois de suite des fois...
Tous ces ennuis m'ont conduit à radicalement changer ma manière de développer avec Arduino, notamment en utilisant Ino, un outils en ligne de commande pour compiler, programmer, etc, bref, un remplaçant du mal aimé environnement par défaut d'Arduino.

Les problèmes de liaison avec la carte Leonardo m'ont également conduit à une solution radicale, j'ai embarqué un Raspberry Pi dans Bleuette auquel est relié la carte Leonardo, ainsi, c'est le Raspberry Pi qui programme la carte Arduino, ça complique un peu mais au moins, je suis moins gêné...

À force d'utiliser ce système, ce qui devait arriver arriva et j'ai donc décidé de créer une carte fille pour le Raspberry Pi qui permettra de piloter Bleuette directement avec cette dernière.
Bien entendu, je ne laisse pas tomber pour autant le dèveloppement sur Arduino, disons que celui ci sera la version simplifiée.

Bleuette embarquant un Raspberry Pi :
Bleuette embarquant un Raspberry Pi

D'ici peu, je publierai un article expliquant toutes les caractéristiques de la carte d'extension pour Raspberry Pi.


  • Newsletter

    Sign up for the PlanetArduino Newsletter, which delivers the most popular articles via e-mail to your inbox every week. Just fill in the information below and submit.

  • Like Us on Facebook