Posts | Comments

Planet Arduino

Archive for the ‘home entertainment hacks’ Category

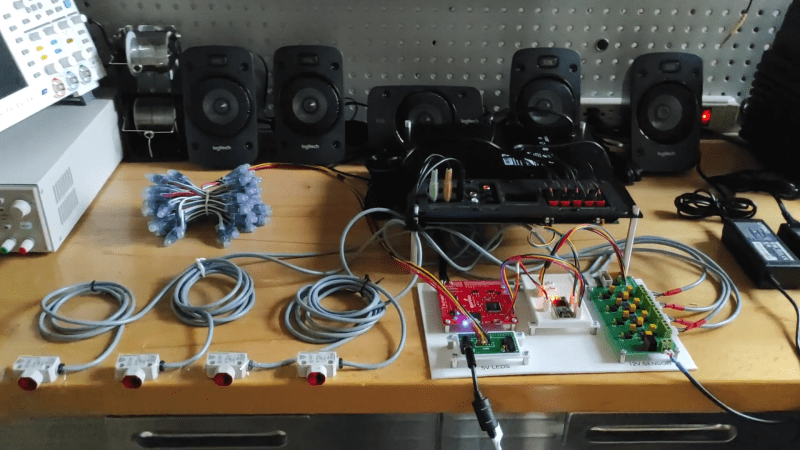
The Logitech Z906 is a well-rounded 5.1 surround sound system. It’s capable of putting out 1000W in peak power, and can decode Dolby Digital and DTS soundtracks as you’d expect. It’s intended to be used as the heart of a home cinema system and used with a central command console. However, [zarpli] figured out the device’s serial secrets and can now run the device in a standalone manner.

As it turns out, the Z906 uses a main control console that speaks to the rest of the hardware over a DE15 connector (also known as the DB-15). [zarpli] realized that the hardware could instead be commanded by just about any device with a serial port. Thus, a library was whipped up that can be readily used with an Arduino to control all the major functions of the Z906. Everything from volume levels to effect modes and channel assignments can be commanded by microcontroller. As a finale, [zarpli] shows off the hardware playing a multi-channel composition without the console connected, with his own hardware running the show instead.

If you’ve got a Logitech Z906 or similar unit that you wish to automate, you might find this work useful. It’s also a good inspiration for anyone contemplating hacking away at the console ports on other hardware. Video after the break.

Amazon might not be happy about it, but at least part of the success of their Fire TV Stick was due to the large hacking and modification scene that cropped up around the Android-powered device. A quick search on YouTube for “Fire Stick Hack” will bring up a seemingly endless array of videos, some with millions of views, which will show viewers how to install unofficial software on the little media dongle. Now it looks like their latest media device, the Fire TV Cube, is starting to attract the same kind of attention.

The team at [Exploitee.rs] has recently taken the wraps off their research which shows the new Fire TV Cube can be rooted with nothing more than an Arduino and an HDMI cable you’re willing to cut apart. Of course, it’s a bit more complicated than just that, but between the video they’ve provided and their WiKi, it looks like all the information is out there for anyone who wants to crack open their own Cube. Just don’t be surprised if it puts you on the Amazon Naughty List.

The process starts by putting the device’s Amlogic S905Z into Device Firmware Upgrade (DFU) mode, which is done by sending the string “boot@USB” to the board over the HDMI port’s I2C interface. That’s where the HDMI cable comes in: you can cut into one and wire it right up to your Arduino and run the sketch [Exploitee.rs] has provided to send the appropriate command. Of course, if you want to get fancy, you could use an HDMI breakout board instead.

With the board in DFU mode in you gain read and write access to the device’s eMMC flash, but that doesn’t exactly get you in because there’s still secure boot to contend with. But as these things tend to go, the team was able to identify a second exploit which could be used in conjunction with DFU mode to trick the device into disabling signature verification. Now with the ability to run unsigned code on the Fire TV Cube, [Exploitee.rs] implemented fastboot to make it easier to flash their custom rooted firmware images to the hardware.

As with the Fire TV Stick before it, make sure you understand the risks involved when you switch off a device’s security features. They’re often there to protect the end user as much as the manufacturer.

We live in a world in which nearly any kind of gadget or tool you can imagine is just a few clicks away. In many respects, this has helped fuel the maker culture over the last decade or so; now that people aren’t limited to the hardware that’s available locally, they’re able to create bigger and better things than ever before. But it can also have a detrimental effect. One has to question, for instance, why they should go through the trouble of building something themselves when they could buy it, often for less than the cost of the individual components.

The critic could argue that many of the projects that grace the pages of Hackaday could be supplanted with commercially available counterparts. We don’t deny it. But the difference between buying a turn-key product and building an alternative yourself is that you can make it exactly how you want it. That is precisely why [Sam Izdat] created this truly one of a kind microphone preamplifier. Could he have bought one online for cheaper? Probably. Could he have saved himself an immense amount of time and effort? Undoubtedly. Do we care? Not in the slightest.

The amplifier is based on the Texas Instruments INA217 chip, with an Arduino Nano and 128×64 OLED display providing the visualization. [Sam] was able to find a bare PCB for a typical INA217 implementation on eBay for a few bucks (see what we mean?), which helped get him started and allowed him to spend more time on the software side of things. His visualization code offers a number of interesting display modes, uses Fast Hartley Transforms, and very nearly maxes out the Arduino.

But perhaps no element of this build is as unique as the case. The rationale behind the design is that [Sam] wanted to compartmentalize each section of the device (power supply, amplifier, visualization) to avoid any interference. The cylindrical shapes were an issue of practicality: the compartments were constructed by using a hole saw to make wooden discs, which were then glued together and hollowed out. The case was stained and coated with polyurethane, but due to some slightly overzealous use of glue and fillers, the coloring isn’t uniform. This gives the final piece a somewhat weathered look, in sharp contrast to the decidedly high-tech looking display.

Overall, this build reminds us of the modular 3D printed amplifier we saw earlier in the year combined with these speaker-integrated Arduino VU meters.

Gesture-enabled controls mean you get to live out your fantasy of wielding force powers. It does, however, take a bit of hacking to make that possible. Directly from the team at [circuito.io] comes a hand gesture controller for Jedi mind-trick manipulation of your devices!

The star of the show here is the APDS-9960 RGB and gesture sensor, with an Arduino Pro Mini 328 doing the thinking and an IR transmitter LED putting that to good use. The Arduino Sketch is a chimera of two code examples for IR LEDs and the gesture sensor — courtesy of the always estimable Ken Shirriff, and SparkFun respectively.

Of course, you can have the output trigger different devices, but since this particular build is meant to control a TV the team had to use a separate Arduino and IR receiver to discover the codes for the commands they wanted  to use. Once they were added to the Sketch, moving your hand above the sensor in X, Y or Z-axes executes the command. Voila! — Jedi powers.

Power issues meant the team needed to implement a ‘deep sleep’ mode that sees the Arduino dosing until a gesture is detected, preserving the 3.7V LiPo 1000mAh battery life. A cool optional add-on they threw in is a tilt switch which also puts the Arduino in sleep mode when the box is in any orientation but up!

How often is it that you can hack your way to having sci-fi powers? More often than you might think.

[LittleTern] — annoyed by repetitive advertisements — wanted the ability to mute their Satellite Box for the duration of every commercial break. Attempts to crack their Satellite Box’s IR protocol went nowhere, so they thought — why not simply mute the TV?

Briefly toying with the idea of a separate remote for the function, [LittleTern] discarded that option as quickly as one tends to lose an additional remote. Instead, they’re using the spare RGYB buttons on their Sony Bravia remote — cutting down on total remotes while still controlling the IR muting system. Each of the four coloured buttons normally don’t do much, so they’re set do different mute length timers — customized for the channel or time of day. The system that sends the code to the TV is an Arduino Pro Mini controlling an IR LED and receiver, with a status LED set to glow according to which button was pressed.

With the helpful documentation from [Ken Shirriff]’s research into IR remotes — yes, that [Ken Schirriff] — [LittleTern] had the needed codes for their TV in hand and a programmed and ready Arduino. They were able to 3D print a project box, attach it to their TV near its IR receiver, and power it off its USB! Bonus!

[LittleTern] has provided their code in their blog post. There’s a little timing tinkering that needs to be done to ensure it works smoothly with a given setup, but otherwise, gone are the days of fumbling for the remote as your program resumes!

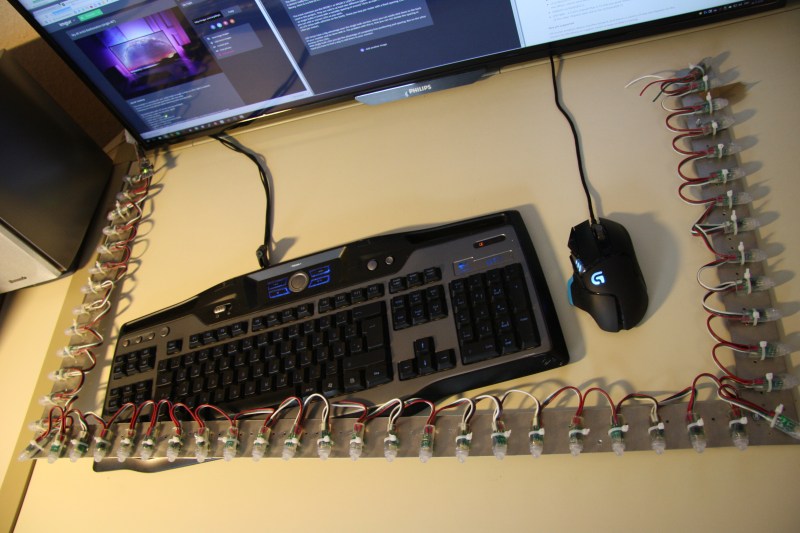
A proper battlestation — or more colloquially, computer desk — setup can sometimes use a bit of technical flair to show off your skills. [fightforlife2] has shared their DIY ambilight monitor backlighting that flows through different colours which mimic what is displayed on the screen.

[fightforlife2]’s setup uses fifty RGB LEDs with individual controllers that support the FastLED library, regulated by an Arduino Nano clone — although any will suffice. The power requirement for the display was a bit trickier, ultimately requiring 3 amperes at 5V; an external power brick can do the trick, but [fightforlife2] also suggests the cavalier solution of using your computer power supply’s 5V line — adding the convenience of shutting off the ambilight display when you shut down your PC!

Ambilight Frame Setup

Connecting the LEDs to the Arduino is simply done, followed by adding the FastLED library and installing and configuring AmbiBox on your PC. For gaming, the software only works with borderless windows for games, but that puts a 5-10% tax on your processor. Be forewarned! — the ambilighing can be distracting when gaming for the first week or so.

If you want to carry this cool idea over into your other pursuits, you can — for example — set up a similar display around your piano.

[via /r/DIY]


Filed under: Arduino Hacks, home entertainment hacks, led hacks

Chromecasts are fantastic little products, they’re basically little HDMI sticks you can plug into any monitor or TV, and then stream content using your phone or computer as the controller. They are powered by a micro USB port in the back, and if you’re lucky, your TV has a port you can suck the juice off. But what if you want to turn it off while you use a different input on your TV? You might have to build a power switch.

Now in all honesty, the Chromecast gets hot but the amount of power it draws when not in use is still pretty negligible compared to the draw of your TV. Every watt counts, and [Ilias] took this as an opportunity to refine his skills and combine a system using an Arduino, Bluetooth, and Android to create a robust power switch solution for the Chromecast.

The setup is rather simple. An HC-05 Bluetooth module is connected to an Attiny85, with some transistors to control a 5V power output. The Arduino takes care of a bluetooth connection and uses a serial input to control the transistor output. Finally, this is all controlled by a Tasker plugin on the Android phone, which sends serial messages via Bluetooth.

All the information you’ll need to make one yourself is available at [Ilias’] GitHub repository. For more information on the Chromecast, why not check out our review from almost three years ago — it’s getting old!


Filed under: Android Hacks, Arduino Hacks, home entertainment hacks

If you’ve built yourself a home theater PC, one of your highest priorities is probably coming up with a convenient control solution. The easiest way to do this is to simply use something like a wireless keyboard and mouse. But, that’s not very conducive to an enjoyable home theater experience, and it feels pretty clunky. However, if you’ve got the right components lying around, [Sebastian Goscik] has instructions and an Arduino sketch that will let you control your HTPC with any IR remote control.

There are a number of ways you could control your HTPC, and we’ve featured more than one build specifically for controlling XBMC over the years. Unfortunately, most of those methods require that you spend your hard earned money (which is better spent on popcorn). [Sebastian’s] setup can be replicated with things you probably have on hand: an Arduino, an IR remote, and a scavenged IR receiver. The IR receiver can be found in many devices, like old stereos or TVs that themselves were controlled via an IR remote.

It starts with an Arduino Sketch that lets you can see on the serial monitor what code is being generated by the button presses on your remote. These are then scripted to perform any task or function you like when those buttons are pushed. The most obvious use here is simple directional control for selecting your movies, but much more complex tasks are possible. Maybe someone can program a T9 script to type using the number buttons on most remotes?


Filed under: Arduino Hacks, home entertainment hacks

[Hari Wiguna’s] father is ninety years young. He started having trouble pushing the buttons on his TV remote, so [Hari] decided to build a custom remote that just has the buttons his dad needs. Oh, and the buttons are big.

There are few interesting things about this project. [Hari] wanted to maximize battery life, so he went through a good bit of effort to keep the processor asleep and minimize power consumption. The remote is programmable, but [Hari] didn’t have access to his dad’s remotes. His answer was elegant. He used his Android phone to mimic the required remotes and provided a way for the remote to learn from another remote (in this case, the phone).

[Hari] made a series of videos that cover the project from the breadboard to a good-looking plastic case with laser cut overlays. It is a well-thought out and documented Arduino project and a good model for what you can do to make life more accessible to anyone with special needs.

[Hari’s] code is available on Github. We are sure his dad will be happy with the result. It is sometimes easier to think of what we want (like a cool and complex touch screen remote) instead of what the end user will appreciate, but [Hari] nailed it, we think. Of course, back in the day, your remote only had seven buttons, anyway.


Filed under: Arduino Hacks, home entertainment hacks


  • Newsletter

    Sign up for the PlanetArduino Newsletter, which delivers the most popular articles via e-mail to your inbox every week. Just fill in the information below and submit.

  • Like Us on Facebook