Posts | Comments

Planet Arduino

Archive for the ‘music’ Category

We all know that one neighbor who always goes the extra mile when decorating for the holidays, and after taking inspiration from these large displays of light and sound, Marcelo Arredondo, Andres Sabas, and Andrea ZGuz of the Electronic Cats crew decided to build a smaller version for their Christmas tree using the Arduino Opta micro PLC.

The team chose to create their music-synchronized light show with the Opta because of its reliability and bank of four built-in relays that could be utilized to switch specific light strings on or off. Lining up and triggering certain lighting effects for the music was all handled through the open-source Vixen Lights software. In here, the Opta was configured as a quad-channel controller that receives its commands over a GPIO connection sent by an Arduino UNO mediator. The PLC is programmed visually to read a programmable input pin for each relay and then leverage a comparator to toggle the relay when the signal is high.

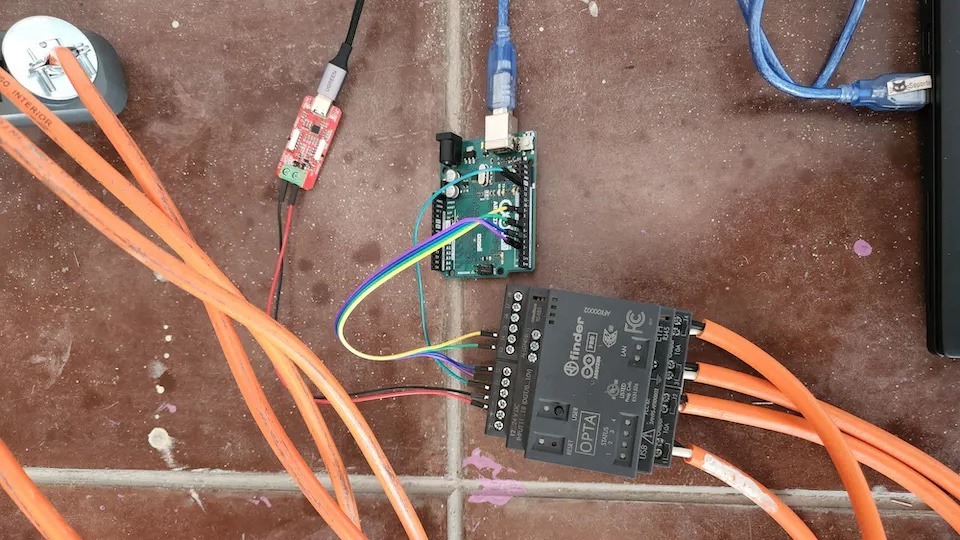
Back in the Vixen Light software, the team imported their favorite Christmas song and began the process of charting it. First, they generated markers over the audio waveform to signify the beats and overall tempo. Next, various effects were added to the timeline which trigger the lighting channels in a particular sequence. Lastly, the UNO was flashed with a sketch that allowed it to read the incoming Serial data from Vixen over USB and then toggle its digital outputs for the Opta to register.

More information about this project can be found in its write-up here on Hackster.io.

The post Syncing tunes to Christmas tree lights with the Arduino Opta appeared first on Arduino Blog.

Arduino is proud to support Soundmit, the synthesizers and electronic instruments expo held in Turin – right from our Italian headquarters, at Toolbox co-working space, on November 11th-12th, 2023. 

The event’s 13th edition will offer two days of live music, instrument expos, showcases, workshops, and masterclasses with international guests: a must-attend summit for industry professionals and anyone interested in the most innovative gear and current trends in music production, instruments, synths, and more. 

In addition to consolidating its role as a major meetup for electronic music pros and fans, as a signatory to Keychange.eu Soundmit has committed to help create a more inclusive music industry for present and future generations. 

Arduino will be at Soundmit 13 with a special booth, presenting a variety of music-inspired demos – including an audio solution based on Arduino Pro’s Portenta X8: come visit to hear nine cores unleash their power in this high-performance application. 

So, find out more about Soundmit, get your tickets, and come say hello! 

The post Ready to make waves at Soundmit 2023! appeared first on Arduino Blog.

The recorder is a type of flute that is very popular in elementary schools because the instrument is so simple and inexpensive. If you were born in the last four decades and grew up in a western country, then there is a very good chance that you were required to learn how to play some basic melodies on a recorder. But like all instruments, the recorder is difficult to play well. So Luis Marx built a robotic recorder that could do the tricky parts.

Marx still has to blow into the mouthpiece to play this robotic recorder, but it takes care of the rest. A standard recorder has eight holes: seven finger holes on top and one thumb hole on bottom. The player’s spare thumb and finger help them stabilize the instrument. This contraption uses eight solenoids to close or open the holes according a pre-programmed sequence. It doesn’t appear that Marx integrated MIDI capability, but that would make it much easier to play new songs.

The current implementation has the sequence of notes programmed into an Arduino sketch. That sketch runs on an Arduino Nano board, which controls the solenoids through eight MOSFETs. Power comes from a 650mAh LiPo battery and everything attaches to the recorder via a 3D-printed frame. As you can hear in the video, this works quite well. Foam earplugs on the solenoid rams ensure an airtight seal on the finger holes, resulting in clean sound as long as Marx’s blowing technique is good.

The post Reliving elementary school with a robotic recorder appeared first on Arduino Blog.

Arduino Lo-Fi Orchestra closeup thumbnail

Hardware projects often fall into three categories: Those that flash lights, those that make sounds and those that move. This virtuoso performance by [Kevin]’s “Lo-Fi Orchestra” manages all three, whilst doing an excellent job of reproducing the 1973 musical classic Tubular Bells by Mike Oldfield.

Producing decent polyphonic sounds of different timbres simultaneously is a challenge for simple microcontroller boards like Arduinos, so [Kevin] has embraced the “More is more” philosophy and split up the job of sound generation in much the same way as a traditional orchestra might. Altogether, 11 Arduino Nanos, 6 Arduino Unos, an Arduino Pro Mini, an Adafruit Feather 32u4, and a Raspberry Pi running MT32-Pi make up this electronic ensemble.

Arduino servo drumkit
Arduino Servo & Relay Drumkit

The servo & relay drumkit is a particular highlight, providing some physical sounds to go along with the otherwise solid-state generation.

The whole project is “conducted” over MIDI and the flashing sequencer in the middle gives a visual indication of the music that is almost hypnotic. The performance is split into two videos (after the break), and will be familiar to fans of 70’s music and classic horror movies alike. We’re astonished how accurately [Kevin] has captured the mood of the original recording.

If this all looks slightly familiar, it may be because we have covered the Lo-Fi Orchestra before, when it entertained us with a rousing rendition of Gustav Holst’s Planets Suite. If you’re more interested in real Tubular Bells than synthesized ones, then check out this MIDI-controlled set from 2013.

[poprhythm]’s Touch Tone MIDI Phone is a fantastic conversion of an old touch tone phone into a MIDI instrument complete with intact microphone, but this project isn’t just about showing off the result. [poprhythm] details everything about how he interfaced to the keypad, how he used that with an Arduino to create a working MIDI interface, and exactly how he decided — musically speaking — what each button should do. The LEDs on the phone are even repurposed to blink happily depending on what is going on, which is a nice touch.

Of course, it doesn’t end there. [poprhythm] also makes use of the microphone in the phone’s handset. Since the phone is now a MIDI instrument with both a microphone and note inputs, it’s possible to use them together as the inputs to vocoder software, which he demonstrates by covering Around the World by Daft Punk (video).

We love how [poprhythm] explains how he interfaced to everything because hardware work is all about such details, and finding the right resources. Here’s the GitHub repository for the Arduino code and a few links to other resources.

We have seen MIDI phone projects before, and each one is always unique in its own way: here’s a different approach to converting a keypad phone to MIDI, and this rotary pulse-dial phone went in a completely different direction with the phone itself completely unmodified, using only external interfacing.

You can admire [poprhythm]’s Touch Tone MIDI Phone in action in the short videos embedded below, with each one showing off a different aspect of the build. It’s great work!

Drums are an exciting instrument to learn to play, but often prohibitive if there are housemates or close neighbors involved. For that problem there are still electronic drums which can be played much more quietly, but then the problem becomes one of price. To solve at least part of that one, [Jeremy] turned to using an Arduino to build a drum module on his own, but he still had to solve yet a third problem: how to make the Arduino fast enough for the drums to sound natural.

Playing music in real life requires precise timing, so the choice of C++ as a language poses some problems as it’s not typically as fast as lower-level languages. It is much easier to work with though, and [Jeremy] explains this in great detail over a series of blog posts detailing his drum kit’s design. Some of the solutions to the software timing are made up for with the hardware on the specific Arduino he chose to use, including an even system, a speedy EEPROM, hardware timers, and an ADC that can sample at 150k samples per second.

With that being said, the hardware isn’t the only thing standing out on this build. [Jeremy] has released the source code on his GitHub page for those curious about the build, and is planning on releasing several more blog posts about the drum kit build in the near future as well. This isn’t the only path to electronic drums, though, as we’ve seen with this build which converts an analog drumset into a digital one.

It’s an old misconception that digital musicians just use a mouse and keyboard for their art. This is often far from the truth, as many computer music artists have a wide variety of keyboards/synths, MIDI controllers, and “analog” instruments that all get used in their creative process. But what if one of those instruments was just a mouse?

Well, that must have been what was going through [kzra]’s mind when he turned an old ps/2 roller ball mouse into an electronic instrument. Born out of a love for music and a hate for waste, the mouse is a fully functional MIDI controller. Note pitch is mapped to the x-coordinate of the pointer, and volume (known as velocity, in MIDI-speak) is mapped to the y-coordinate. The scroll wheel can be used as a mod wheel, user-configurable but most often used to vary the note’s pitch. The mouse buttons are used to play notes, and can behave slightly differently depending on the mode the instrument is set to.

Not satisfied with simply outputting MIDI notes, [kzra] also designed an intuitive user interface to go along with the mouse. A nice little OLED displays the mode, volume, note, and mouse coordinates, and an 8×8 LED matrix also indicates the note and volume. It’s a fantastic and versatile little instrument, and you’ve gotta check out the video after the break to see it for yourself. We’ve seen some awesome retro-tech MIDI controllers before, and this fits right in.

Thanks to [midierror] for the tip!

In the world of music, being able to keep time accurately is vital when playing a piece, as even small deviations in timing can cause the notes played to sound “off.” Ordinarily a device called a metronome is used to provide consistent ticks that the musician can use, but most are not that visually interesting. This is what inspired ChristineNZ over on Instructables to create her own metronome that uses an Arduino Uno to both show the beat and produce a small noise. 

ChristineNZ’s Piano Metronome enables users to select both the rate (tempo) of the beat and its volume by turning one of two rotary encoders. Rather than having some clunky interface, this project has a large 20×4 I2C LCD on the front that displays the current time via an RTC, the sound’s amplitude, and even subdivisions. The top of the enclosure also holds four RGB LEDs that visually indicate the beat and subdivision if present.

One other cool feature of the Piano Metronome is its ability to show various tempo markings, which are the names given to the beats-per-minute value. To observe ChristineNZ’s project in action, check out the video below or visit its write-up to see how it was built along with the accompanying software.

The post The Piano Metronome is key to keeping the beat appeared first on Arduino Blog.

[Attoparsec] has been building intriguing musical projects on his YouTube channel for a while and his latest is no exception. Dubbed simply as “Node Module”, it is a rack-mounted hardware-based Markov chain beat sequencer. Traditionally Markov chains are software state machines that transition between states with given probabilities, often learned from a training corpus. That same principle has been applied to hardware beat sequencing.

Each Node Module has a trigger input, four outputs each with a potentiometer, and a trigger out. [Attoparsec] has a wonderful explanation of all the different parts and theories that make up the module at the start of his video, but the basic operation is that a trigger input comes in and the potentiometers are read to determine the probabilities of each output. One is randomly selected and fired. As you can imagine, there are loops and even dead-end nodes and for some musical pieces there is a certain number of beats expected, so a clever reset signal can be sent to pull the chain back to the initial starting state at a regular interval. The results are interesting to listen to and even better to imagine all the possibilities.

The module itself is an Arduino-based custom PCB that is laid out quite cleanly. The BOM, code, and KiCad files are available on GitHub if you want to make one yourself. This isn’t the first instrument we’ve seen [Attoparsec] make, and we’re confident it won’t be the last.

Thanks [smellsofbikes] for sending this one in!

Build a smart octopus drumbot that listens, learns, and plays along with you

Read more on MAKE

The post Dr. Squiggles: An AI Rhythm Robot appeared first on Make: DIY Projects and Ideas for Makers.


  • Newsletter

    Sign up for the PlanetArduino Newsletter, which delivers the most popular articles via e-mail to your inbox every week. Just fill in the information below and submit.

  • Like Us on Facebook