Posts | Comments

Planet Arduino

Archive for the ‘synth’ Category

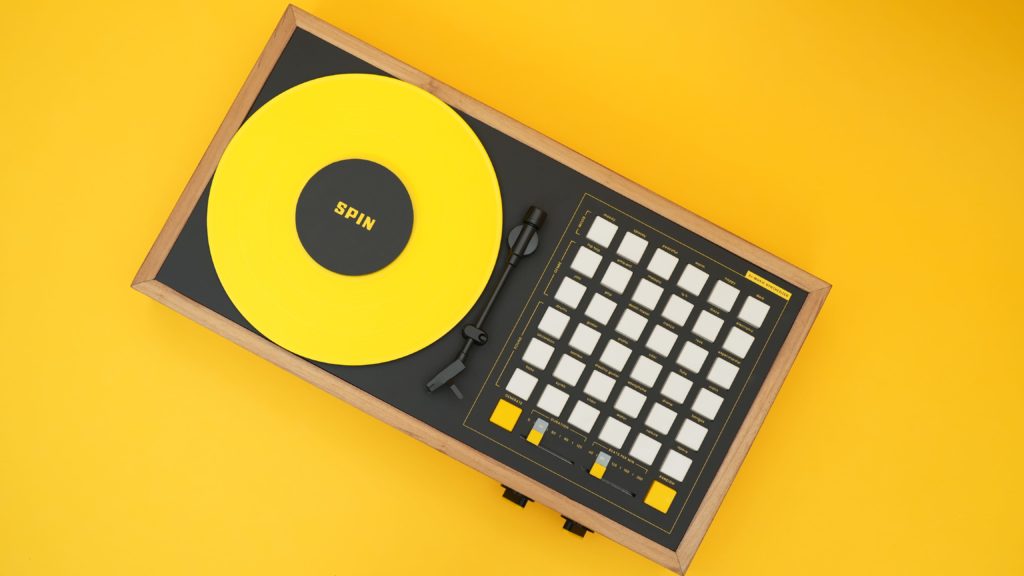
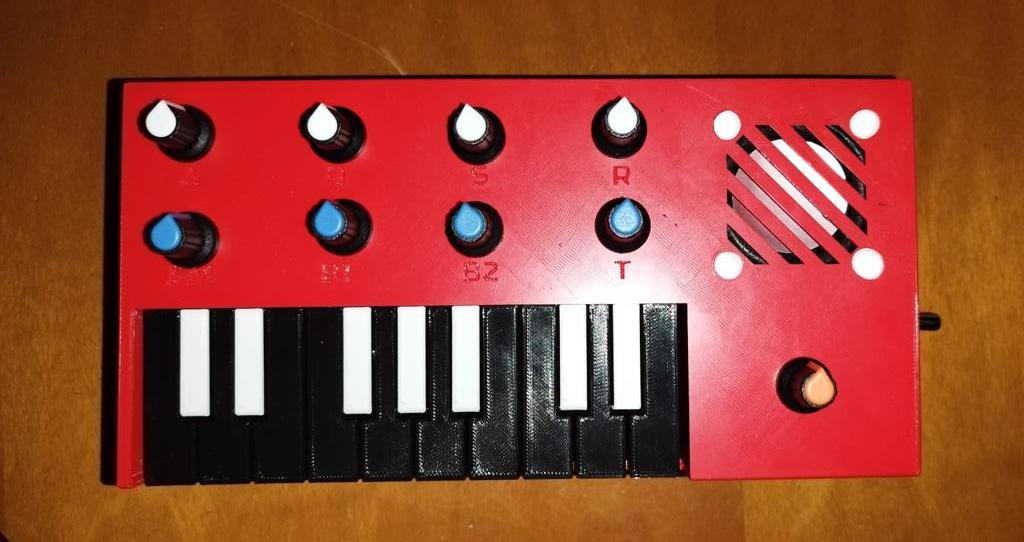
If you’re heard the pop music emanating from any recent reality TV show, you won’t be surprised to learn that AI is perfectly capable of generating tunes on demand. It won’t replace true artistry any time soon, but AI music fits all of the technical criteria. But typing a prompt is boring, which is why Arvind Sanjeev constructed this gorgeous and imaginative AI synthesizer called SPIN.

SPIN is beautiful and looks like a cross between a turntable and a drum machine. Those visual cues hint at its function. The user can press buttons on the right-side pad to define musical characteristics, which then form a prompt for a language model called MusicGen. That synthesizes music according to the selected characteristics, like “happy” and “lo-fi.” The music then starts playing and the user can control its speed and direction using the record on the turntable — even scratching like a DJ if they want.

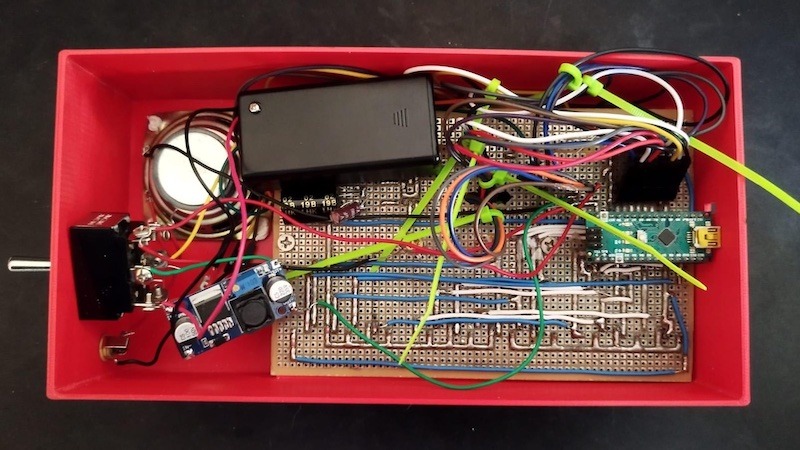
A Raspberry Pi 4 Model B runs MusicGen, but it receives inputs through an Arduino Mega 2560 connected to the buttons. There are also dials to set song duration and BPM (beats per minute), as well as control knobs.

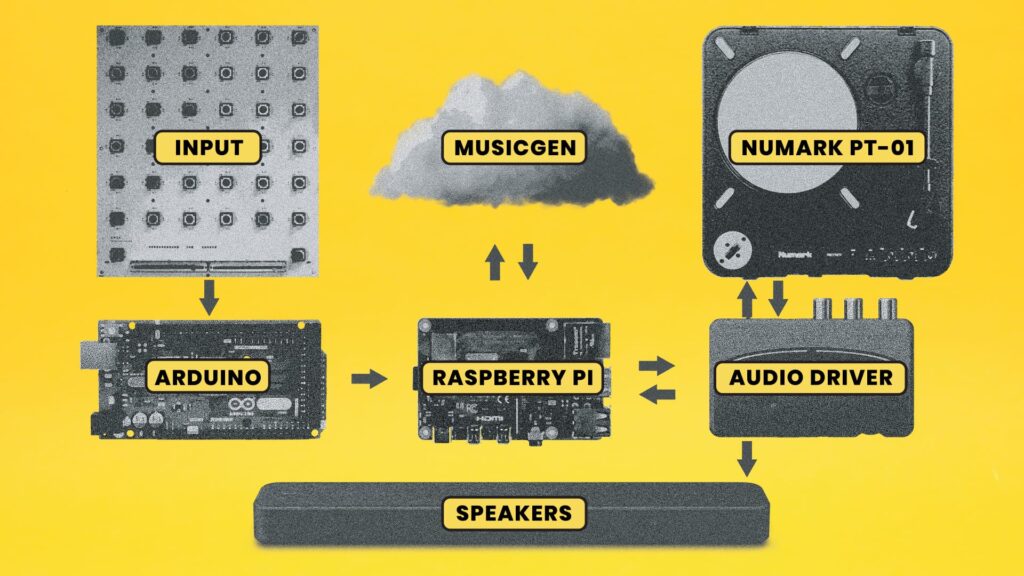
The turntable is a Numark PT-01, but the vinyl is a special dummy record that only contains a time code track. The sound from that then feeds through the audio driver back to the Raspberry Pi, where it is decoded to control the playback of the synthesized music. 

SPIN is truly stunning to look at and its functionality is quite interesting, but Sanjeev’s real motivation was to raise awareness about the ethics of AI-generated art and the original human-made art it is trained on. 

The post SPIN is a beautiful and imaginative AI synthesizer appeared first on Arduino Blog.

The Eowave Persephone was an interesting ribbon synthesizer that let musicians control frequency by moving their fingers across a long touch sensor. Ben Glover used to own one, but sold it. During shipping to the buyer, it got lost in the mail and so Glover can’t even buy it back. He regretted losing his Eowave Persephone, so he decided to create his own ribbon synthesizer called the Screech Owl.

If you could even find one, buying a used Eowave Persephone today would likely set you back at least a thousand dollars. But the Screech Owl is affordable to build, operates in the same manner, and sounds very similar. Glover is a novice maker and was able to pull of this project by outsourcing much of the work to ChatGPT and vendors on Fiverr.

One part that Glover designed himself was the custom PCB that acts as a shield for an Arduino Leonardo board. The Arduino handles the synthesis according to the input coming from the ribbon. That ribbon is actually two sensors: a SoftPot 500mm-long membrane potentiometer for position and thin film pressure sensor to measure force for aftertouch. Those components fit into a simple but attractive, laser-cut MDF enclosure.

Now Glover can relive the experience of playing the Eowave Persephone without the immense cost.

The post Unique synthesizer screeches like an owl appeared first on Arduino Blog.

Synthesizers have existed in their current form for several decades now. In essence, they generate simple waveforms that are then either added or subtracted together and modified through the use of filters, envelopes, and modulators to control pitch, volume, and several other characteristics. Due to their simplicity, many types of components can be combined to create them with a wide variety of unique characteristics.

Built by Ignacio Ríos, his take on the synthesizer incorporates an Arduino Nano along with a series of buttons, potentiometers, and an amplifier to produce sounds. It starts by taking a carrier frequency that is modulated by a secondary oscillator, similar to how FM radio functions. From here, four potentiometers modify how the carrier frequency responds to the modulated wave. Another four potentiometers change the attack, decay, sustain, and release durations, all of which are read by the Nano’s onboard ADC.

Each of the keyboard’s keys are actuated with a tactile switch that constantly gets polled for when it is either pressed or released. When pressing a key, the program updates the current note being played and each of the four channels with the computed values from the aforementioned potentiometers. Finally, the PWM pin’s pulse width is updated to reflect the new value.

After 3D printing a shell, the 17 keys for the keyboard, and a few dials, Ignacio assembled the synthesizer together and was able to successfully play a series of varied notes. To see this in action, you can watch Ríos’ YouTube video below or check out his write-up on Instructables.

The post This Arduino Nano-based synthesizer can produce a wide range of intriguing sounds appeared first on Arduino Blog.

Small synth held in two hands

We’ve always been delighted with the thoughtful and detailed write-ups that accompany each of [Tommy]’s synth products, and the background of his newest instrument, the Scout, is no exception. The Scout is specifically designed to be beginner-friendly, hackable, and uses 3D printed parts and components as much as possible. But there is much more to effectively using 3D printing as a production method than simply churning out parts. Everything needed to be carefully designed and tested, including the 3D printed battery holder, which we happen to think is a great idea.

3d printed battery holder, showing inserted spring contacts
3D printed battery holder, with spring contacts inserted by hand.

[Tommy] also spends some time explaining how he decided which features and design elements to include and which to leave out, contrasting the Scout with his POLY555 synth. Since the Scout is designed to be affordable and beginner-friendly, too many features can in fact be a drawback. Component costs go up, assembly becomes less straightforward, and more complex parts means additional failure points when 3D printing.

[Tommy] opted to keep the Scout tightly focused, but since it’s entirely open-sourced with a hackable design, adding features is made as easy as can be. [Tommy] designed the PCB in KiCad and used OpenSCAD for everything else. The Scout uses the ATmega328, and can be easily modified using the Arduino IDE.

STL files can be downloaded here and all source files are on the project’s GitHub repository, which also contains detailed assembly and modification guides. Watch it in action in the video, embedded below.

A popular tool in chiptune software like LSDJ allows the user to draw a waveform and use it as the basis for a wavetable synth. It’s fun and it can produce some great bleeps and bloops. [Kevin] has created a similar tool using an Arduino and a touchscreen.

You can draw the waveform! That’s neat.

The build is based on the Arduino Uno, the humble mainstay of the Arduino line. It’s hooked up to an ILI9488 color touchscreen display, which acts as the primary user interface. Using a stylus, or presumably a finger, the user can draw directly on the screen to specify the desired waveform for the synth to produce. The Arduino reads the step-by-step amplitude values of the drawn waveform and uses them to synthesize audio according to MIDI messages received over its serial port. Audio output is via PWM, as is common in low-cost microcontroller projects.

It’s a fun build and we’re sure [Kevin] learned plenty about wavetable synthesis along the way. We’ve seen his work on other Arduino synthesis projects before, too! Video after the break.

We are no stranger to peculiar and wonderful musical instruments here at Hackaday. [James Bruton] has long been fascinated with barcode scanners as an input source for music and now has a procedural barcode-powered synth to add to his growing collection of handmade instruments. We’ve previously covered his barcode guitar, which converts a string of numbers from the PS/2 output to pitches. This meant having a large number of barcodes printed as each pitch required a separate barcode. As you can imagine, this makes for a rather unwieldy and large instrument.

Rather than looking at the textual output of the reader, [James] cracked it open and put it to the oscilloscope. Once inside, he found a good source that outputs a square wave corresponding to the black and white lines that the barcode sees. Since the barcodes [James] is using don’t have the proper start and stop codes, the barcode reader continuously scans.  Normally it would stop the laser to send the text over the USB or PS/2 connection. A simple 5v to 3.3v level shifter feeds that square wave into a Teensy board, which outputs the audio.

A video showcasing a similar technique inspired [James] with this project. The creators of that video have a huge wall of different patterns of black and white lines. [James’s] next stroke of brilliance was to have a small HDMI display to generate the barcodes on the fly. A Raspberry Pi 4 reads in various buttons via GPIO and displays the resulting barcode on the screen. A quick 3d printed shell rounds out the build nicely, keeping things small and compact. All the code and CAD files are up on GitHub.

Thanks [James Bruton] for the awesome project!

Some years ago, Emily Velasco started exploring the idea of creating a musical instrument based on a pendulum. This didn’t work out exactly the way she’d planned, but after several iterations — and inspiration from a cat toy — the device eventually turned into a sort of wobbling egg-shaped instrument, which sings as it tilts and tumbles. 

The Orb —  as seen and heard in the video below — is truly strange, reminiscent of a theremin morphed with a trendy bowl-shaped wooden speaker. 

As it’s spun, the Orb produces a sort of warbling noise, and one can position it to vary the sound by hand if they so desire. Inside lies an Arduino Nano running the Mozzi audio synthesis library, along with an accelerometer and audio amplifier board. 

This one goes out to anyone who loves music and feels it in their soul, but doesn’t necessarily understand it in their head. No instrument should stand in the way of expression, but it seems like they all do (except for maybe the kazoo).

[FrancoMolina]’s hybrid synth-MIDI controller is a shortcut between the desire to play music and actually doing it. Essentially, you press one of the buttons along Synthfonio’s neck to set the scale, and play the actual notes by pressing limit switches in the controller mounted on the body. If you’re feeling blue, you can shift to minor scales by pressing the relative minor note’s neck button at the same time as the root note, e.g. A+C=Am. Want to change octaves? Just slide the entire controller up or down for a total of three.

All of these switches are muxed to two Arduinos — an MKR1010 for USB MIDI control, and a bare ‘328 to provide the baked-in synth sounds. Power comes from a stepped-up 18650 that can be charged with an insanely cheap board from that one site. [Franco] has all the code and files available, so go have fun making music without being turned off by a bunch of theory. Push that button there to check out the demo.

If ‘portable’ means pocket-sized to you, then let this mini woodwind MIDI controller take your breath away.

Synths are a ton of fun no matter how good or bad they sound. Really, there are no bad-sounding ones, it’s just that some are more annoying to listen than others to if you’re not the one making the beep boops. [Clem] had built a tiny LDR-based synth into a watch case a few years back and took it to many a Maker Faire, where it delighted and annoyed until it ultimately broke.

Naturally, it was time to make a new version that’s more capable. Whereas the first one was Atari-punk-console-meets-light-Theremin, this one has a bunch of inputs and can be programmed on the fly to record and play back bendable tones. It’s driven by an Arduino MKR, and the inputs are managed by an impressively squash bug-wired shift register. [Clem] used beefy switches this time in the hopes that this one will last longer. We think the slide pots are a great touch, as are the candy-colored knobs printed in PMMA.

Our favorite part is that [Clem] took advantage of the random states the microcontroller pins are in when it’s first powered on. If you don’t want to program any notes, you can use the ones generated at boot and just play around with those. Be sure to check out the build video after the break.

We’ve seen our share of synths, but few as delicious-looking as KELPIE from this year’s Hackaday Prize.

Unless you’re very good, personal synths are fun for you — though often quite annoying for onlookers. After making his own wristwatch-based synth in 2016, Clem Mayer decided to build a new version that’s larger and louder than ever, and programmable via an Arduino controller.

Mayer chose the MKR WiFi 1010 here to take advantage of its LiPo charging abilities. This enables the device to be entirely self-contained in its custom housing, with a variety of switches and sliders for an interface. 

Users can program their own “tune” to be played back, or even take advantage of a random sequence generated on startup, then modify the sound as it plays live.


  • Newsletter

    Sign up for the PlanetArduino Newsletter, which delivers the most popular articles via e-mail to your inbox every week. Just fill in the information below and submit.

  • Like Us on Facebook