Posts | Comments

Planet Arduino

Archive for the ‘Robots’ Category

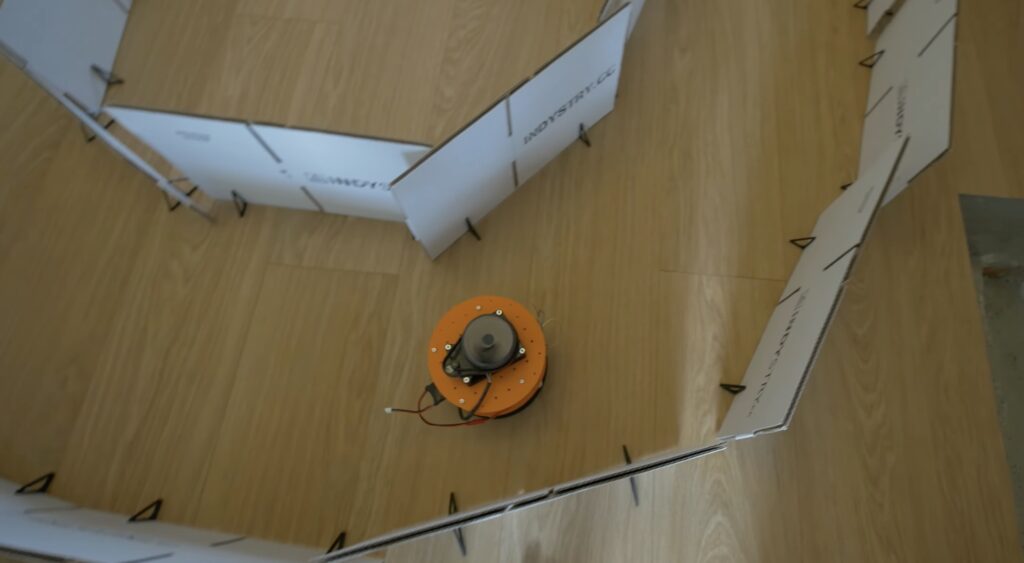
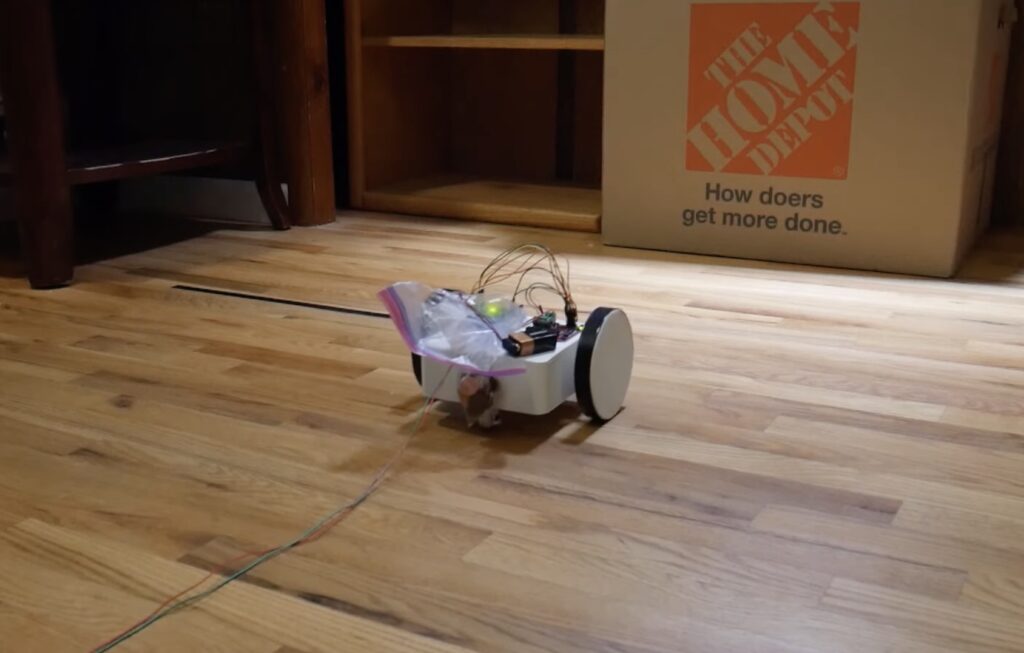
The future we were promised was supposed to include robot maids and flying cars. The future we got has Roomba vacuums and Southwest Airlines. But at least those Roomba vacuum robots work pretty well for keeping floors slightly cleaner. Sadly, they leave elevated surfaces untouched and dust-ridden. To address that limitation, Jared Dilley built this tiny DIY Roomba to clean his desk.

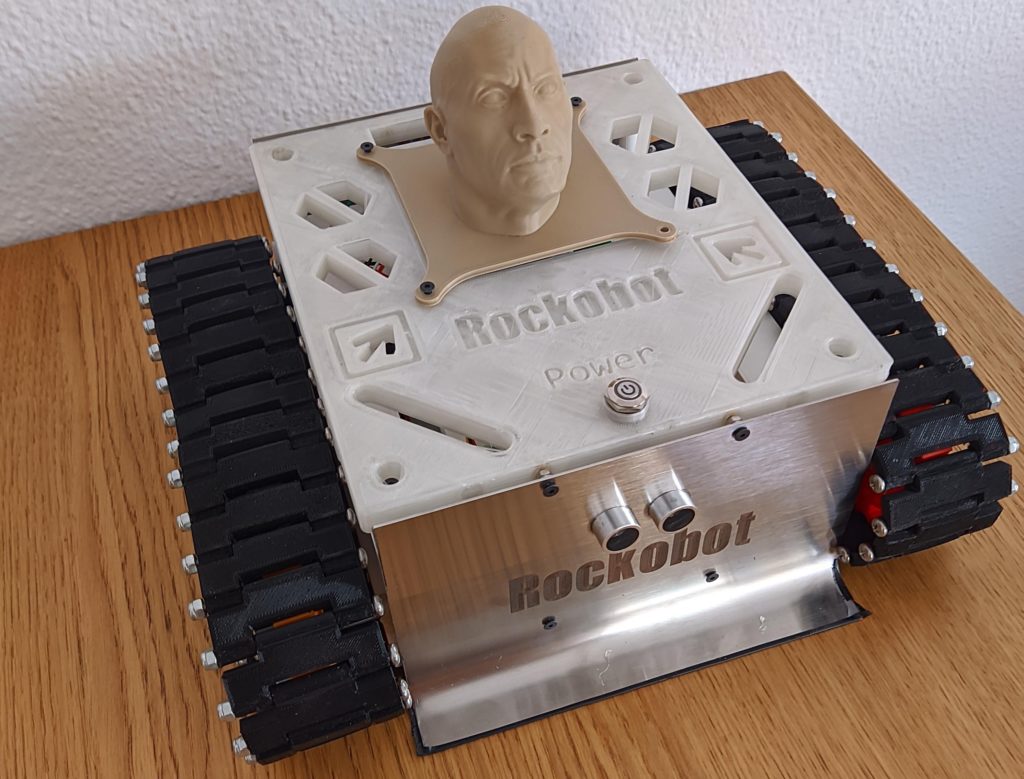
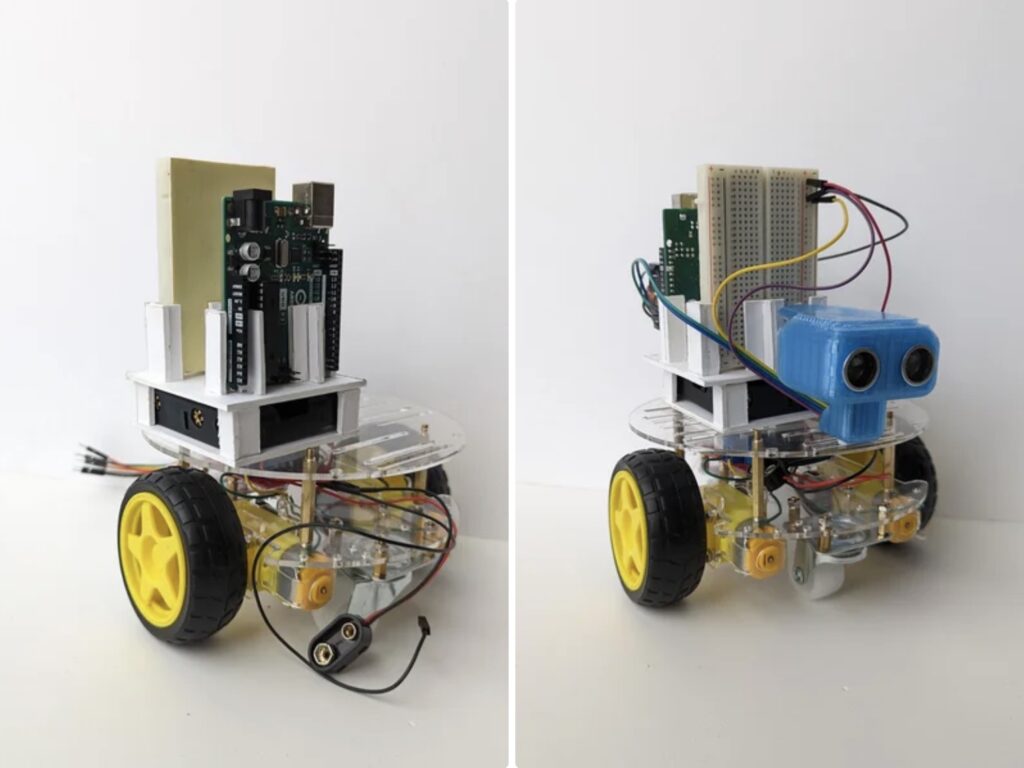
Dilley is a dog owner and so his desk ends up with quite a bit of dust and loose hair, even though his dog is large and doesn’t sit on the desk—a mystery all pet owners will find relatable. Fortunately, Dilley is an engineer and had already created a small Arduino-controlled tank robot a while back. That operated a bit like a Roomba and would drive around until its ultrasonic sensor detected an obstacle, at which point it would turn. Dilley just needed to repurpose that robot into small mean cleaning machine.

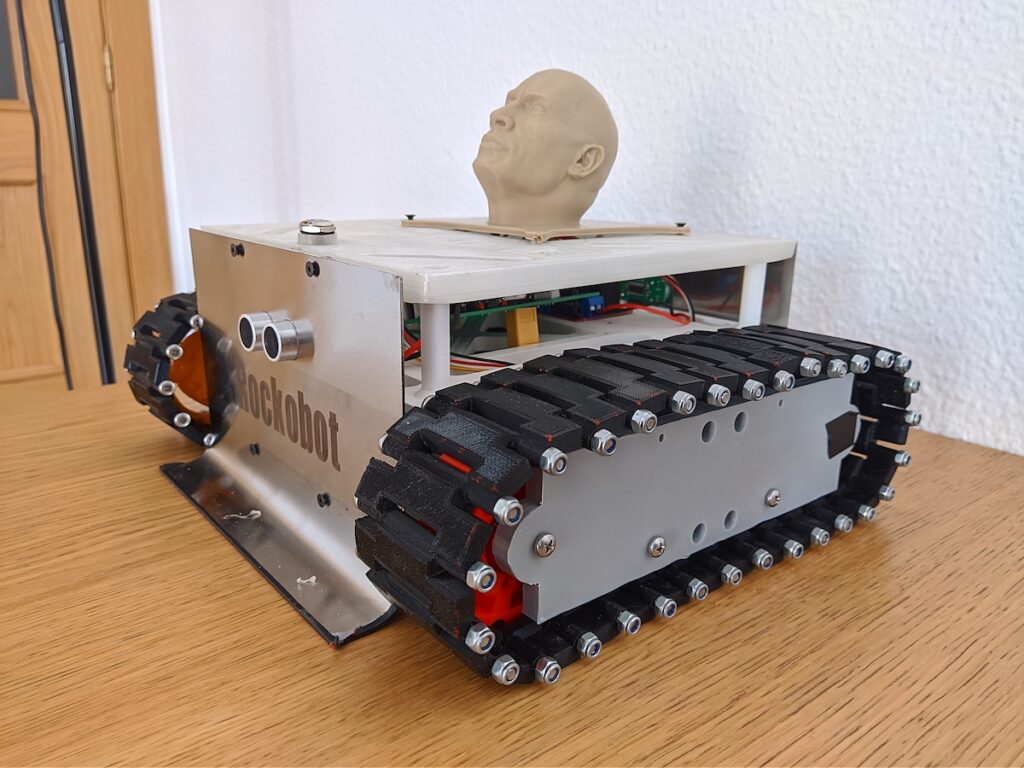
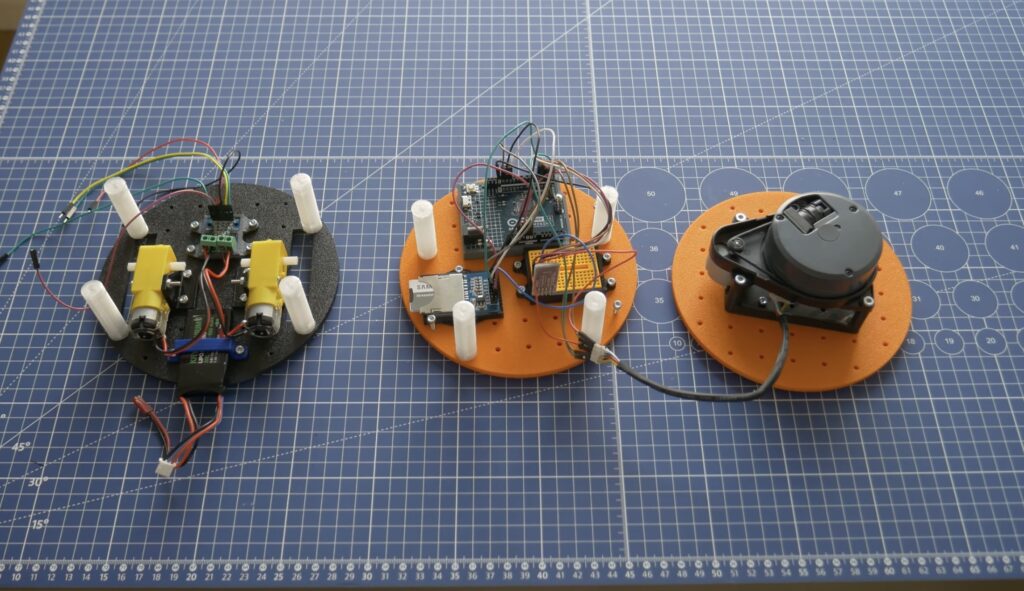
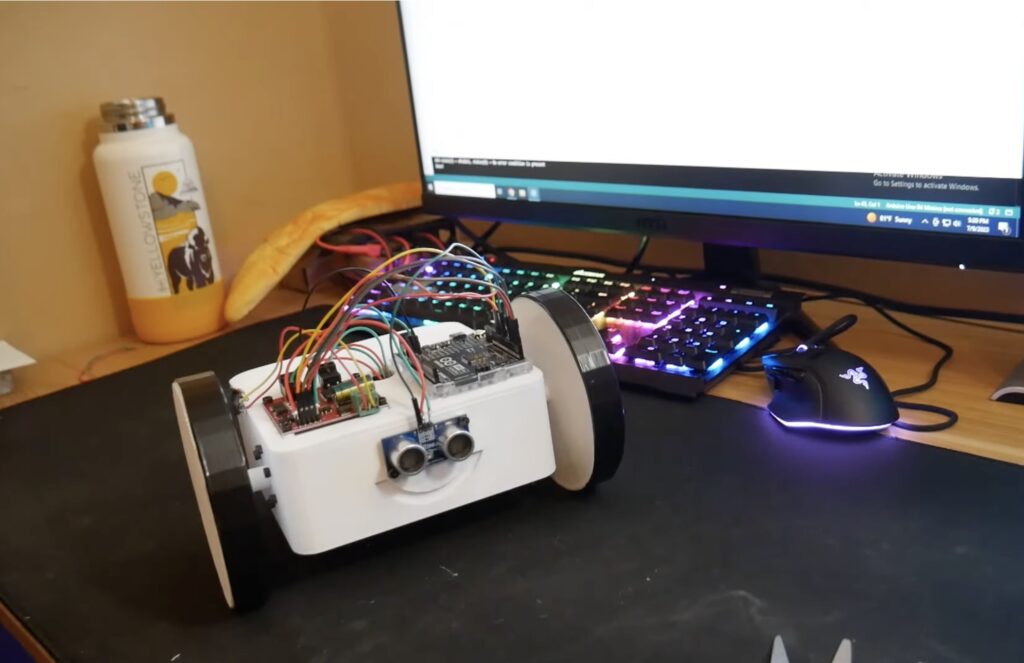
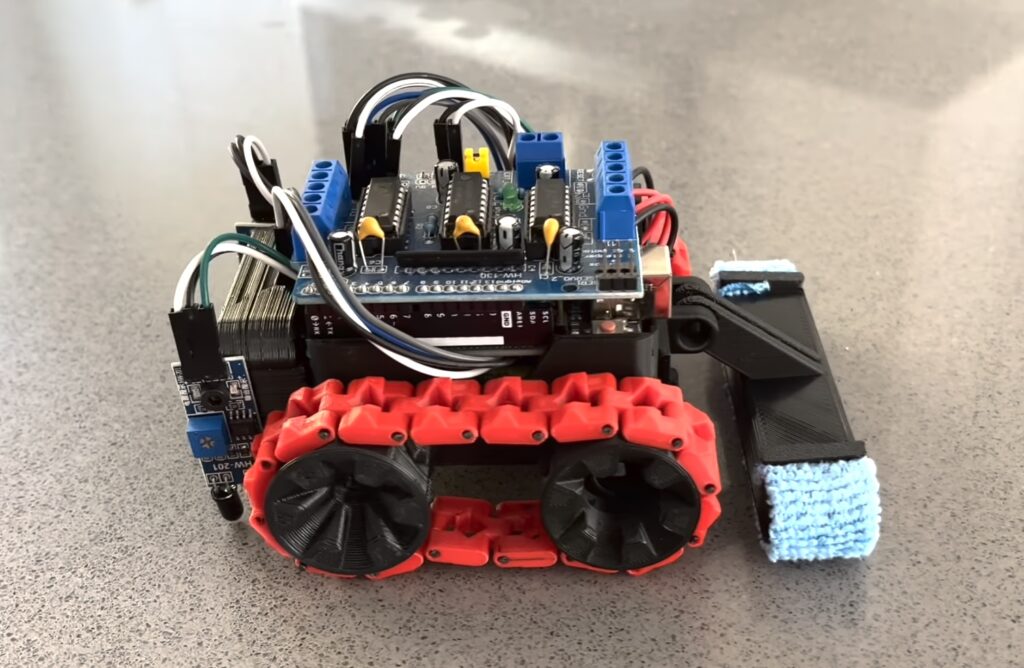
The 3D-printed robot operates under the control of an Arduino UNO Rev3 through a motor driver shield. Originally, it only had the ultrasonic sensor, which was enough to detect obstacles in front of the robot. But because its new job is to patrol desks and countertops, Dilley had to add “cliff” sensors to keep it from falling off. He chose to put an infrared sensor at each of the front two corners. The Arduino will register the lack of a reflection when one of those sensors goes past an edge, and will then change course. A Swiffer-like attachment on the back of the robot wipes up dust and dog hair.

The post Tiny DIY Roomba cleans desks and countertops appeared first on Arduino Blog.

Modern engineering is increasingly cross-disciplinary, so today’s students often take courses that would have seemed to be “outside their field” a couple of decades ago. Pelochus and their classmates at the University of Granada are studying computer engineering, but had a class that challenged them to build battlebots in order to get some hands-on learning with microcontrollers and embedded systems. To dominate the competition, they used an Arduino to create the Rockobot.

This is a play on a meme that was popular in the 3D printing community recently. For laughs, people would slap a bust of Dwayne “The Rock” Johnson — wrestler and actor extraordinaire — onto just about anything that could be 3D-printed. Pelochus and their team figured that such adornment would increase their chances of success in a battle, and we can smell what they’re cooking.

Below the studly noggin, the Rockobot is a pretty standard tank-style battlebot. It has bent sheet metal plows in the front and back, which are the primary offense and defense. An Arduino Nano board controls the motors that drive the tank treads through a custom PCB populated with L289N H-bridge drivers. Power comes from a 1550mAh 14.8V battery through a step-down converter. Ultrasonic sensors on the front and back, along with infrared sensors on the sides, help the Rockobot navigate autonomously while avoiding collisions.

The spirit of Mr. Johnson must have been inhabiting the Rockobot, because it blew through the competition and took the top position in the class tournament.

The post Can you smell what the Rockobot is cooking? appeared first on Arduino Blog.

The rapid rise of edge AI capabilities on embedded targets has proven that relatively low-resource microcontrollers are capable of some incredible things. And with the recent release of the Arduino UNO R4 with its Renesas RA4M1 processor, the ceiling has gotten even higher as YouTuber and maker Nikodem Bartnik has demonstrated with his lidar-equipped mobile robot.

Bartnik’s project started with a simple question of whether it’s possible to teach a basic robot how to navigate around obstacles using only lidar instead of the more resource-intensive computer vision techniques employed by most other platforms. The chassis and hardware, including two DC motors, an UNO R4 Minima, a Bluetooth® module, and SD card, were constructed according to Open Robotic Platform (ORP) rules so that others can easily replicate and extend its functionality. After driving through a series of courses in order to collect a point cloud from the spinning lidar sensor, Bartnik imported the data and performed a few transformations to greatly minify the classification model.

Once trained, the model was exported with help from the micromlgen Python package and loaded onto the UNO R4. The setup enables the incoming lidar data to be classified as the direction in which the robot should travel, and according to Bartnik’s experiments, this approach worked surprisingly well. Initially, there were a few issues when navigating corners and traveling through a figure eight track, but additional training data solved it and allowed the vehicle to overcome a completely novel course at maximum speed.

The post Teaching an Arduino UNO R4-powered robot to navigate obstacles autonomously appeared first on Arduino Blog.

A popular goal among roboticists is animal-like locomotion. Animals move with a fluidity and grace that is very hard to replicate artificially. That goal has led to extremely complex robots that require a multitude of motors and sensors, along with heavy processing, to walk. But even those don’t quite match biological movement. Taking a new approach, engineers from Carnegie Mellon University and the University of Illinois Urbana-Champaign created a simple bipedal robot named “Mugatu” that walks using a single actuator.

This approach is counter-intuitive, but quite sensible when we actually look at the gaits of real animals. Bipedal animals, such as humans, don’t need to engage many muscles when walking on flat surfaces. We achieve that efficiency with balance and body geometry evolved for this purpose. In a sense, a walking human is always falling forward slightly and redirecting their inertia to take a step. This robot walks in a similar manner and only needs a motor to move one leg forward relative to the other.

The team built Mugatu using 3D-printed legs connected by a servo “hip” joint. An Arduino MKR Zero board controls that motor, moving it with the precise timing necessary to achieve the “continuous falling” gait. This prototype doesn’t utilize it yet, but there is also an IMU in the left leg that could provide useful feedback data in the future. For now, the robot relies on pre-programmed movements.

While the prototype Mugatu has little utility, the research could prove to be indispensable for developing more natural gaits with fewer actuators.

Image credit: J. Kyle et al.

The post Bipedal robot walks with a single motor appeared first on Arduino Blog.

In robotics and several other disciplines, PID (proportional-integral-derivative) control is a way for systems with closed-loop feedback to adjust themselves according to sensor data without overshooting the target. Drones, for example, use PID control to remain stable without wild oscillations caused by over-correction. But implementing PID control can feel overwhelming, so Adam Soileau from element14 Presents built a simple robot for some experimentation.

This robot’s only job is to drive forward until it sees a wall, then stop at a specific distance from that wall. That isn’t hard to achieve when a robot is moving at slow pace, because the code can tell the robot to stop moving the moment it reaches the target distance. But when moving fast, the robot has to take braking acceleration into account and that is much harder to predict. PID control is perfect for this situation, because it adjusts motor output in real-time according to the incoming sensor data.

In this case, that sensor data comes from an ultrasonic rangefinder mounted to the front of the 3D-printed robot. An Arduino UNO R4 Minima board receives that data and controls the robot’s two motors through H-bridge drivers. That hardware is very straightforward so that Soileau could focus on the PID control. Tuning that is all about balancing the three constant values to get the desired performance. Soileau spent some time working on the Arduino sketch to get the PID control integrated and was eventually able to make the robot act like it should.

If you’re interested in using PID control in your next robotics project, then Soileau’s video should help you get started.

The post Experiments in PID control with an Arduino UNO R4 Minima-powered robot appeared first on Arduino Blog.

Soft robotics is a challenging field, because it comes with all of the difficulties associated with conventional robotics and adds in the complexity of designing non-rigid bodies. That isn’t a trivial thing, as most CAD software doesn’t have the ability to simulate the flexibility of the material. You also have to understand how the actuators will perform. That’s why a team of researchers from Zhejiang University and Carnegie Mellon University developed MiuraKit, which is a modular construction kit for pneumatic robots.

MiuraKit isn’t any one robot, but rather a set of tools and designs that can be combined to build robots and shape-changing interfaces. Anything made with MiuraKit will have a few things in common: pneumatic actuation, flexibility, and origami-like structures. Those structures expand or deform in a variety of different ways to suit the application. For example, one type is a simple one-dimensional expander similar to a linear actuator. Another type twists for rotary actuation. By linking different types together, roboticists can achieve complex motion.

Because these structures rely on pneumatic actuation, they need valves to control airflow. MiuraKit works with electromagnetic valves under the control of an Arduino board. That receives commands from a computer over a serial connection, but it can also work on its own with pre-programmed instructions. MiruaKit includes almost everything needed to create a robot: 3D-printable pneumatic connectors, a CAD design tool, laser cutter templates, and the pump with control system. In the coming weeks, the designers plan to give MiuraKit out to design firms and schools for evaluation.

Image credit: Cui et al.

The post MiuraKit simplifies pneumatic robot design appeared first on Arduino Blog.

Building walking robots is difficult, because they either need a lot of legs or some ability to balance through their gait. There is a reason that the robots designed by companies like Boston Dynamics are so impressive. But lots of hobbyists have made bipedal and quadrupedal robots, while largely ignoring tripedal robots. To find out if they could be practical, James Bruton created a prototype tripedal robot.

When compared to a bipedal robot, a tripedal robot is more stable when standing still. But a bipedal robot is more stable when walking. That’s because it can keep its center of gravity almost directly above the foot that contacts the ground. A tripedal robot, on the other hand, needs to attempt to balance on two legs while move the third, while the center of gravity is somewhere above the middle of a triangle formed by the three feet. That makes walking gaits difficult to achieve.

Bruton built this prototype using a 3D-printed body, legs actuated by servo motors, and an Arduino Mega 2560 for control. The three legs are arranged with radial symmetry and each leg has three joints. Bruton attempted to give the robot a gait in which it tries to momentarily balance on two legs, while lifting and swinging the third around.

But that was very inefficient and clumsy. Bruton believes that he could achieve better results by equipping the robot with an IMU. That would give it a sense of balance, which could help it remain steady on two legs through a gait. With a counterbalancing weight, that could make a big difference. But for now, Bruton is putting this experiment on the back burner.

The post Can tripedal robots actually walk? appeared first on Arduino Blog.

There are many ways to control a robot arm, with the simplest being a sequential list of rotation commands for the motors. But that method is very inefficient when the robot needs to do anything complex in the real world. A more streamlined technique lets the user move the arm as necessary, which sets a “recording” of the movements that the robot can then repeat. We tend to see that in high-end robots, but Mr Innovative built a robot arm with recording capability using very affordable materials.

This uses an input controller that is roughly the same size and shape as the robot arm, so Mr Innovative can manipulate that controller and the arm will mimic the movements like a puppet. The robot arm will also record those movements so it can repeat them later without any direct oversight. The video shows this in action with a demonstration in which the robot picks up small cylindrical objects and places them at the top of chute, where they slide back down for the process to continue indefinitely.

An Arduino Nano board powers the servo motors through a custom driver board to actuate the robot arm. It takes input from the controller, which has rotary potentiometers in the joints where the robot arm has servo motors. Therefore, the values from the potentiometers match the desired angles of the servo motors. The custom driver board has two buttons: one to activate the gripper and one to record to movements. When Mr Innovative holds down the second button, the Arduino will store all the movement commands so that it can repeat them.  

The post This cheap robot arm can follow recorded movements appeared first on Arduino Blog.

Many people find the subjectivity of art to be frustrating, but that subjectivity is what makes art interesting. Banksy’s self-shredding art piece is a great example of this. The original painting sold at auction for $1.4 million — and then it shredded itself in front of everyone. That increased its value and the now-shredded piece, dubbed “Love Is in the Bin,” sold again at auction in 2021 for a record-breaking $23 million. In a similar vein to that infamous work, this robot destroys the artwork that it produces.

“The Whimsy Artist” is a small robot rover, like the kind you’d get in an educational STEM kit. It is the type of robot that most people start with, because it is very simple. It only needs two DC motors to drive around and it can detect obstacles using an ultrasonic distance sensor and has two infrared sensors for line-following. An Arduino Uno Rev3 board controls the operation of the two motors according to the information it receives from the sensors.

That decision-making is where the artistic elements come into play. When it doesn’t detect any obstacles, the robot will run in “creative” mode. It opens a chute on a dispenser to drop a trail of fine sand while it moves in a pleasant spiral pattern. But if it sees an obstacle with the ultrasonic sensor, it gets angry. In that mode, it reverses direction and uses the IR sensors to follow the line it just created while deploying a brush to ruin its own sandy artwork.

The post The Whimsy Artist is a little robot that both creates and destroys art appeared first on Arduino Blog.

While it is easier now than ever before, getting into robotics is still daunting. In the past, aspiring roboticists were limited by budget and inaccessible technology. But today the challenge is an overwhelming abundance of different options. It is hard to know where to start, which is why Saul designed a set of easy-to-build and affordable robots called Bolt Bots.

There are currently five different Bolt Bot versions to suit different applications and you can build all of them with the same set of hardware. Once you finish one, you can repurpose the components to build another. The current designs include a large four-leg walker (V1), a tiny four-leg walker (V2), a robot arm (V3), a car (V4), and a hanging plotter that can draw (V5). They all have a shared designed language and utilize 3D-printed mechanical parts with off-the-shelf fasteners.

Every robot has an Arduino Micro board paired with an nRF24L01 radio transceiver module for control. Users can take advantage of existing RC transmitters or build a remote also designed by Saul. The other components include servo motors, an 18650 lithium battery, and miscellaneous parts likes wires and screws. Some of the Bolt Bots require different servo motors, like continuous-rotation and mini 1.8g models, but most of them are standard 9g hobby servo motors.

Because there are five Bolt Bot variations that use the same components, this is an awesome ecosystem for getting started in robotics on a budget — especially for kids and teens.

The post Bolt Bots are perfect for aspiring roboticists appeared first on Arduino Blog.


  • Newsletter

    Sign up for the PlanetArduino Newsletter, which delivers the most popular articles via e-mail to your inbox every week. Just fill in the information below and submit.

  • Like Us on Facebook