Posts | Comments

Planet Arduino

Archive for the ‘touchscreen’ Category

Waveshare 240×280 , IPS, 1.69inch Round LCD Display Module with Touch Paneel

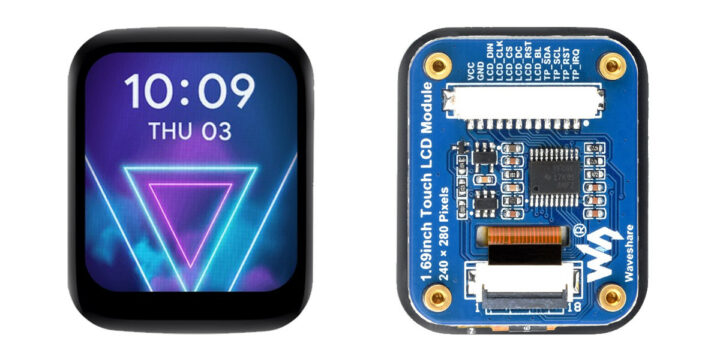
The Waveshare 1.69-inch IPS touch LCD is a 1.69-inch rounded display with 240×280 resolution and a 262K color range. The display driver (ST7789V2) and touch controller (CST816T) are integrated on-board and rely on SPI and I2C interfaces that make it compatible with popular platforms such as Raspberry Pi, Arduino, ESP32, STM32, and more. Previously we have covered many similar display modules like the MaTouch ESP32-S3, T-RGB ESP32-S3, and ESP32-S3 Round SPI TFT. Feel free to check these out if you are looking for a specific rounded display product. Waveshare 1.69-inch IPS touch LCD specifications Display 1.69-inch round LCD with 240×280 resolution and IPS panel. 262K color depth Display Driver –  ST7789V2 SPI display driver Touch Control – CST816T I2C capacitive touch controller for responsive input. Onboard Logic Level Converter  – Onboard voltage translator for 3.3V/5V power, works with Raspberry Pi, ESP32-S3, Raspberry Pi Pico, Arduino, STM32, and more. Dimensions – 41.13 x 33.13 [...]

The post $15 Waveshare 1.69-inch IPS touch LCD module works with Raspberry Pi, Arduino, ESP32, STM32, and other platforms appeared first on CNX Software - Embedded Systems News.

Infinity mirrors are some far-out table mods and make a great centerpiece. Instructables user [bongoboy23] took a couple steps beyond infinity when designing this incredible table tailor-made for our modern age.

Poplar and pine wood make up the framing, and red oak — stained and engraved — make for a chic exterior. Programmed with Arduino and run on a Teensy 3.1, the tabletop has 960 LEDs in forty sections. There are, four USB ports hidden behind sliding panels, as well as a two-port AC outlet and an inductive charging pad and circuit.  A hidden Adafruit TFT touchscreen display allows the user to control the table’s functions. Control is limited to changing lighting functions, but Pac-Man, Snake, and text features are still to come!

Weighing in at $850, it’s not a cheap build, but it looks amazing.

This is one of the most extensive Instructables you may happen across, containing dozens of pictures, CAD files, diagrams, appendices, and a change log, with tips besides; if you want one just like this at home, you are in good hands, here. Or try an easier build, we won’t judge. However, maker beware — you may be stepping through a portal that’s difficult to return from.

[Thanks for the tip, JohnL!]


Filed under: Arduino Hacks, how-to, led hacks
Instal·larem el monitor tàctil de 10,1 polzades de Waveshare. Les instruccions estan a la pàgina de Waveshare


Instal·larem el monitor tàctil de 10,1 polzades de Waveshare. Les instruccions estan a la pàgina de Waveshare


A new season, a new partner! We’ve had our sights set on 4D Systems’ touchscreen product for quite some time, and we’re excited to finally introduce that this Arduino and Genuino-compatible product is joining the AtHeart program. The 4Duino-24 is a 2.4-inch, 240×320-pixel Intelligent Display Module with Wi-Fi capabilities.

“For years Arduino/Genuino users have been taking advantage of our Intelligent Display Modules for adding graphical user interfaces with touch capability to their applications. With the 4Duino-24 we wanted to make something a bit more special and combine some of the more popular shields and the ATmega32U4 into a compact easy to use package. We are delighted to become part of the AtHeart program and very much look forward to seeing a full variety of applications running on the 4Duino-24.” – Markku Riihonen, Products and Business Development Manager, 4D Systems.

Perfect for your next creative IoT project, the 4Duino-24 runs on an ATmega32U4 MCU and is powered by the 4D Systems PICASO Graphics Processor that offers an array of display functionality and options for any designer and Maker. The 4Duino-24 also includes the popular ESP8266 module, which is pre-programmed with the AT command set firmware enabling the 4Duino to have Wi-Fi functionality right out of the box.

Beyond that, the 4Duino-24 is equipped with an onboard microSD connector and headers in the layout of an Arduino, including power pins (5V, 3.3V, GND and VIN), 20 digital I/O pins—seven of which can be used as PWM outputs, while 12 pins have analog input capabilities.

The 4Duino-24 can be programmed using the standard Arduino IDE or the 4D Workshop4 IDE and its three new 4Duino-based development environments with the added dimension of graphics. Creating Arduino GUIs doesn’t get any easier!

Ready to get started? You can watch 4D Systems’ 10-minute video below, as well as check out its product page here. The 4Duino-24 is available as starter kit and standalone module at the price of $79 USD/€69.90 (+tax).

Feb
26

Critter cam hacked from an old cellphone.

arduino hacks, camera, cellphone, pictures, touchscreen, wildlife Comments Off on Critter cam hacked from an old cellphone. 

critter-cam-hacked-from-old-cellphone

[Art Barrios] kept having night-time visitors who were raiding his dog’s food storage bin. It’s a plastic tub with a lid that latches but the critters were knocking it over and popping that lid off. He wanted to find out which animal was the culprit so he hacked together an automatic camera system using an old cellphone.

You can see the majority of the hardware he used in the image above. There’s an Arduino on the left. This monitors a switch which he added to the lid of the food storage container. It triggers the system when opened, switching on an LED light and snapping pictures.

The touchscreen button is used to trigger the shutter. That’s what all of that tin foil is about. Some experiments led [Art] to realize that a metal ‘finger’ could register on the screen if there was enough foil attached. To move the metal bracket he uses a solenoid. The last problem he faced was keeping the cellphone screen awake. He figured out that power cycling the charger does the trick. The Arduino manages this using a mains-rated relay.

The system successfully captured images of a family of raccoons feasting on the tasty morsels.


Filed under: arduino hacks


  • Newsletter

    Sign up for the PlanetArduino Newsletter, which delivers the most popular articles via e-mail to your inbox every week. Just fill in the information below and submit.

  • Like Us on Facebook