Posts | Comments

Planet Arduino

Archive for the ‘Stepper Motor’ Category

For a recent event, [MakerMan] was tasked with creating an interactive display that could move back and forth along an image of the Moscow skyline to highlight different points of interest. The end result is certainly gorgeous, but since this is Hackaday, we were more excited to see all the behind the scenes video of how it was built.

As with many of his projects, this one started with little more than scrap parts. Two metal I-beams were welded together to make a track, and a wheeled cart was fashioned to ride on it. Using a belt and pulley system that’s not unlike a scaled up version of what you might see on a desktop 3D printer, the motor in the cart is able to move the arrangement back and forth with minimal slop.

Installing the motor and pulley in the cart.

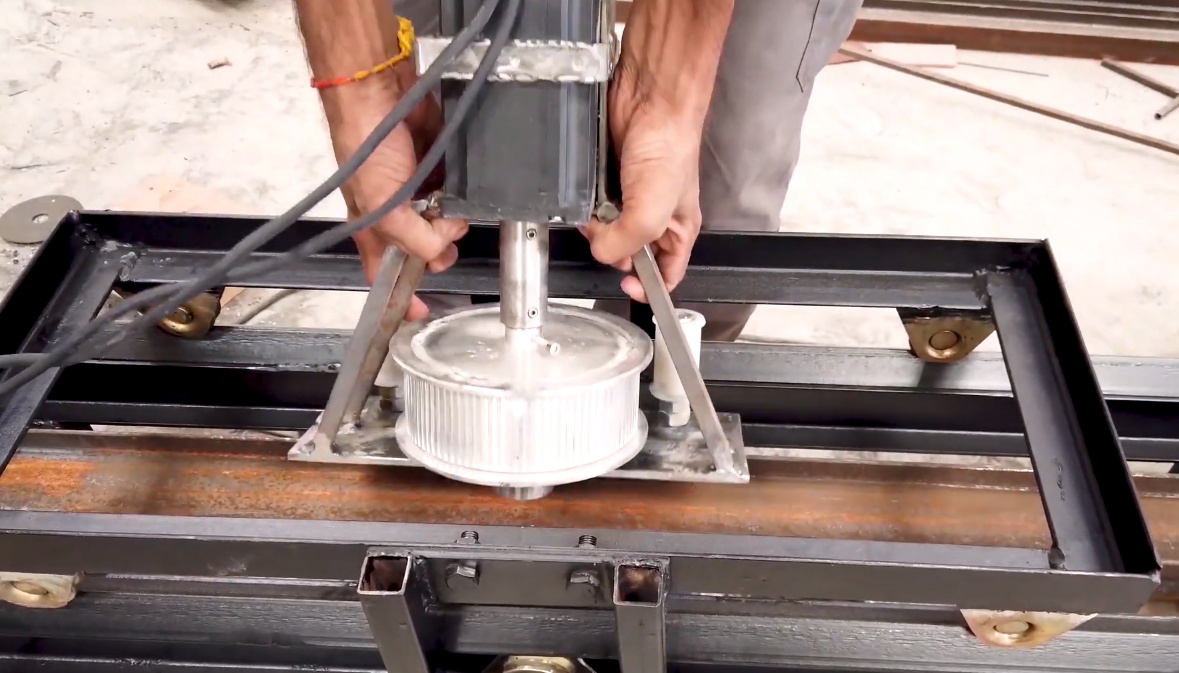
The cart actually holds all of the electronics in the project, including the power supplies, MA860H motor controller, a pair of endstop switches, and the Arduino that pulls it all together. A drag chain is used to keep the wires tight to the side of the rail without getting tangled up in anything.

[MakerMan] doesn’t explain much of the software side of this one, though we suppose he might only have been contracted to develop the hardware. But towards the end of the video you can see how the cart, now with large touch screen display mounted on top, moves back and forth when the appropriate commands are sent to the Arduino.

We’re not really sure what application such a contraption would have for the average hacker, but that doesn’t mean we can’t be jealous. There’s just something about huge illuminated screens that just speaks to us.

Traditionally, the useless machine is a simple one that invites passersby to switch it on. When they do, the machine somehow, some way, turns itself off; usually with a finger or finger-like object that comes out from the box in what feels like an annoyed fashion. Honestly, that’s probably part of what drives people to turn them on over and over again.

But [Bart Blankendaal] has managed to turn the useless machine on its head. When this machine is switched to the on position, unseen forces inside the box will spin the toggle switch around 180° to the off position.

What’s really happening is that an Arduino is getting a signal from the toggle switch, and is then rotating it on a ball bearing with a stepper motor driven through an H-bridge.

It shouldn’t be too hard to make one of these yourself, given that [Bart] has provided the schematic and STLs. If we weren’t living in such touchy times, we might suggest building one of these into your Halloween candy distribution scheme somehow. Sell the switch as one that turns on a candy dispenser, and then actually dispense it after three or five tries.

Many see useless machines as tangible examples of existential quandary. Here is one that takes that sentiment a bit further by snuffing out a candle.

We would be preaching to the choir if we told you that fear is the action killer when it comes to the challenge of new projects in uncharted territory. Everyone who reads Hackaday knows that it takes mettle to forge through the self-doubt as we push ourselves to new engineering heights.

[JBV Creative] hears the voice, too: the one that says you can’t build that thing, it’s too difficult/useless. He knows that both creativity and anti-creativity stem from the same source — the powerful human mind that dreams up these projects in the first place.

The Encouragement Machine combines the two in a piece that engineers art from garbage, aka negative thoughts. It works by first acknowledging the most basal of discouraging thoughts — an important step of the process — and then it simply trims away the negativity.

This machine uses a stepper motor to feed receipt paper underneath a custom stamp that says YOU CAN’T DO IT. Then it passes the paper through a pair of servo-driven scissors that snip off the apostrophe-t.

Ironically or not, [JBV Creative] ran into a few issues with this build, but managed to muster up enough moxie to work through the problems without encouraging slips of paper. We have to wonder how much more smoothly the next project will go given all the positivity he now has on-demand.

[JBV] doesn’t delve into the electronics much, but it looks like an Arduino and a motor driver to us. We totally dig the design — it looks like an electrical substation or rocket launch pad that happens to have a Ferris wheel. Step right up and check out the build video after the break.

Generic encouragement is great all-purpose attitude adjuster, but what if you want more specific sentiments? Here’s an affirmation mirror that will help you believe whatever you program into the scrolling display.

When it comes to cleaning your hands, [Arnov Sharma] is not messing around. He built an automatic soap dispenser using ultrasonic sensors, a stepper motor for activating the pump, and 3D printed components for housing a bottle of soap – a spectacular display of over-engineering. At least he won’t be needing to stand in line at the supermarket for motion detection soap dispensers anytime soon.

Initially, he had the idea to build the dispenser using a common servo motor-based method.  This would involve activating motors to push down on the plunger for the soap bottle to dispense soap. Instead, he for a different approach that ended up being fairly straightforward in theory, although the execution is pretty involved.

Model of the soap dispenser made in Fusion 360

He started off by 3D printing the compartment where the soap bottle would sit and the structural support for the Z-axis rail that would be pushing down on the soap bottle. It’s similar to the type of linear actuator you might find in a 3D printer or PCB mill, where a motor controls a rotating screw that moves the carriage across a belt. (We presume the linear rail came first, and the ultrasonic soap dispenser second.)

In this build, there are two additional rods added to help support the lever pressing down on the soap dispenser.


The setup is controlled by an Arduino, which triggers the movement from the linear actuator if it receives a signal from an ultrasonic sensor. He’s added the model files and Arduino code for other makers curious about building a similar project. Check out his video for the soap dispenser in action – the stepper motor definitely makes for a much more powerful plunge than you might expect.

Were tarot card readers deemed non-essential in your part of the world (and do you think they saw it coming?) More than ever, we all need diversions that are for entertainment purposes only. And what better basis for entertainment than a mystical fortune-telling robot that can read your tarot cards?

This fantastic-looking ‘bot stands on the shoulders of [Scott Bezak]’s trailblazing method for easy DIY split-flap displays. Push the rather inviting-looking button on the top, and the flaps start flipping around to find your fortune. Once the fates have aligned, a thermal printer on the front spits out an image of your card along with an interpretation.

It’s obvious that [i_mozy] put quite a lot of effort into this slick machine, and we think the stickers look especially great. All the details of physical tarot card readings are accounted for, including a random number to decide the card’s position, and LEDs to represent the card’s element. Suspend your disbelief and check out the demo/promo video after the break.

Split-flap displays are a great choice no matter what you want to show. We’ve seen them used to display everything from the weather to the current Spotify track.

Via r/duino

If we asked you to rattle off all the tools at your own personal disposal, you’d probably leave your timepieces off the list. But we say clocks are definitely tools — cool tools that come in countless forms and give meaning to endless days.

A clock form we hadn’t considered was that of an actual tool. So we were immeasurably delighted to see [scealux]’s clock made from a measuring tape. At least, the time-telling part of the clock is made from a measuring tape. The case isn’t really from a tape measure — it’s entirely printed, Bondo’d, sanded, and painted so well that it’s quite easy to mistake it for the real thing.

Tightly packed inside this piece of functional art is an Arduino Nano and a DS3231 precision RTC module, which we think is fitting for a tool-based clock. The Nano fetches the time and drives a stepper motor that just barely fits inside. There’s just enough tape wound around the printed hub to measure out the time in increments of one hour per inch. Take 1/16″ or so and watch the demo and brief walk-through video after the break.

Not all tools are sharp, and not all clocks are meant to be precise. Here’s a clock for the times that gives you the gist.

It isn’t hard to imagine a scenario where you are stuck at home all day with nothing to do and certain items are in short supply. Sure, bathroom tissue gets all the press, but try buying some flour or a freezer and see how far you get. Plus online shopping has given up on next day delivery for the duration. Not hard to imagine at all. Now suppose your latest self-quarantine project needs a rotary shaft encoder. Not having one, what do you do? If you are [Tech Build] you go all MacGyver on an old printer and pull out a stepper motor.

How does a stepper motor turn into an encoder? Well, that’s the MacGyver part. We are not big fans of the physical circuit diagrams, but it looks like [Tech Build] borrowed (with credit) from an earlier post and that one has a proper schematic.

Looking at [Andriyf1’s] schematic, you can see each coil connects to an op-amp wired as a positive feedback comparator. The result should be a fairly clean square wave from a noisy input. The real trick is how to connect the coils, which depends on how the stepper is wired. If you have a stepper motor of unknown providence, grab your ohmmeter and read how to sort the wires out.

The initial version was on a breadboard, but the final was on a prototyping board. Of course, an Arduino reads the pulses. We love using things for unintended purposes. Speakers and microphones are often interchangeable. Generators and motors, too. Then there’s the paperclip.

Timepieces are cool no matter how simplistic or granular they are. Sometimes its nice not to know exactly what time it is down to the second, and most of the really beautiful clocks are simple as can be. If you didn’t know this was a clock, it would still be fascinating to watch the bearings race around the face.

This clock takes design cues from the Story clock, a visual revolution in counting down time which uses magnetic levitation to move a single bearing around the face exactly once over a duration of any length as set by the user. As a clock, it’s not very useful, so there’s a digital readout that still doesn’t justify the $800 price tag.

[tomatoskins] designed a DIY version that’s far more elegant. It has two ball bearings that move around the surface against hidden magnets — an hour ball and a minute ball. Inside there’s a pair of 3D-printed ring gears that are each driven by a stepper motor and controlled with an Arduino Nano and a real-time clock module. The body is made of plywood reclaimed from a bed frame, and [tomatoskins] added a walnut veneer for timeless class.

In addition to the code, STLs, and CAD files that birthed the STLs, [tomatoskins] has a juicy 3D-printing tip to offer. The gears had to be printed in interlocked pieces, but these seams can be sealed with a solution of acetone and plastic from supports and failed prints.

If you dig minimalism but think this clock is a bit too vague to read, here’s a huge digital clock made from small analog clocks.

In ridiculous times, it can help to play ridiculous instruments such as the slide whistle to keep your bristles in check. But since spittle is more than a little bit dangerous these days, it pays to come up with alternative ways to play away the days during lockdown life.

Thanks to some clever Arduino-driven automation, [Gurpreet] can maintain a safe distance from his slide whistle while interacting with it. Slide whistles need two things — air coming in from the top, and actuation at the business end. The blowing force now comes from a focused fan like the ones that cool your printed plastic as soon as the hot end extrudes it. A stepper motor moves the slide up and down using a printed rack and pinion.

Here’s a smooth touch — [Gurpreet] added a micro servo to block and unblock the sound hole with a cardboard flap to make the notes more distinct. Check out the build video after the break, which includes a music video for “My Heart Will Go On”, aka the theme from Titanic. It’s almost like the ship herself is playing it on the steam whistles from the great beyond.

Speaking of, did you hear about the effort to raise and restore the remains of her radio room?


  • Newsletter

    Sign up for the PlanetArduino Newsletter, which delivers the most popular articles via e-mail to your inbox every week. Just fill in the information below and submit.

  • Like Us on Facebook