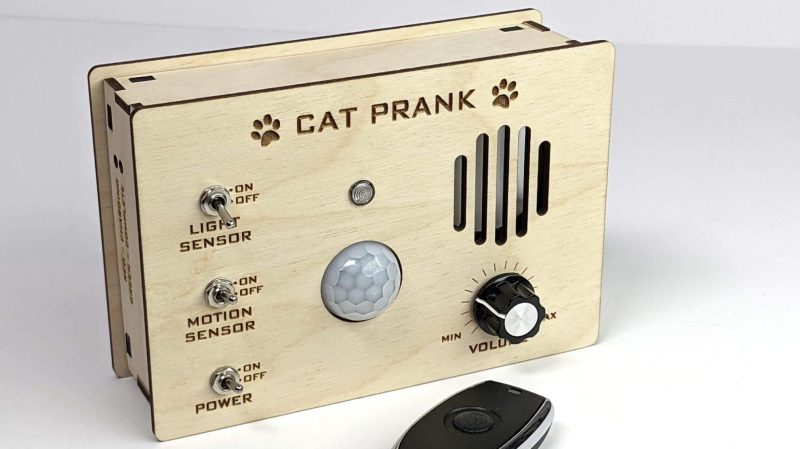
The idea is simple: hide the Cat Prank box in a cupboard or other space in a friend’s house, and it will meow from its secret location. When found, either the light sensor or motion sensor will trigger the yowling of an angry feline, with hopefully startling effects.
An Arduino Mini is the brains of the operation, paired with an XY-V17B sound module which plays the required animal wailings. There’s also a 433 MHz radio module that lets the prankster trigger meowing via remote control.
Code is available for those wishing to build their own. We’d love to see a mod with a time delay built in, so the device could be hidden and left to start meowing at some later date when the prankster is far away.
Similar work has graced these pages before, like the devilishly fiendish OpenKobold design. Just make sure your friends are receptive to such jokes before you go ahead and invest time and hardware in the prank!
The first thing to notice about [Bijuo]’s cat-sized quadruped robot designs (link is in Korean, Google translation here) is how slim and sleek the legs are. That’s because unlike most legged robots, the limbs themselves don’t contain any motors. Instead, the motors are in the main body, with one driving a half-circle pulley while another moves the limb as a whole. Power is transferred by a cable acting as a tendon and is offset by spring tension in the joints. The result is light, slim legs that lift and move in a remarkable gait.
[Bijuo] credits the Cheetah_Cub project as their original inspiration, and names their own variation Mini Serval, on account of the ears and in keeping with the feline nomenclature. Embedded below are two videos, the first showing leg and gait detail, and the second demonstrating the robot in motion.
There’s more than one way to make a robot cat, of course, and here’s another design that doesn’t completely evict motors from the limbs, but still manages to keep them looking sleek and nimble.
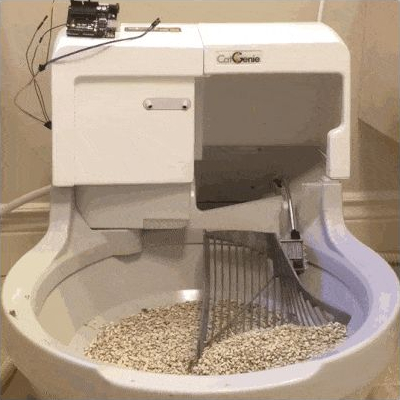
The CatGenie is an amazing device to watch in action, basically a self-cleaning litter box for cats that even does away with the need to replace the litter. It’s comparable to what the indoor flush toilet is for humans compared to maintaining a composting toilet. However, there is a problem. It uses costly soap cartridges which have to be replaced because an RFID reader and a usage counter prevent you from simply refilling them yourself.
CatGenie and Arduino
[David Hamp-Gonsalves] reverse engineered the electronics so that he didn’t have to pay for the cartridges anymore. This has been done before and one of those who did it created a product called the CartridgeGenius, but it’s made and sold as a parttime project and there were none in stock. The cartridges have an RFID tag and another solution which we’ve covered before is to replace the RFID reader board with an Arduino. That’s the solution [David] adopted. So why write this post if this isn’t new?
The RFID reader board communicates with the rest of the CatGenie using I2C and he needed to know what was being transmitted. To do that he learned how to use a cheap logic analyzer to read the signals on the I2C wires, which makes this an interesting story. You can see the logic analyser output on his blog and GitHub repository along with mention of a timing issue he ran into. From what he learned, he wrote up Arduino code which sends the same signals. He and his cat are now sitting pretty.
What he didn’t do is make a video. But the CatGenie really is amazing to watch in action as it goes through its rather complex 30-35 minute process so we found a video of it doing its thing, shown at 3.5x speed, and included that below. If you’re into that sort of thing.
Hackaday.io user [peterquinn] has encountered a problem with his recently unruly cat peeing under the dining table. Recognizing that the household cat’s natural enemy is the spray bottle, he built an automatic cat sprayer to deter her antics.
The build is clear-cut: an Arduino Uno clone for a brain, an MG995 servo, PIR sensor, spray bottle, and assorted electronics components. [peterquinn] attached the servo to the spray bottle with a hose clamp — ensuring that the zero position is pointing at the trigger — and running a piece of cabling around the trigger that the servo will tug on. Adding a capacitor proved necessary after frying the first Uno clone, as the servo powering up would cause the Uno to reset.
The code is set up to trigger the servo — spraying the cat twice — once the PIR detects the cat for more than ten seconds. After toying with a few options, [peterquinn] is using a 9V, 2A power supply that works just fine. For now, he hopes the auto-sprayer should do the trick. If it somehow doesn’t work, [peterquinn] has mused that a drastic upgrade to the vacuum may be necessary.
A good robot is always welcome around here at Hackaday, and Hackaday.io user [igorfonseca83]’browser-controlled ‘bot s is no exception. Felines beware.
[igorfonseca83] — building on another project he’s involved in — used simple materials for the robot itself, but you could use just about anything. His goal for this build was to maximize accessibility in terms of components and construction using common tools.
An Arduino Uno gets two D/C motors a-driving using an H-bridge circuit — granting independent control the wheels — an ESP8266 enabling WiFi access, with power provided by a simple 5V USB power bank. [igorfonseca83] is using an Android smartphone to transmit audio and video data; though this was mostly for convenience on his part, a Raspberry Pi and camera module combo as another great option!
A few workarounds notwithstanding — considering some components in this particular configuration do not directly connect to each other — a bunch of code, set up of a website to act as a controller that accesses the IP address of the ESP8266, and an app installed on the audio/video streaming smartphone later, and you have a cat-stalking robot ready to rock. There are, of course, other uses for fpv robots, but with arguably less entertaining results.
We don’t know what cats see when they see a red laser beam, but we know it isn’t what we see. The reaction, at least for many cats — is instant and extreme. Of course, your cat expects you to quit your job and play with it on demand. While [fluxaxiom] wanted to comply, he also knew that no job would lead to no cat food. To resolve the dilemma, he built an automated cat laser. In addition to the laser module, the device uses a few servos and a microcontroller in a 3D printed case. You can see a video, below. Dogs apparently like it too, but of course they aren’t the reason it was built.
If you don’t have a 3D printer, you can still cobble something together. The microcontroller is an Adafruit Pro Trinket, which is essentially an Arduino Pro Mini with some extra pins and a USB port.
There are twelve different patterns the device cycles through at random to attempt to confuse your cat. We couldn’t help but wonder if this ought to be on the Internet so you could take control and manually play with your cat. Sounds like a job for Blynk. The last time we saw a cat laser, it was a little more mobile.
The Hummingbird by BirdBrain Technologies is an Arduino AtHeart microcontroller designed to enable beginners to create robots from craft materials. Hummingbird kits include LEDs, motors, and sensors that connect directly to the board. This eliminates the need for soldering or breadboarding and ensures that users have the parts they need to build their first robots. All of the components are reusable, so the same kit can be used to build many different robots.
In addition, the Hummingbird supports a variety of programming options, making it appropriate for beginning programmers as well as those who are more advanced. Some programming languages, such as Scratch and Snap!, can only be used when the board is connected to the computer. We will concentrate here on programming alternatives that enable users to upload a program onto the board’s Arduino.
Classrooms all over the world have used the Hummingbird from elementary to high school for projects ranging from Shakespeare dioramas to the physics of amusement park rides. In the following project, the BirdBrain Technologies team will show how they used the Hummingbird to build an automatic cat treat dispenser and demonstrate how the Hummingbird can be utilized to construct robots from everyday materials.
Building with the Hummingbird
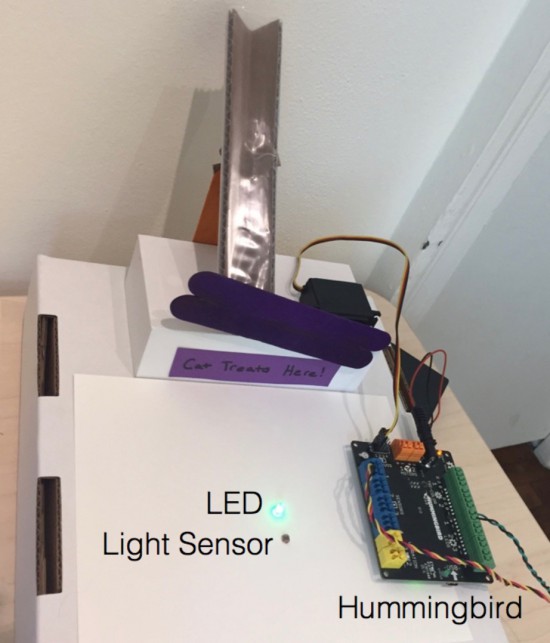
Beginners can easily get started building Hummingbird robots with cardboard and craft materials. Motors, sensors, and LEDs can be connected directly to the Hummingbird board, and these elements can be added to the robot with hot glue. Hot glue peels off the components so that they can later be reused.
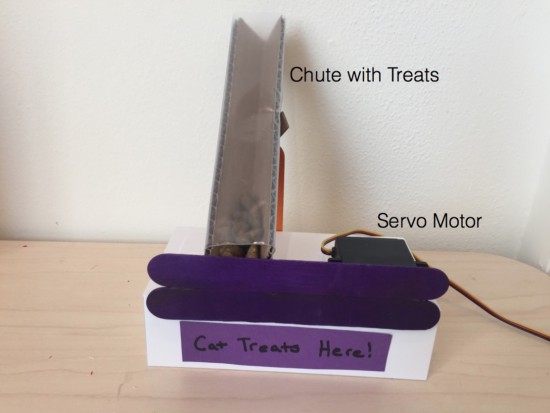
The example project uses one servo motor, one single color LED, and a light sensor. The dispenser consists of a servo motor attached to craft sticks that block the bottom of a chute containing cat treats. The position of the servo motor can be changed in software to release treats.
To receive a treat, the cat must cover a light sensor in front of the chute. When the cat covers the sensor, the servo motor briefly moves to open the chute and dispense a treat. The LED was included to show our test cat the location of the light sensor.
Programming with the Hummingbird
One unique feature of the Hummingbird is that it supports three different programming options for producing an Arduino program. These options provide steps of increasing difficulty to support learners as they transition from programming novices to Arduino experts.
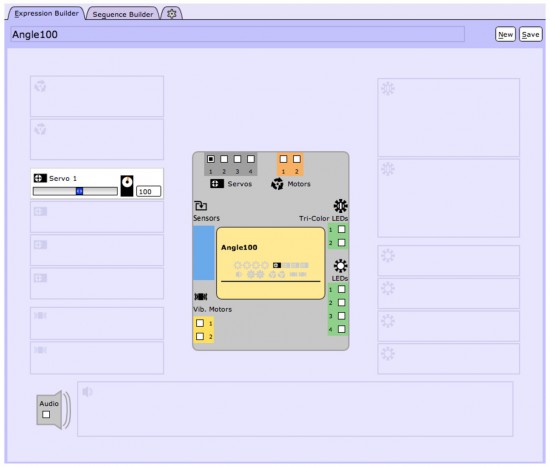
Beginners can start with the CREATE Lab Visual Programmer. This software option is based on storyboarding. Users can select the motors and LEDs that they are using on a schematic of the Hummingbird board. Then they can create expressions by using sliders to set the values of these outputs. The expression below sets a servo motor to 100°.
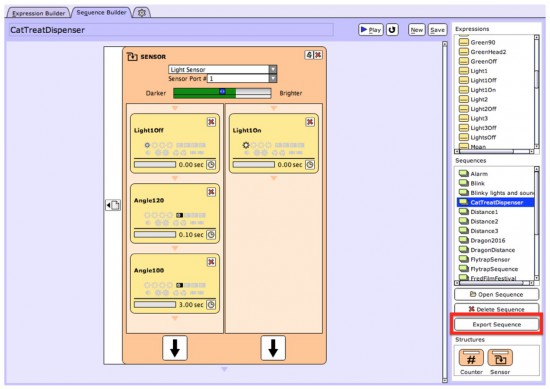
Expressions can be combined to create sequences. For example, the sequence below controls our automatic cat treat dispenser. This sequence is controlled by a sensor block. If the light level is low, the three expressions on the left are executed. If the light level is high, the three expressions on the right are executed. The user can then convert this sequence to an Arduino program by simply clicking the “Export Sequence” button (shown outlined in red). The Hummingbird can then be placed into Arduino mode and the program uploaded to the microcontroller.
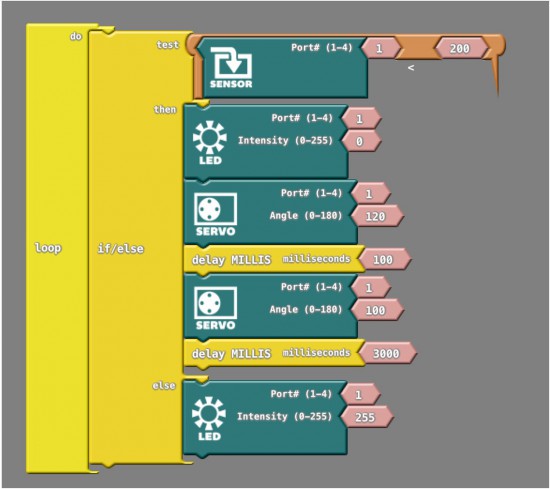
Another option for beginners is ArduBlock, which provides a visual introduction to the Arduino language. The Hummingbird extension for ArduBlock includes a block for each Hummingbird component. A program in ArduBlock to control the treat dispenser is shown below. This program is equivalent to the CREATE Lab Visual Programmer sequence shown above.
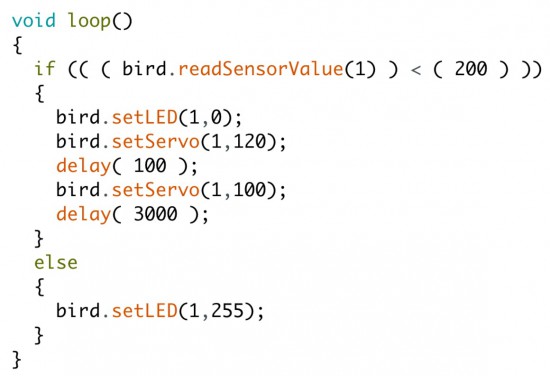
The Arduino code generated by this ArduBlock program is shown below. Individuals moving from the CREATE Lab Visual Programmer or ArduBlock to Arduino can start by modifying the generated code. For example, in the video we modified the commands inside the else to make the LED blink to attract the cat’s attention.
Once individuals are comfortable with the Arduino programming language, they can create more complex programs in Arduino. For instance, the video shows how we modified our robot and our code to incorporate three lights and three sensors. To get a treat, the cat must cover the sensor when the corresponding light is on.
The cat treat dispenser is only one example of a Hummingbird robot using the power of the Arduino at its core. The parts can be used and reused to construct an unlimited number of robots with low-cost materials such as cardboard, pipe cleaners, recycled materials, and even paper mache!
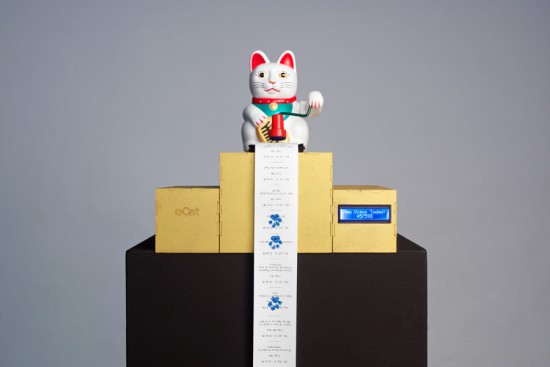
Over the last couple of years, cat videos have become the undisputed champions of the web. Whether it’s kittens playing with their shadows to failed jump attempts to giving each another massages, we’re all guilty of watching a few of these clips from time to time (yes, even at work). Built with this in mind, oCat is a real-time tracker for feline-related activity on the Internet.
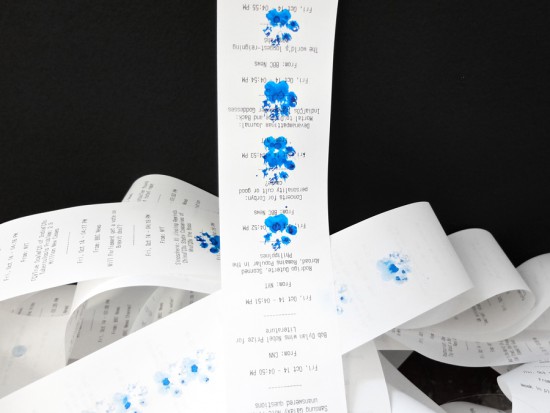
oCat consists of two parts: the oCat News Distractor and the Kitty o’Cat Twitter bot. Using Google’s YouTube API, the system works by continuously monitoring for new uploads, the number of new views each day, or a specific video that has received a remarkable amount of attention. It then tweets these stats and prints them out on thermal paper, stamping a paw print on the timeline for every 1,000 views.
Created by Annika Engelhardt, a digital media design master’s student at the University of the Arts in Bremen, oCat uses an Arduino along with an ESP Wi-Fi module, a servo, and an LCD screen. The aim of the project is to increase and reveal the amount of hours people spend watching cat videos online.
The cat is an altered Maneki-neko, holding a stamp using welding wire and hot glue. Even though I filled the stamp with extra ink, it did not work properly and I had to cut out the paw-shape from a sponge and glue it onto the original stamp.
The thermal printer used in the device needs a USB connection, so I used a Raspberry Pi to control it. I wrote a Python script that checks four different RSS news feeds for new posts every 15 minutes and prints one headline with a timestamp every minute.
The Twitter bot was programmed using Python and a library called tweepy. Most of the script is reading JSON files, juggling and comparing data and text files and in the end mixing up parts of a sentence to form a tweet. The bot will be enhanced in the future
Tired of being harassed by your cat? [MomWillBeProud] made a cheap, effective — and more importantly cat-operated — cat food dispenser.
The feeder is of an efficient construction — a double cat food dish, one container to store the electronics, and a Pringles can to act as the hopper. A simple servo rotates the hopper thirty degrees and back on each button press; using gravity to drop food through an opening that appears due to this motion. The button itself is an old IKEA timer and a piece of plastic large enough for a hungry cat to swat.
An Arduino controls the servo, and while [MomWillBeProud] skips over going into detail on his code, you can check it out here.
[MomWillBeProud] toyed with the idea of scheduled feeding, but believes his cat is smart enough to feed itself; indeed — training cats is hard work, and it took a couple of weeks for the lessons to sink in. He also recommends using an Arduino Pro Mini, since it consumes so little power that it can operate for months on one set of batteries. Since [MomWillBeProud]’s cat needs a refill only once a week, that’s a lot less time fussing with one’s feline companions.
Planet Arduino is, or at the moment is wishing to become, an aggregation of public weblogs from around the world written by people who develop, play, think on Arduino platform and his son. The opinions expressed in those weblogs and hence this aggregation are those of the original authors. Entries on this page are owned by their authors. We do not edit, endorse or vouch for the contents of individual posts. For more information about Arduino please visit www.arduino.cc
You are currently browsing the archives for the cat category.