Posts | Comments

Planet Arduino

Archive for the ‘dr. who’ Category

As an avid fan of the show Dr Who, [Adam Sifounakis] saw a model for a laser-cut TARDIS that piqued his curiosity that eventually grew into a multi-week project involving multiple setbacks, missteps, revamps and — finally — gratification. Behold, his sound activated TARDIS.

First and foremost, assembling and painting the model was a fun puzzle — despite a few trips to the store — with a little backtracking on the painting due to impatience. Next, the creation of a pulsing soft white LED circuit timed with an audio clip to really sell the image of a mini-TARDIS proved to be a tedious ordeal, paying off in the end with a satisfying glow through the vellum-diffused windows on the model.

How to trigger the lights? [Sifounakis] initially wanted a capacitive sensor to trigger the sound effects, but that way lay dragons — and madness — so he went with snap-activated effect to activate the TARDIS like the Doctor himself. After struggling with building his own microphone setup, he switched to an electret mic with adjustable gain which worked like a charm. Setting up this TARDIS’ Adafruit Pro Trinket brain involved a snag or two, and after that it was smooth sailing!

Until he hit another hitch with the power circuit too, that is. Luckily enough, adding a capacitor to give the circuit a bit more juice on boot solved the issue. All that was left to do was dismantle and rebuild his circuit after all this troubleshooting and substitutions, and — finally — install it in his model.

With much satisfaction and a final rework of the LED pulsing effect, it was done. Check it out!

Be it in the shape of an infrasonic subwoofer, a motion-sensing alarm, or topping Christmas trees, the TARDIS never fails to amaze.


Filed under: Arduino Hacks, hardware
May
03

[Bithead942’s] love of the ever popular Dr Who series led her to develop a replica of the 4th Doctor’s robotic companion. It’s name is K-9, and was built from scratch in only 4 months. Its shell is made from HPDE – a light and bendable plastic. A custom plastic bender was constructed to get the angles just right, and custom laser cut parts were used in various places.

Its frame consists of aluminum channel, and is packed full of juicy electronics. An arduino with an XBee shield controls the remote voice, frickin’ laser and eye sensors. Another arduino is paired with a motor shield to control the liner actuator for the neck movement. And a Raspberry Pi keeps the LCD screen in order.

We’re not done, folks. Because this puppy is radio controlled, a custom controller is needed. Sparkfun’s Fio paired with another XBee is used along with a 16×2 LCD and various other electronics to keep the robot on an invisible leash.

Be sure to check out the blog site, as it goes into great detail on all the various parts used to construct this complicated but awesome project.


Filed under: Arduino Hacks, classic hacks, wireless hacks
Oct
09

Flora-Powered TARDIS Dog Costume

arduino, Art & Design, dog, dr. who, General, Kids & Family, knitting, pet, Tardis Comments Off on Flora-Powered TARDIS Dog Costume 

flora_spidey-sweater-dualHow To: Doctor Who TARDIS costume for dogs complete with TARDIS sounds and lights

Read more on MAKE

dr who sonic screwdriver

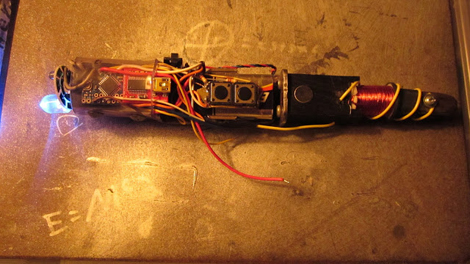
“I don’t understand, you don’t have the technology.” OK, so it’s not actually a futuristic tool with the same capabilities as the one off the hit TV series Dr. Who, but this homemade “sonic screwdriver” is a multifunction device that’s pretty cool nonetheless.

Created around an Arduino Pro Mini, [Gunther] really one-upped the last screwdriver we featured. Built in functions include: brown note tone generator, dog whistle, EMF meter, flashlight, IR universal remote, laser pointer, ohm meter, sound level meter, voltage detector, and a voltage meter.  You can also have an electromagnet or output voltage supply if you want. If that wasn’t enough, it can even play the theme song from Star Wars! Whew. That’s a mouthful of functionality.

Although he has posted the Arduino code, you’ll have to keep an eye on his site for more details if you want to create your own. He’s mentioned that he’s working on blue prints and a full parts list… Awesome. Now where’s that lock pick function?

Check out a video showing off some of the features after the break.

[via Make]


Filed under: Arduino Hacks


  • Newsletter

    Sign up for the PlanetArduino Newsletter, which delivers the most popular articles via e-mail to your inbox every week. Just fill in the information below and submit.

  • Like Us on Facebook