Posts | Comments

Planet Arduino

Archive for the ‘servo motor’ Category

Apr
29

Make your lasercut datamonster with Intel Galileo

arduino, ArduinoCertified, datamonster, Galileo, Intel Galileo, sensors, servo motor Comments Off on Make your lasercut datamonster with Intel Galileo 

datamonster

Datamonsters are creatures that respond to you. They can see you and respond to your presence and movement. In addition to responding to immediate interactions, they can also be influenced by events happening in the world outside.


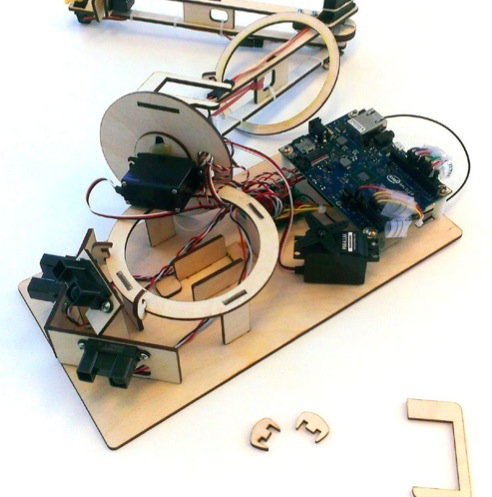
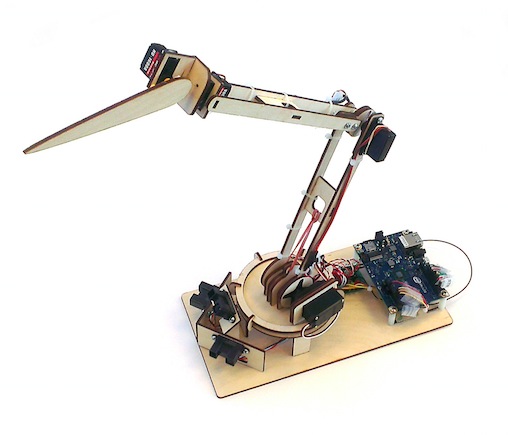
The project you see in the picture was made by Lucas Ainsworth  using Intel Galileo board and needs 3 main things:

- a physical structure
The physical structure uses commonly available materials and a relatively easy-to build wooden kit pattern, so that the physical form “gets out of the way”
as much as possible. If you cut this kit and put it together, you will have a robot with 5 joints: waist rotation, waist elevation, mid-body elevation, neck rotation, and head movement.

- sensing
For this version, we’re using 3 long range active IR sensors for simplicity and low cost. This sensor pack estimates object location in 3D space. Next gen could possibly use a webcam and OpenCV to include face-detection and motion in addition to presence.

- software
This is where the fun is and where the most work remains to be done. We have code for the Arduino IDE (written for the Intel Galileo board) that you
can use to calibrate and control your monster. If you use our code unchanged, you’ll have some basic reactions to objects, and a connection over WiFi to Thingspeak. Thingspeak is an easy-to-use repository for data collected from the internet or any data sources you create.

You can make your own Datamonster following the detailed documentation at this link. The Galileo code to get started (for the Arduino IDE) is on GitHub.


datamonster2

Oct
09

Moti on Kickstarter: spin the dials and the motors follow!

kickstarter, motor, Robot, servo motor, servos Comments Off on Moti on Kickstarter: spin the dials and the motors follow! 

moti on kickstarted

Moti is a smart motor you can control from an app . It allows to use your fingers directly on the screen to move the motor, adjust speed with sliders and even program motions with simple building blocks. You can attach it to any kind of objects and bring them to life with intuitive and easily understandable steps.

At the same time Moti is advanced enough to satisfy makers and developers who are looking to build complex robots. Each one is programmable with Arduino, has bunch of built-in sensors, daisy-chains, and even has a web-API so you can develop sites and games for your robot.

Nick wrote us:

Our aim with Moti is to make robotics accessible to everyone by providing a
tool that’s as intuitive to use as a hammer. Simply attach Moti smart motors to anything and then use the graphical app to bring your creation to life…spin the dials and the motors follow. Presto, instant robot!

Moti was born out of our frustrations in building robots.  We’ve just done a lot of the grunt work so you don’t have to.

At present, a lot of low level work is required to get a robot moving, and that prevents most people from exploring beyond the basics, if at all. Moti simplifies robotics so more people can apply it to interests such as amateur filmmaking, animatronics, window displays, art projects, 3D printed robots, DIY toys, RC vehicles, home automation and much more.

In the 80′s computing shifted from labs and industry into everyday life. We think robotics is ready for a similar shift, and Moti is here to help that happen.

They are on Kickstarter now! See how it works:


Jun
11

A painting machine sensing your touch

Android, arduino, diy, DUE, painting, servo motor Comments Off on A painting machine sensing your touch 

arduino android painting machine


Kris Temmerman, a freelance creative developer based in Belgium, just published a nice report on how he built a painting machine running on an Arduino Due and an Android tablet.

I was always interested to remove the perfection from computer graphics. So thought it would be fun to try to make the most obvious thing first. A machine that uses a paint brush to print a drawing.

arduino painting detail

As you can see from the video below, Kris was able to translate the pen pressure on the tablet into specific brush strokes on the paper:

Follow the link to discover the code on github and enjoy the painting!


May
11

DIY $200 Robotic Hand with Arduino Uno

arduino, diy, hand, Robot, servo motor Comments Off on DIY $200 Robotic Hand with Arduino Uno 

robotic hand with arduino

Instructables user aaronthomen posted a couple of videos about his ingenious robotic hand and a controller he designed and built for less than $200.  The first video shows the hand in action and the  second one explains how he made it.


Apr
16

Lego’s stress test reveals the magic number is 37,112

arduino, Infrared, LEGO, servo motor Comments Off on Lego’s stress test reveals the magic number is 37,112 

lego clutch power


The question was simple: ”How many times can I assemble LEGO bricks before they wear out?” And Phillipe Cantin found the answer  after building a machine to test it: it took 10 days and 37,112 assembling and disassembling actions.

He used an arm moved by a servo-motor, a infrared sensor validating if the lego was off or on, and an Arduino Uno controlling the machine. Here’s the video explanation of the machine and below another one after 102 hours into the ongoing test :

Stay tuned to Phillipe’s website as he said that he’s going to build a faster machine and right now he suggests:

Don’t try this at home. It’s long, noisy and cruel to LEGO bricks.

Mar
14

blaus lasershow

Last year MediaInteractiveDesign and PlayModes , two interactive design and creative technology studios based in Catalonia, collaborated to develop a system to control DIY Laser robot.

They created a new shield  to control Dinamyxel servomotors  to work with PWM laser drivers. The shield works using Arduino Ethernet programmed with a specific firmware to control laser and motor using Open Sound Control.

The project involved a team of 3 people (Eloi Maduell, Alex Posada and Santi Vilanova) coming from the field of audiovisual creativity, hardware engineering and software development.

To show us the way this system can be used, they sent us two of their projects. Enjoy!

RADIAL
Radial is a fully immersive audiovisual experience driven by cutting edge DIY technologies. Composed by a set of 8 moving blue laser heads and a kinetic light sculpture, it drives the audience into an abstract synaesthesic trip.
While laying down on the center of the installation, you let yourself be surrounded of synchronized three dimensional light compositions, multichannel sound and the intricate moving color patterns of the Particle.

Here’s the technical schematic of Radial, some pics, and below the video:

Technical Schematic


BLAUS

Blaus is an immersive space where light and sound relate intimately to impact on the visitor.  It can be a cube or a blossoming flower, a grid or a jellyfish; a mutant entity of reflecting lights which submerge the audience into a symbolical universe, driven by hidden forces of the architecture. Movement and reflections of light, sound and laser beams generates a kinetic atmosphere that transforms the architecture into the main character of a geometric play.


And here you can see some pics and the video about how they made it:


Last but not least for the implementation of the system they used and want to thank:


  • Newsletter

    Sign up for the PlanetArduino Newsletter, which delivers the most popular articles via e-mail to your inbox every week. Just fill in the information below and submit.

  • Like Us on Facebook