Posts | Comments

Planet Arduino

Archive for the ‘Arduino Leonardo’ Category

A robot that uses CV to detect villagers in Stardew Valley and display their gift preferences on a screen.

It seems like most narrative games have some kind of drudgery built in. You know, some tedious and repetitious task that you absolutely must do if you want to succeed. In Stardew Valley, that thing is gift giving, which earns you friendship points just like in real life. More important than the giving itself is that each villager has preferences — things they love, like, and hate to receive as gifts. It’s a lot to remember, and most people don’t bother trying and just look it up in the wiki. Well, except for Abigail, who seems to like certain gemstones so much that she must be eating them. She’s hard to forget.

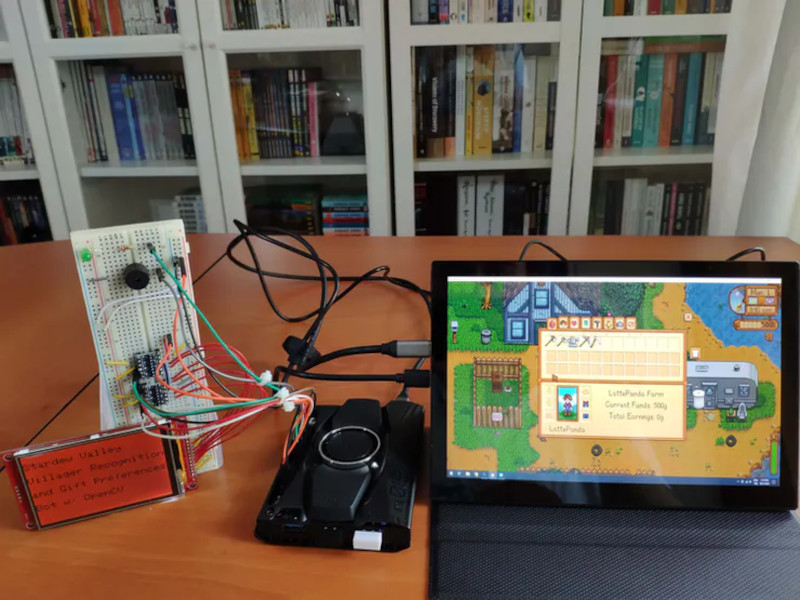
[kutluhan_aktar]’s villager gift preferences bot is a fun and fantastic use of OpenCV. This bot uses a LattePanda Alpha 864s, which is a single-board computer with an Arduino Leonardo built in. It works using template matching, which is basically a game of Where’s Waldo? for computers.

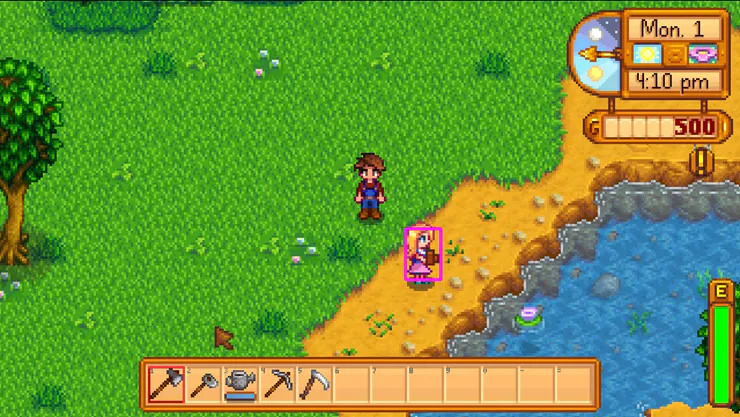
Given a screenshot of each villager in various positions, the LattePanda recognizes them among a given game scene, then does a lookup of their birthday and preferences which the Leonardo prints on a 3.5″ LCD screen. At the same time, it alerts the player with a buzz and big green LED. Be sure to check it out in action after the break.

In Animal Crossing, the drudgery amounts to pressing the A button while catching shooting stars. That’s not a huge problem for a Teensy.

When [easyjo] picked up this late ’80s Marconi mil-spec keyboard for cheap, he knew it wouldn’t be easy to convert it to USB — just that it would be worth it. Spoiler alert: those LEDs aren’t a mod, they’re native. They get their interesting shape from the key traces, which are in the four corners.

Despite having way-cool buttons such as WPNS HOLD, and the fact that Control is on the home row where it belongs, this keyboard does not look fun to type on at all for any length of time. Of course, the point of this keyboard is not comfort, but a reliable input device that keeps out dust, sweat, liquids, and the enemy.

This is probably why the controller is embedded into the underside of the key switch PCB instead of living on its own board.  [easyjo] tried to analyze the signals from the existing 26-pin connector, but it didn’t work out.

So once he was able to decode the matrix, he removed the controller chip and wired the rows and columns directly to an Arduino Leonardo. Fortunately, the LEDs were just a matter of powering their columns from the front side of the board.

The availability of certain kinds of military surplus can make for really interesting modernization projects, like adding POTS to a field telephone.

Via r/duino

You’ve (probably) got four limbs, so why are you only using half of them when you’re working on the computer? Just because your toes don’t have the dexterity to type (again, probably) doesn’t mean your feet should get to just sit there doing nothing all day. In a recent project, [MacCraiger] shows you just how easy it can be to put some functionality under foot by building a pair of media control stomp switches.

Crimp pin connectors grant +50 professionalism.

If the devices pictured above look a lot like guitar effects, that’s because they share a lot of parts. [MacCraiger] used the same sort of switch and aluminum case that you might see on a pedal board, as he figured they’d be better suited to a lifetime of being stepped on than something he 3D printed.

Up on the desk, and this time in a printed case, is the Arduino Leonardo that they connect to. The wiring for this project is very straightforward, with the switches connected directly to the GPIO pins. From there, the Arduino firmware emulates a USB Human Interface Device and fires off the appropriate media control keystrokes to skip to the next track or pause playback depending on which switch has been engaged.

This hardware isn’t exactly breaking any new ground here, but we did like how [MacCraiger] used standard 3.5 mm audio cable and the associated jacks to connect everything up. It’s obviously on-theme for what’s essentially a music project, but more importantly, gives the whole thing a very professional look. Definitely a tip to mentally file away for the future.

For the more accomplished toe-tapper, our very own [Kristina Panos] recently recently took us through the construction of her macro slinging footstool. Between these two examples of bespoke peripherals, you should have everything you need to create your own custom input devices. We suppose you could even make one that’s hand operated if you’re into that sort of thing.

When [gdarchen] wanted to read some NFC tags, he went through several iterations. First, he tried an Electron application, and then a client-server architecture. But his final iteration was to make a standalone reader with an Arduino and use WebUSB to connect to the application on the PC.

This sounds easy, but there were quite a few tricks required to make it work. He had to hack the board to get the NFC reader’s interrupt connected correctly because he was using a Leonardo board. But the biggest problem was enabling WebUSB support. There’s a library, but you have to change over your Arduino to use USB 2.1. It turns out that’s not hard, but there’s a caveat: Once you make this change you will need the WebUSB library in all your programs or Windows will refuse to recognize the Arduino and you won’t be able to easily reprogram it.

Once you fix those things, the rest is pretty easy. The PC side uses node.js. If you back up a level in the GitHub repository, you can see the earlier non-Arduino versions of the code, as well.

If you want to understand all the logic that went into the design, the author also included a slide show that discusses the three versions and their pros and cons. He did mention that he wanted a short-range solution so barcodes and QR codes were out. He also decided against RFID but didn’t really say why.

NFC business cards are a thing. You can also use them to catch some public transportation.

Security is something that’s far too often overlooked in embedded devices. One of the main risks is that if the device doesn’t verify the authenticity of incoming firmware updates. [Walter Schreppers] was working on a USB password storage device, so security was paramount. Thus, it was necessary to develop a secure bootloader.

[Walter]’s device was based upon the Arduino Leonardo. Starting with the Caterina bootloader, modifications were made to enable the device to be locked and unlocked for programming. This can be done in a variety of ways, depending on how things are setup. Unlocking can be by using a secret serial string, an onboard jumper, and [Walter] even suspects a SHA1 challenge/response could be used if you were so inclined.

It’s never too soon to start thinking about security in your projects. After all, we must stave off the cyberpunk future in which leather-clad youths flick all your lights on and off before burning your house down in the night by overclocking the water heater. Naturally, we’ve got a primer to get you going in the right direction. Happy hacking!

The modern keyboard enthusiast is blessed with innumerable choices when it comes to typing hardware. There are keyboards designed specifically for gaming, fast typing, ergonomics, and all manner of other criteria. [iot4c] undertook their own build for no other reason than nostalgia – which sounds plenty fun to us.

An Arduino Leonardo is pressed into service for this hack. With its USB HID capabilities, it’s perfectly suited for custom keyboard builds. It’s built into a working Atari 65XE computer, and connected to the keyboard matrix. The Keypad and Keyboard libraries are pressed into service to turn keypresses on the 80s keyboard into easily digseted USB data.

There’s plenty of room inside the computer for the added hardware, with the USB cable neatly sneaked out the rear. [iot4c] notes that everything still works and the added hardware does not cause any problems, as long as it’s not used as a computer and a keyboard at the same time.

It’s possible to do a similar hack on the Commodore 64, too. If you’re doing tricky keyboard builds yourself, you know where to send ’em.

The junk bin can be a great source of inspiration, unless you’re too familiar with the contents to be imaginative with them. But thrift stores are another matter, like giant junk bins that are constantly replenished by underappreciated elves. You never know what kinds of goodies they will pile on the shelves, so it’s easy to become a fixture and visit them once or thrice a week.

[Hunter Irving] haunts a few choice thrift stores in his neighborhood, and a few months ago he found a knockoff Thomas the Tank Engine with an articulated face. It uses a simple mechanism to produce an impressive amount of movement, especially for a cheap knockoff toy. Both of its eyes slide sideways and its mouth opens, resulting in a very animated (and terrifying) range of expressions. Sensing an opportunity to turn his animatronic robot dreams into karaoke-singing nightmare fuel for the rest of us, he forked over a few bucks and took it home.

As luck would have it, a 9g micro servo fit perfectly in the back of the frightening little face. [Hunter] designed an axle to transfer motion to the face mechanism, but it broke almost immediately. We applaud his Plan B, though, which consists of a mounting block for the servo, and a cable tie armature connected with screws. Once that was sorted, [Hunter] designed a bulbous body for it in Blender.

This terrifying train-faced toy uses an Arduino Leonardo to read MIDI note-on and -off messages, and opens his mouth when appropriate to sing hit favorites in a smooth, speech-synthesized contralto. Pour yourself a strong beverage and enjoy the build/demo video after the break.

Interested in making your own? [Hunter] has all the files up on his Patreon page. For just $1, you can access the code, synth files, and STL files. While you’re there, you can also get the scoop on his Nintendo LABO waveform cards.


Macros are useful things. They allow one to execute a series of commands with a single keypress. There exists a wide variety of hardware and software solutions to create and use macros to improve your workflow, and now [Evan] has brought the open-source ManyKey into the fray, along with a build tutorial to boot.

The tutorial acts as a great introduction to ManyKey, as [Evan] walks through the construction of a macro keyboard designed to be operated by the feet. Based around the Arduino Leonardo and using off-the-shelf footswitches commonly used in guitar effects, it’s accessible while still hinting at the flexibility of the system. Macros are programmed into the keyboard through a Python app which communicates over serial, and configurations are saved into the Arduino’s onboard EEPROM. The ManyKey source is naturally available over at GitHub.

[Evan] tells us he uses his setup to run DJ software with his feet while his hands are busy on the turntables. That said, there’s all manner of other applications this could be used for. Efficiency is everything, and we love to see keyboard projects that aim to improve workflow with new ideas and custom builds – this shortcut keyboard makes a great example.


While keyboards are great, and custom shortcuts can make things even better, why not do away with buttons and knobs altogether, controlling your computer instead via simple gestures? Maker Ben James has done just this, creating a unique interface using a Skywriter device to pick up finger movements, along with an Arduino Leonardo to emulate a keyboard on his laptop.

Since the Skywriter can detect a number of gestures, James assigned various swipes, taps and circular motions to keyboard commands. As you can see in the video here, the results are pretty neat. 

More info on this project can be found on his blog post, and its code is available on GitHub.

If you’re faced with a closet that doesn’t have any lights inside, you simply could go and find puck lights at most retail stores. But, if you’re Dillon Nichols, you buy a set of lights, and enhance them with a wired power supply and automatic Arduino control.

To accomplish this, Nichols decoded the infrared remote control signal to his puck lights using an Arduino Leonardo, then set up things up to sense the door’s opening via a physical switch and signal the lights accordingly. Now when he opens the closet, lights automatically shine down and fade out when it’s closed.

Nichols also added a timer, so that they turn off after 10 minutes automatically if he forgets to shut the door. Looking for an over-engineered, non-permanent solution for yourself? You can check out his detailed write-up here and find the code for his build on GitHub.


  • Newsletter

    Sign up for the PlanetArduino Newsletter, which delivers the most popular articles via e-mail to your inbox every week. Just fill in the information below and submit.

  • Like Us on Facebook