Posts | Comments

Planet Arduino

Archive for the ‘Arduino Leonardo’ Category

Old laptops are easy to find and many have a trackpad with a PS/2 interface hardwired into the guts of the laptop. [Build It] wanted one of those trackpads for use in the DIY Raspberry Pi laptop he’s working on. But the Raspberry Pi has no PS/2 input, and he read that a PS/2 to USB adapter wouldn’t be reliable enough. His solution? Wire the trackpad to an Arduino and have the Arduino convert the trackpad’s PS/2 to USB.

After removing a few screws, he had the trackpad free of the laptop. Looking up the trackpad’s part number online he found the solder pads for data, clock and five volts. He soldered his own wires to them, as well as to the trackpad’s ground plane, and from there to his Arduino Pro Micro. After installing the Arduino PS/2 mouse and the Mouse and Keyboard libraries he wrote some code (see his Instructables page). The finishing touch was to use generous helpings of hot glue to secure all the wires, as well as the Arduino, to the back to the trackpad. By plugging a USB cable into the Arduino, he now had a trackpad that could plug in anywhere as a USB trackpad. Watch [Build It] put it all together step-by-step in the video below.

Want something else to do with a trackpad. How about combining sixteen of them into an awesome MIDI controller like [Scott] did?


Filed under: Arduino Hacks

Mechanical typewriters are, for the most part, a thing of the past. Though the tactile feedback of these machines is interesting, as is the ability to directly mark on a piece of paper, they lack the important ability to input instructions into a modern computer. Konstantin Schauwecker, not satisfied with this analog-only output, decided to retrofit a German Olympia Monica typewriter as a unique digital user input device.

To accomplish this, he created a PCB with phototransistors that sense when the linkages for each key are pushed down. The result is a keyboard that functions perfectly well as a manual typewriter, and pushes this data to a computer using an Arduino Leonardo.

I modified a vintage type writer to function as a USB keyboard using an Arduino and 50 phototransistors. The typewriter is a German Olympia Monica that I bought at a local flea market. For this project I created a simple PCB that carries the phototransistors and several multiplexers and decoders. The PCB is connected to the Arduino through a ribbon cable. I used an Arduino Leonardo, which can function as a USB input device.

Check out Schauwecker’s write-up for more info on this clever build.

Alex of the YouTube channel “Super Make Something” is a huge fan of Dance Dance Revolution (DDR), and still has to play the game whenever he steps foot into an arcade. However, with the number of arcades slowly declining, the Maker has decided to bring that experience into his living room with a USB DDR dance pad.

And yes, you could always buy a metal dance pad but rather than spend $300, why not build your own? That is exactly what Alex has done using some easy-to-find materials: a 35″ x 35” slab of plywood for the base, four 1” x 35” pieces of wood for the border, five 11” x 11” pieces of MDF for the stationary panels, four 9″ x 9” pieces of cardboard for the riser panels, 12 metal button contacts out of aluminum, four 11” x 11” MDF button pads, acrylic sheets for the dance surface, and plenty of paint and graphics for the finishing touch.

The dance pad itself is based on pull-up resistors and an Arduino Leonardo, which is housed inside a 3D-printed enclosure. The Arduino includes an ATmega32U4 chip that can be programmed to act as a USB input device. The working principle here is that the MCU sends out a keystroke every time a button panel is stepped on. Alex provides a more in-depth breakdown of how it works in the video below! Meanwhile, the Arduino code can be downloaded here.

With school just about out for the summer, Brian Fitzgerald’s son was throwing a party to celebrate the end of exam week. Like any cool Maker dad would, he decided to build awesome lights made out of a few old soda bottles, the “gooey innards” of glow sticks, and some other supplies he had lying around the basement.

Fitzgerald used a wooden plate for the base and a playground post bracket for the mount, along with an Arduino Leonardo (though any Arduino would do) and three NeoPixel rings for the colorful effects.

Fill the Coke bottles with water. Alternatively, you can add a drop of milk to get a cloudy effect — it makes the liquid translucent and gives the impression of solid light, but you loose the little bubble and scratch effects that clear water highlights, which we thought was cooler. We put a black Sugru cap on the bottles to avoid a drunken accident involving water and electronics. And filled the countersunk bolt holes with Sugru to hide the bolt heads as well.

I attached the plastic Arduino casing with double-sided velcro to the base unit for easy removal. It’d look nicer if I’d put the whole unit inside the base, but as we’re planning to pull the board out and modify for music sensitivity, I opted for convenience over beauty. If anybody has any cool Arduino code that gets an Adafruit auto-gain mic and NeoPixels jamming via FFT, I’d love to see it. There are some great color organ projects out there, but I can’t seem to find this particular combo. So we may have to write it ourselves!

Plug the 9v wall wart into the Arduino and BOOM. You got yourself a classic party light that’s mesmerizing to look at, throws patterns on the ceiling that look like Hubble images of distant nebulae, a fine conversation piece, and a bunch of cast off junk transformed into a thing of beauty.

Intrigued? You can check out the entire project on Instructables, as well as see it in action below.


step

The Interaction Awards  published the shortlisted projects for 2016 and up to five finalists in each category will be announced during the event on Friday evening, March 4, 2016. In the Expressing category, showcasing projects enabling self expression and/or creativity there is a project called Step representing an innovative and engaging way of approaching music production for children between 6 and 100 years old.

Step runs on an Arduino and has been created by Federico Lameri, Sandro Pianetti at the Master of Advanced Studies in Interaction Design in Lugano under the supervision of Massimo Banzi and Giorgio Olivero of Todo.

To prototype the user experience we’ve used an Arduino Leonardo connected to a processing sketch that handle the recording and playback features. Using a Mux Shield 2 we managed connecting 25 IR sensors, 16 LEDs, 1 knob and a button to a single Arduino board. We needed a quick and effective way to test the experience and by using Arduino we managed to design and build the whole product in three weeks.

Most of the music toys on the market are trying to fake the sounds and the experience of real instruments. Step has a different approach as it’s designed to give children the opportunity to create real loops and beats using whatever sounds they like from objects of everyday life.

Players can record any sounds and match them with  coloured tags, and then  create melodies, loops and and beats by placing tags on the track and by adjusting the tempo!

Check the video below to see it in action:

Motion control is a Holy Grail of input technology. Who doesn’t want an interface that they can control with simple and natural movements? But making this feel intuitive to the user, and making it work robustly are huge hills to climb. Leap Motion has done an excellent job creating just such a sensor, but what about bootstrapping your own? It’s a fun hack, and it will give you much greater appreciation for the currently available hardware.

Let’s get one thing straight: This device isn’t going to perform like a Leap controller. Sure the idea is the same. Wave your hands and control your PC. However, the Leap is a pretty sophisticated device and we are going to use a SONAR (or is it really SODAR?) device that costs a couple of bucks. On the plus side, it is very customizable, requires absolutely no software on the computer side, and is a good example of using SONAR and sending keyboard commands from an Arduino Leonardo to a PC. Along the way, I had to deal with the low quality of the sensor data and figure out how to extend the Arduino to send keys it doesn’t know about by default.

The Plan

The plan is to take an inexpensive SONAR module (the HC-SR04) and an Arduino Leonardo and use it to perform some simple tasks by mimicking keyboard input from the user. The Leonardo is a key element because it is one of the Arduinos that can impersonate a USB keyboard (or mouse) easily. The Due, Zero, and Micro can also do the trick using the Arduino library.

I wanted to determine how many gestures I could really determine from the HC-SR04 and then do different things depending on the gesture. My first attempt was just to have the Arduino detect a few fingers or a hand over the sensor and adjust the volume based on moving your hand up or down. What I didn’t know is that the default Arduino library doesn’t send multimedia keys! More on that later.

How the SONAR Works

The SONAR boards come in several flavors, but the one I used takes 4 pins. Power and ground, of course, are half of the pins. In fact, my early tests didn’t work and I finally realized the module requires more power than I could draw from the Arduino. I had to add a bench supply to power the module (and, of course, I could have powered the module and the Arduino from the same supply).

The other two pins are logic signals. One is an input and a high-going pulse causes the module to ping (8 cycles at 40kHz). There is a delay and then the other pin (an output) will go high and return low when the module detects the return ping. By measuring the time between your signal to ping and the return, you can judge the distance. In my case, I didn’t care about the actual distance (although that’s easy to compute). I just wanted to know if something was farther away or closer.

ping
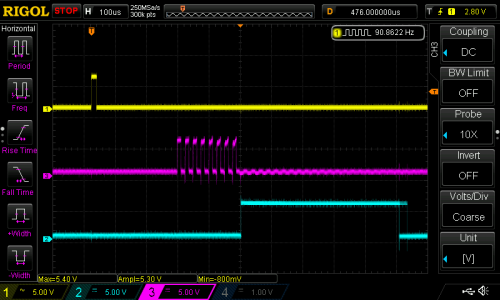
The scope trace to the right shows the sensor pointing at something relatively near. The top trace is the start pulse and the bottom trace is the input to the Arduino. The center trace is the output of the SONAR transducer. All the signal conditioning is inside the sensor, so you don’t need to worry about the actual signal processing to generate and recover the audio. You only need to measure the width of that bottom pulse.

The scope has persistence and you can see that the bottom trace does not always come out right at the same time (look at falling edge and you can see “ghosts” for previous samples. It shouldn’t come as a surprise that it may take a little effort to reduce the variations of the signal coming back from the SONAR.

Noise Reduction and Actions

Averaging

I wound up trying several different things to attempt to stabilize the input readings. The most obvious was to average more than one sample. The idea is that one or two samples that are way off will get wiped out by the majority of samples that are hovering around some center value. I also found that sometimes you just miss–especially when looking for fingers–and you get a very large number back. I elected to throw out any data that seemed way off when compared to the majority of received data.

Verifying

One other tactic I used was to verify certain elements with a second reading. For example, the start event occurs when the SONAR reports a value under the idle limit. The idle limit is a number less than the reading you get when the SONAR is pointed at the ceiling (or wherever it is pointing) and you don’t have anything blocking it. To recognize a valid start, the code reads twice to make sure the value is under the limit.

The code inside the Arduino loop is essentially a state machine. In the IDLE state, it looks for a reading that is below the idle limit. When found, that causes a transition to the sampling state. When the reading goes up or down more than some preset value, the code in the sample state sends a volume up or down key via the keyboard interface. If the sample goes back over the idle limit, the state machine returns to IDLE.

I got pretty good results with this data reduction,  but I also found the NewPing library and installed it. Even though it isn’t hard to write out a pulse and then read the input pulse, the NewPing library makes it even easier (and the code shorter). It also has a method, ping_median, that does some sort of data filtering and reduction, as well.

You can select either method by changing the USE_NEW_PING #define at the top of the file. Each method has different configuration parameters since the return values are slightly different between the two methods.

I said earlier that the code sends volume up and down commands when it detects action. Actually, the main code doesn’t do that. It calls an action subroutine and that subroutine is what sends the keys. It would be easy to make the program do other things, as well. In this case, it simply prints some debugging information and sends the keys (see below). I didn’t react to the actual position, although since the action routine gets that as a parameter, you could act on it. For example, you could make extreme positions move the volume up two or three steps at a time.

Sending Keyboard Commands

I wanted to send standard multimedia keys to the PC for volume up and down. Many keyboards have these already and usually your software will understand them with no effort on  your part. The problem, though, is that the default Arduino library doesn’t know how to send them.

Fortunately, I found an article about modifying the Arduino’s library to provide a Remote object that wasn’t exactly what I had in mind, but would work. Instead of sending keys, you have methods on a global Remote object that you can call to do things like change or mute the volume. The article was for an older version of the Arduino IDE, but it wasn’t hard to adapt it to the version I was using (version 2.1.0.5).

The action routine really only needs the UP_IN and DN_IN cases for this example. However, I put in all four branches for future expansion. Here’s the action subroutine:

void action(int why, unsigned value=0)
{
 Serial.print(value);
 switch (why)
 {
 case START_IN:
 Serial.println(" Start");
 break;
 case STOP_IN:
 Serial.println(" Stop");
 break;
 case UP_IN:
 Serial.println(" Up");
 Remote.increase();
 break;
 case DN_IN:
 Serial.println(" Down");
 Remote.decrease();
 break;
 }
}

The Final Result

sonar
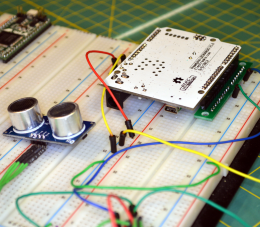
The final result works pretty well, although the averaging makes it less responsive than you might wish. You can turn down the number of samples to make it faster, but then it becomes unreliable. You can download the complete code from Github. The first thing you’ll want to do is check the top of the file to make sure your module is wired the same (pin 3 is the trigger pin and pin 8 is the echo return pin). You’ll also want to select if you are going to use the NewPing library or not. If you choose to use it, you’ll need to install it. I flipped my Leonardo upside down and mounted it on a breadboard with some adapters (see picture to right). It really needs a more permanent enclosure to be useful. Don’t forget to give the SONAR module its own 5V power supply.

If you look near the top of the loop function there is an #if statement blocking out 3 lines of code. Change the 0 to a 1 and you’ll be able to just get averaged data from the sensor. Put the module where you want it and see what kind of numbers you get. Depending on the method I used I was getting between 4000 and 9000 pointed up to the ceiling. Deduct a bit off of that for margin and change IDLETHRESHOLD (near the top of the file) to that number.

The DELTATHRESHOLD is adjustable too. The code sees any change that isn’t larger than that parameter as no change. You might make that bigger if you have shaky hands or smaller if you want to recognize more “zones”. However, the smaller the threshold, the more susceptible the system will be to noise. The display of samples is helpful because you can get an idea how much the readings vary when your hand is at a certain spot over the sensor. You can try using one or two fingers, but the readings are more reliable when the sound is bouncing off the fleshy part of your palm.

If you want to add some more gestures, you may have to track time a bit better. For example, holding a (relatively) stationary position for a certain amount of time could be a gesture. To get really sophisticated gestures, you may have to do some more sophisticated filtering of the input data than a simple average. A Kalman filter might be overkill, but would probably work well.

If you look around, many robots use these sensors to detect obstacles. Makes sense, they’re cheap and work reasonably well. There are also many projects that use these to show an estimate of distance (like an electronic tape measure). However, you can use them for many other things. I’ve even used a similar set up to measure the level of liquid in a tank and earlier this week we saw ultrasonic sensors used to monitor rice paddies.

If you really want to get serious, [uglyduck] has some analysis of what makes spurious readings on this device. He’s also redesigning them to use a different processor so he can do a better job. That might be a little further than I’m willing to go, although I was impressed with the 3D sonic touchscreen which also modified the SONAR units.


Filed under: Arduino Hacks, Featured, peripherals hacks

2015-09-21

Industruino’s mission is to offer industrial automation components that have the simplicity of Arduino at its core. It’s created by Loic & Ainura, two product designers originally from Belgium and now based in Shenzhen, with a mission to help people make their own products, by creating an accessible platform.

Today they are officially joining the Arduino AtHeart program with Industruino Proto, a Leonardo compatible industrial controller housed in a DIN-rail enclosure, with screw connector terminals to robustly connect to sensors and actuators.

industruino_blogpost3

Industruino allows makers and professionals to take a breadboarded solution and make it into an enclosed finished looking product, ready for permanent installation. Watch Loics’ introduction:

With Industruino everyone can combine the strengths of Arduino with the specific requirements of industry:

We are now at the dawn of a new industrial revolution, one in which the key elements will be automation, robotics and interconnected devices. In this revolution the Arduino platform is growing to be a real contender.

We are very excited to become part of the At Heart family! It is our way to show that we are very much interlinked with the Arduino community. We are looking forward to further develop the use of Arduino in industrial applications whilst contributing back to the Arduino platform.

When you open the enclosure you will find a prototyping area to add your own components, and re-routable jumper connections, letting you connect any point to either the microcontroller’s pins or the external screw connectors. The onboard graphic LCD and membrane button panel facilitate quick UI development to visualise and input your application’s data.

Explore other tech info on Industruino website and make it yours on their store!


industruino_blogpost2

We’re surprised we haven’t seen this kind of clock before, or maybe we have, but forgot about it in the dark filing cabinets of our minds. The above picture of [danjhamer’s] Matrix Clock doesn’t quite do it justice, because this is a clock that doesn’t just tick away and idly update the minutes/hours.

matrix clock

Instead, a familiar Matrix-esque rain animation swoops in from above, exchanging old numbers for new. For the most part, the build is what you would expect: a 16×8 LED Matrix display driven by a TLC5920 LED driver, with an Arduino that uses a DS1307 RTC (real-time clock) with a coin cell battery to keep track of time when not powered through USB. [danjhamer] has also created a 3D-printed enclosure as well as added a piezo speaker to allow the clock to chime off customizable musical alarms.

You can find schematics and other details on his Hackaday.io project page, but first, swing down below the jump to see more of the clock’s simple but awesome animations.


Filed under: Arduino Hacks, clock hacks
Sep
01

Music and language skills get a boost with Toot

arduino, Arduino Leonardo, education, Featured, Kids, leonardo, music, sound, Toys Comments Off on Music and language skills get a boost with Toot 

toot02

Toot is an interactive and sound-active toy designed for children aged between 3 and 6 years old that wants to enhance their auditory, music and language skills. It was developed by Federico Lameri as his thesis project of Master of Interaction Design at Supsi and prototyped using Arduino Leonardo.

The toy is composed by eight little cubical speaker boxes:

On each speaker children are able to record a sound. In order to listen back to the recorded sound the speaker must be shaken as if the sound was physically trapped into a box. After having recorded sounds on them, the speakers can be placed in a sequence after Mr.toot, and by tapping on his head it is possible to trigger the playback of the speakers in a sequence. toot is also matched with a mobile application that offers different kind of interactions and experiences. it allows to play some exercise that will teach children to listen, understand and catalog sound and melodies.

toot

The app expands the possibilities of interaction, offering different exercises created with the help of musicians and educators from different areas of expertise,  some of them are also inspired by a Montessori sensorial activity.

Take a look at the video interview with Montessori educator Fanny Bissa:


Apr
02

Unlocking your Computer with a Leonardo and an NFC Shield

arduino hacks, Arduino Leonardo, NFC, radio hacks Comments Off on Unlocking your Computer with a Leonardo and an NFC Shield 

Manually typing your login password every time you need to login on your computer can get annoying, especially if it is long and complex. To tackle this problem [Lewis] assembled an NFC computer unlocker by using an Arduino Leonardo together with an NFC shield. As the latter doesn’t come with its headers soldered, a little bit of handy work was required.

A custom enclosure was printed in order to house the two boards together and discretely mount them under a desk for easy use. Luckily enough very few code was needed as [Lewis] used the Adafruit NFC library. The main program basically scans for nearby NFC cards, compares their (big-endianned) UIDs against a memory stored-one and enters a stored password upon match. We think it is a nice first project for the new generation of hobbyists out there. This is along the same lines as the project we saw in September.

(You’ll notice I made this post without mentioning the you-know-what project!)


Filed under: Arduino Hacks, radio hacks


  • Newsletter

    Sign up for the PlanetArduino Newsletter, which delivers the most popular articles via e-mail to your inbox every week. Just fill in the information below and submit.

  • Like Us on Facebook