Posts | Comments

Planet Arduino

Archive for the ‘Programming’ Category

Mar
07

Embrio: A visual programming environment for Arduino

arduino, Embrio, Programming Comments Off on Embrio: A visual programming environment for Arduino 

embrio-screenshot-1-600x278Embrio

Embrio, create Arduino programs without writing code:

Easy To Use -Make programs by adding and connecting nodes. No coding necessary!

Real Time Connection -Work with a live connection to your Arduino, see how your program works as you build it!

Powerful -While easy to use, Embrio is a powerful development tool that you won’t outgrow as your skills develop.

Embrio: A visual programming environment for Arduino - [Link]

Jan
29

Windows Bean Loader Enables Wireless Arduino Programming from Surface Pro Tablets

arduino, Bluetooth LE, Programming, Software Comments Off on Windows Bean Loader Enables Wireless Arduino Programming from Surface Pro Tablets 

win_bean_loader_1

SAN FRANCISCO and MINNEAPOLIS, January 26, 2015 — Punch Through Design, a hardware and software development firm that brings Bluetooth Low Energy hacking to the masses, has released the Windows Bean Loader, the first-ever wireless Arduino programming app for Windows users. Using the loader app, Windows-based developers and hobbyists can easily upload code to their LightBlue Bean and experience the power of Bluetooth Low Energy, without cables or a physical connection to the LightBlue Bean.

“The LightBlue Bean represents a new method of wirelessly interacting with prototypes and projects; says Colin Karpfinger, founder and CEO, Punch Through Design. Previously, only Mac OS X and iOS users could program their Beans, and now we are extending that functionality to Windows users.

The full-featured app, available from the Windows Store, fills a void for Windows-based developers and DIYers looking to create smartphone-controlled devices.

Windows Bean Loader Enables Wireless Arduino Programming from Surface Pro Tablets - [Link]

Apr
17

Arduino AVR Progamming Shield

arduino, AVR, Programming, shield Comments Off on Arduino AVR Progamming Shield 

FLKLUX6HTK2J358.MEDIUM

Do you need a quick and easy way to program AVR chips. Did you know you can use your Arduino and the Arduino IDE? This Arduino shield makes the process much easier.

Arduino AVR Progamming Shield - [Link]

Apr
16

How to make your own Primo prototype using digital fabrication and Arduino boards

arduino, ArduinoAtHeart, Kids, Programming Comments Off on How to make your own Primo prototype using digital fabrication and Arduino boards 

primo doc

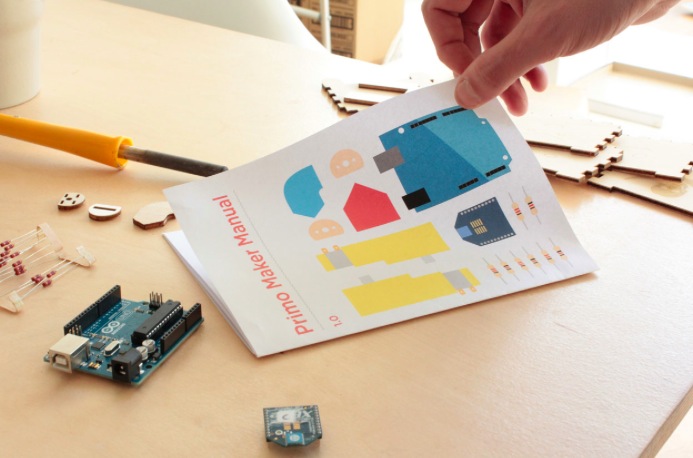
Primo‘s team sent us exciting news from their HQ about their contribution to the open source community. After the successful Kickstarter campaign to launch the wooden play-set that uses shapes, colours and spacial awareness to teach programming logic through a tactile, warm and magical learning experience, they took a step further. They released all the documentation and the instructions to produce a Primo prototype,  different from the product that they make and sell.

We just finished the first edition of the Primo play-set open documentation, that includes the design files that we used to make our first prototype and a step-by-step guide to make your own version of the Primo play set. This “maker” version of our product can be assembled using rapid prototyping techniques and common tools like Arduino boards.

We recently published a preview of this documentation just for our Kickstarter backers, who already started to build their projects and to translate the document in their language. The FabLab in São Paulo for example already translated it in Brasilian Portuguese, while other languages like Dutch, Italian and Japanese are now in progress.

The whole documentation is completely transparent: it’s written in Markdown using Jekyll and GitHub pages. In this way it is very easy for creators to modify, translate and use it as a starting point for their projects.

In parallel we are developing an industrial version of our product, using manufacture-quality materials and custom Arduino-compatible electronic boards.


Primo

And if you want to read about the experience of a dad making a DIY version in 1 month and a half of work, follow this link.

Primo is an Arduino At Heart partner. If you have a great project based on Arduino and want to join the program, read the details and then get in touch with us.

Dec
18

Primo and playful programming: last 3 days on Kickstarter!

arduino, ArduinoAtHeart, education, game, Kids, Programming Comments Off on Primo and playful programming: last 3 days on Kickstarter! 

Primo_Workshop

Here’s the latest updates from Primo’s team on their successful Kickstarter campaign. You have only 3 days left to pre-order your copy!

————–

27 days on from our Kickstarter campaign for Primo, in collaboration with the Arduino at Heart program, we are pleased to announce that we have reached both our first funding goal at £ 35,000 and our first stretch goal at £ 40,000. This means that our little robot will evolve to allow makers to add sensors and actuators, amplifying greatly the Primo experience.

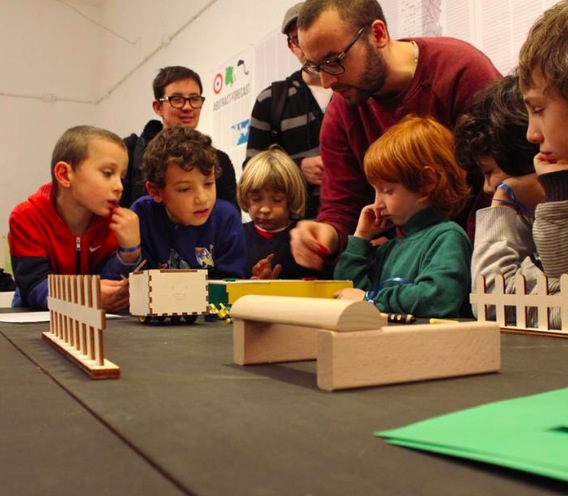
During this period we also successfully held our first workshop with children, which saw the Primo Play Set being operated in what in the future we hope will be a classroom in every school.

We are looking at a final stretch to reach our final stretch goal, which is to craft a 3 month school program in multiple languages, that can facilitate the adoption of Primo in schools all over the world. We are now offering Maker Workshops as a reward, where the Primo team will travel to your neighbourhood, workshop or school and teach you how to build more Primo’s, use them and hack them, so as to get you started with your own R&D with the Primo Play Set.

Primo.io Team

Nov
22

Teach programming logic to kids with Primo – Now on Kickstarter!

arduino, ArduinoAtHeart, kickstarter, Kids, Programming, Scracth Comments Off on Teach programming logic to kids with Primo – Now on Kickstarter! 

Primo

Primo is a play-set that uses shapes, colours and spacial awareness to teach programming logic through a tactile, warm and magical learning experience.

We are proud to announce that Primo is on Kickstarter now and it’s an Arduino At Heart product!

I recently met Matteo Loglio, one of the creators of  Primo,  and  I took the chance to know more about this great game for kids:

Tell us a bit more how Primo was born?

It all started as a student project, when I was doing my master at MAInD in Lugano. There was this course called “Designing Advanced Artifacts” with Massimo Banzi and HABITS studio where each student had to choose a field for his project. My choice was “How can we teach science and technology to children in a playful way?”.

The first thing I did was to visit  a kindergarten, in Chiasso. There I spent a couple days talking with teachers and watching children playing. I was able to gather useful insights that are still very important for the development of Primo. Later I did some desktop research on how the same topic was approached in the past, I discovered “Mindstorms” from Seymour Papert, I think one of the most significant books in this field. That’s how I also discovered Jean Piaget’s early work in the field of cognitive psychology, where Papert took inspiration for his researches.

Any other significant inspirations?

Papert translated his studies in Logo, a graphic computer software that was so innovative that it’s still used in elementary and middle schools. It’s like the father of Scratch, much simpler, but very powerful; the aim of Logo was in fact to enhance the way children face problems and assimilate knowledge. Most of Logo applications are purely on-screen, with some exceptions though, that are called “physical turtles”. I wanted to start from there, with a different target and with the help of new prototyping tools like Arduino. A big challenge was to hide all the technology, screens and any “tech” element from the product. Everything is hidden, to create a “magic” and engaging experience, with no distractions. Children know that everything can happen on a screen, but wooden robots are still a pleasant surprise for them. The rest of the project was quite simple actually, I simplified the Logo concept into three main instructions: forward, left and right, then I also added a “function”, for more advanced levels; the idea is in fact to create levels, with increasing difficulty and challenges. This is a key aspect of Primo, LOGO didn’t have any challenge it’s a pure expressing tools.

How does Primo it work?

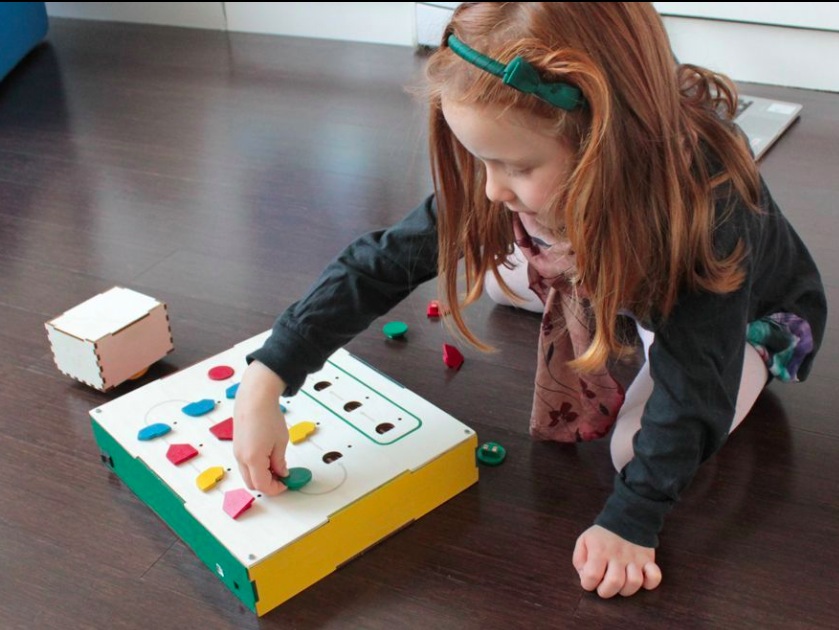
There’s this small smiling robot, that we call “cubetto”, that got lost and it has to come back home. The only way to move it, is by giving it the right instructions. The set of instructions are very limited: forward and left or right turn, 90 degrees. They have to be placed in the right order into a board, with an empty “queue” of holes. In this way the children are composing basic algorithms to solve a problem, using just colored wooden blocks, no need for literacy or previous knowledge in computing, keyboards or screens. Basically the teacher (or the parent), places the cubetto and his house on the floor and the child has to figure out one way to bring cubetto home, using just a limited set of elements.

How did Primo became a product?

After the prototyping phase, along with Filippo Yacob of Brain Cube Corp., we decided to turn Primo into a real product, so we funded a company together, primo.io, with the intention of producing Primo industrially and hopefully distribute it to schools world-wide. We soon assembled a team with Josh Valman from MiProto, Lucia Rabago and Beatrice Finauro. Each member bringing his unique set of skills necessary to transform Primo into a real product produced in series. Production represented an entire new set of constraints, from financial to logistical. As a team we had to redesign for the real world. This changes your perception of the product. It was however a benefit that Primo was originally designed in a university setting, with no other focus other than the end user, we wouldn’t have been as happy with the result had we began designing for commercial reasons.
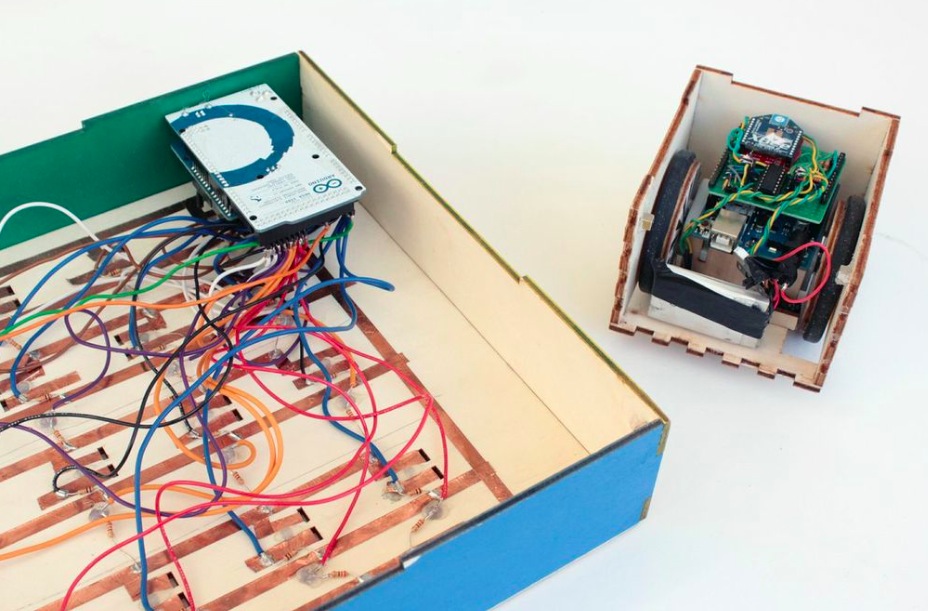
Primo_Inside

And then you decided to take part to the Arduino At Heart Program, why?

We chose to take part in the initiative for a number of reasons. As a maker-centric company we concentrate on ideating and developing products. Marketing and publicity is a completely different type of activity, and an aspect of business that takes time to develop and execute effectively. Outsourcing this element of business, is normally prohibitively expensive for a small business, or virtually impossible to achieve. Arduino at Heart solves this problem by making their resources available in this field.

Wanting to be “Arduino approved” gave us the desire to improve our processes and products to a quality level that would match the Arduino brand. As a consequence, this makes our product more accessible and user friendly to a community that is already familiar with the technology

Arduino At Heart

From the point of view of interaction design, what are the cool things  about Primo, why is innovative?

I think that from the beginning we tried to develop a tool to learn technology, without showing the complexity behind it. Normally, we say that kids these days grow up with touch screens and computers, so we have to develop on these platforms. This is a safe road to follow, but we took the other one, we wanted to validate our theories, we knew that we could synthesize these concepts in a purely tangible form, without relying on any previously known cognitive interface. We created our own model, specifically crafted for our target. PCs, laptops and tablets were designed for other purposes, we started from scratch. Primo has been tested a lot, around 150 children used it so far, they liked it but we can’t really say how much it can be innovative, until we see children using this extensively and improve their problem solving skills. For this reason we built a company around primo, now we are six people with very different backgrounds. We will be Kickstarter at the beginning of November, to see if other people will support the project, to spread it around schools, houses and keep improving it.
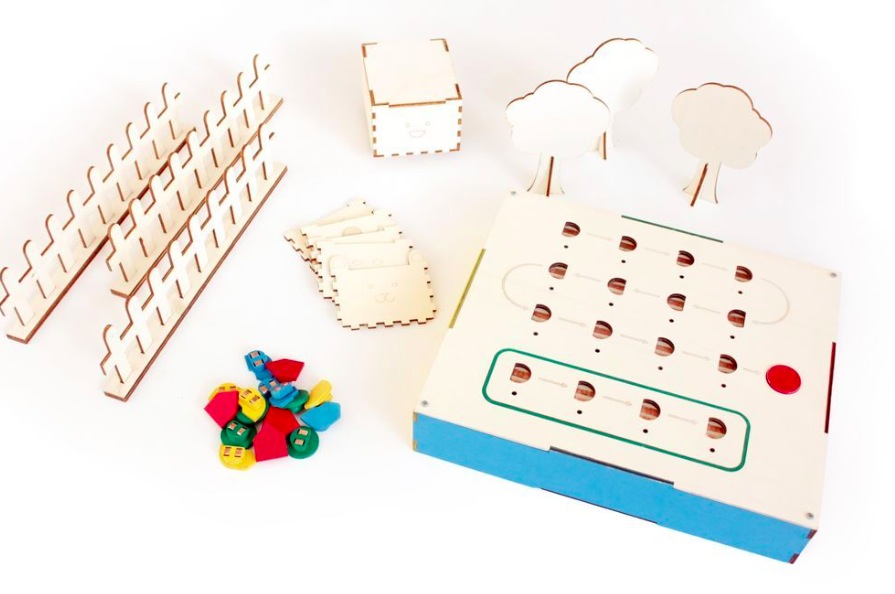
Primo Components

In the last couple of years, a series of initiative focused on kids making things with technology, coding and electronics have been launched all over the world. Why you chose to create something for kids, isn’t it harder and more difficult to start form the young ones?

Maybe it’s a bit more difficult because you can’t interview or study their behavior directly. Of course they are very different from adults, they keep changing and learning new things very fast, so their conceptions and values can change over time. Everything has to be tested, but during tests it’s also easier to see if they don’t like something.

As you say lots of projects are simplifying code access to non technical people, that is great, it’s like in the 80s with computers. We are bringing technology that just a few years ago was unaccessible to the people, with the consequence that more and more users have access to these technologies, musicians, artists, designers and why not, educators.

Oct
25

Introduction

After helping many people get started with the world of Arduino and electronics,  we still find a small percentage of people who are turned off by the concept of programming or have trouble breaking larger tasks into smaller ones with regards to writing algorithms for their code/sketch.

So after being introduced to a new graphical programming tool called “Ardublock“, we were excited about the possibilities wanted to share it with our readers. Ardublock provides a truly graphical and non-coding solution to controlling an Arduino, that is an open-source product and thus free to download and try for yourself.

Installation

Ardublock is a Java application that runs from inside the Arduino IDE, which can be downloaded from here. It’s only one file, that needs to be placed in a new folder in the Arduino IDE. The folder names must be the same as shown below:

ardublock installation folder

Once you’ve copied the file, simply open the Arduino IDE and select Ardublock from the Tools menu:

arduino ide tools menu ardublockFrom which point a new window appears – the Ardublock “development environment”:

ardublock development environment

 Using Ardublock

It’s quite simple – you simply select the required function from the menu on the left and drag it into the large area on the right. For a quick example where we blink the onboard LED on and off – watch the following video:


The following image is the screen capture of the program from the video:

ardublock LED Blink

As you can see the “blocks” just fit together, and parameters can be changed with the right mouse button. After a few moments experimenting with the Ardublock software you will have the hang of it in no time at all.

And thus you can demonstrate it to other people and show them how easy it is. And there is much more than just digital output controls, all the functions you’re used to including I2C, variables, constants, servos, tone and more are available.

The only technical thing you need to demonstrate is that the Arduino IDE needs to stay open in the background – as once you have finished creating your program, Ardublock creates the required real Arduino sketch back in the IDE and uploads it to the board.

This is also a neat function – the user can then compare their Ardublock program against the actual sketch, and hopefully after a short duration the user will have the confidence to move on with normal coding.

Conclusion

Ardublock provides a very simple method of controlling an Arduino, and makes a great starting point for teaching the coding-averse, very young people or the cognitively-challenged. It’s open source, integrates well with the official IDE and works as described – so give it a go.

And if you enjoyed this review, or want to introduce someone else to the interesting world of Arduino – check out my book (now in a third printing!) “Arduino Workshop” from No Starch Press.

tronixstuff

In the meanwhile have fun and keep checking into tronixstuff.com. Why not follow things on twitterGoogle+, subscribe  for email updates or RSS using the links on the right-hand column? And join our friendly Google Group – dedicated to the projects and related items on this website. Sign up – it’s free, helpful to each other –  and we can all learn something.

The post Review – “Ardublock” graphical programming for Arduino appeared first on tronixstuff.

Sep
03
Picture used with permission form @sbbrainI have to admit, I love LED, who doesn't. But when i came across this awesome Instructable from user Sbbrain I started to go nuts.

Read more on MAKE

May
22

Diyode Codeshield Gets a Lesson Plan

arduino, education, Programming, shield Comments Off on Diyode Codeshield Gets a Lesson Plan 

codeshieldThe Diyode Codeshield is a fascinating project out of the Diyode hackerspace in Guelph, ON. It’s an Arduino shield loaded with sensors, a buzzer, a motor, LEDs, a rotary encoder, and so on, with the idea that it would help people learn Arduino programming without having to learn about electronics […]

Read the full article on MAKE

Apr
15

Developing for Arduino on Android

Android, arduino, Computers & Mobile, Programming Comments Off on Developing for Arduino on Android 

The underside of the Arduino Uno.You can now develop for Arduino directly from Android using the ArduinoDroid app, released on Friday onto the Google Play store.

Read the full article on MAKE


  • Newsletter

    Sign up for the PlanetArduino Newsletter, which delivers the most popular articles via e-mail to your inbox every week. Just fill in the information below and submit.

  • Like Us on Facebook