Posts | Comments

Planet Arduino

Archive for the ‘pir sensor’ Category

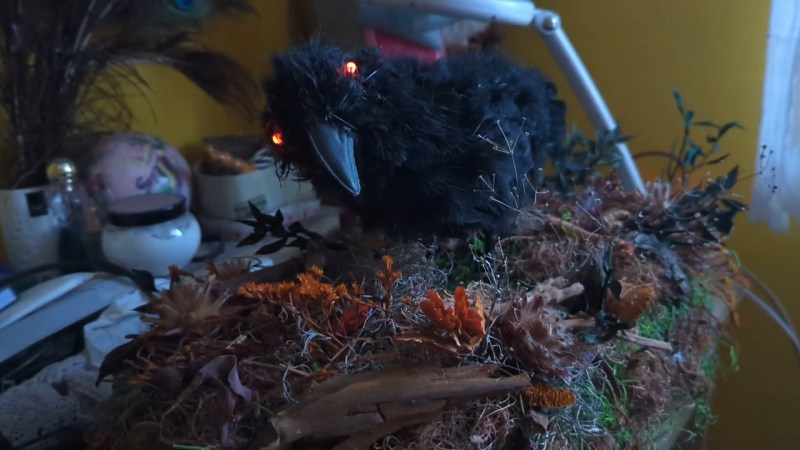
Sometimes, projects start in somewhat unlikely places. This one began when [Istvan Raduly] scored a fake raven at a neighbor’s garage sale and decided to turn it into a thunder-and-lightning decoration that would frighten even the bravest trick-or-treater.

Get close enough to this raven and you’ll set off the PIR sensor, which triggers lighting and sound effects, including some spooky glowing and blinking red eyes, general cawing, and of course, thunder. The light comes from a whopping 10-watt, 12-volt power LED. This bird’s brain is an Arduino Nano, which is protected from the 12V supply with a boost converter. As you might expect, the sounds are on an SD card and played through a DF Player Mini.

Spookiness aside, our favorite part might be the absolutely lovely job that [Istvan] did decorating the raven’s base. Hiding electronics and hot glue is one thing, but this is above and beyond. Be sure to check it out after the break, both in the safety of the house, and outside in the scary darkness.

In the Red Dwarf TV series, Talkie Toaster wants to know if you want toast, and if not toast, then maybe a muffin or waffle, and it will pester you incessantly until you smash it with a 14lb lump hammer and throw it in a waste disposal. Now [slider2732] has actually gone and made one of the infernal machines!

He’s hidden a PIR sensor in the toaster handle to tell an Arduino Pro Mini when someone is unfortunate enough to be passing by. The Arduino then reads sound files from an SD card reader and plays them through a 3 watt amplifier out to a speaker. For that he uses the TMRpcm library available on github.

[slider2732] cleverly mounted the speaker to the side of the toaster along with some appropriately shaped bits and pieces, and some LEDs to make it appear and work much like the circular panel that lights up on the real Talkie Toaster. We dare you to watch the video after the break, unless you really are looking for toast. As a consolation, the video also walks through making it.

These links will take you to clips of Talkie Toaster in the TV series before he was smashed and after he was repaired.

And what else can you do with a toaster? Why not make a flying one. Of course what seems to be most popular here on Hackaday is making reflow ovens from toaster ovens.


Filed under: Arduino Hacks

Planning to make that carved a pumpkin last past Halloween night? Forget the tealight or LED candle—here’s an easy, no-solder project that will make it extra special. By default, this jack-o-lantern looks like it has a flickering flame, but get close enough to it and it goes crazy with color.

All you need is an LED matrix, a Rainbowduino to drive it, a PIR motion sensor to trigger the random colors, and a power source. [Alpha Charlie] kept the electronics from becoming pumpkin-flavored with some plastic bags. Since he used the PIR as the jack-o-lantern’s nose, there is a bit of plastic behind it to keep moisture from interfering.

[Alpha Charlie]’s build instructions are quite detailed, which makes this project even simpler if you’ve never used a PIR before. There are lots of ways you could build on this project to make it your own, like using trick-or-treater motion to trigger screams or spooky sounds, or add more sensors to make it more interactive. Watch it react after the break.

If you have nothing else at all to do between now and trick-or-treat time, you could bust out the soldering iron and recreate this 70-LED matrix jack-o-lantern. Blinkenlights too safe for your tastes? Fire-breather it is, then.


Filed under: Arduino Hacks, Holiday Hacks
Oct
16

Build a Basic IR Motion-Sensing Camera with Weekend Projects

arduino, Electronics, Featured, GreatCreate, pir sensor, RadioShack, Weekend Projects Comments Off on Build a Basic IR Motion-Sensing Camera with Weekend Projects 

bellagram_compositeCombine some common components and several pieces of software into one, and assemble this microcontroller-driven motion-sensing camera that records VGA resolution pictures to SD card.

Read more on MAKE

Nov
02

Build a Basic Infrared Motion Alarm with Weekend Projects

alarm, arduino, GreatCreate, MAKE Projects, Piezo, PIR, pir sensor, RadioShack, Sensor, Weekend Projects Comments Off on Build a Basic Infrared Motion Alarm with Weekend Projects 

rs16_blog_featurecBuild a motion-sensing alarm by combining a few common components: an Arduino, a PIR sensor, a piezo buzzer, and a breadboard. All you need is some jumper wire to connect them all, and the software to run it.

Read the full article on MAKE

I have recently received the following question from a reader: I’m looking for a circuit board design that will need to turn on an array of LEDs when motion is detected during the day time, and also stay on continuously during the night time; using the Arduino would be nice. The project that I am […]

The post Motion and Light Sensors with Arduino (and Without) appeared first on Tinker Hobby.

Sep
28

Webcam + PIR sensor + servos +ioBridge + txt message alerts = awesome security system

iobridge, pir sensor, servo, webcam Comments Off on Webcam + PIR sensor + servos +ioBridge + txt message alerts = awesome security system 

So I extended my webcam project to become a security system while I was away for the last couple weeks.


I mounted a webcam with two Futaba S3003 servos (pan + tilt) with the help of a Meccano 5-model set . I also installed 2 PIR sensors to detect movement. Then I mounted all to a tripod.

I created 2 ioBridge messaging actions to send me a TXT message if any of the PIR sensor went to the ON position (note that I only activated this action while away to avoid receiving a huge amount of TXTs) and also a Digital input to servo position action to move the camera to the direction of movement.

I placed the camera on the side of my main hall, so I was able to get at 180 degree view of my house while away.


Luckily it only went off once when I asked my sister to come to my house to grab something for me :) , other than that It worked great! I also used my x10 controllers to turn on/off a few lights inside my house as well as a lamp candle (scentsy) that I was able to to turn on the day I flew back home.

Now I only wonder what will it take to tap  into my actual security system with my ioBridge.


  • Newsletter

    Sign up for the PlanetArduino Newsletter, which delivers the most popular articles via e-mail to your inbox every week. Just fill in the information below and submit.

  • Like Us on Facebook