Posts | Comments

Planet Arduino

Archive for the ‘TFT’ Category

Add some jazz & pizazz to your project with a color touchscreen LCD. This TFT display is big (3.5″ diagonal) bright (6 white-LED backlight) and colorful! 480×320 pixels with individual RGB pixel control, this has way more resolution than a black and white 128×64 display, and double our 2.8″ TFT. As a bonus, this display has a capacitive touchscreen attached to it already, so you can detect finger presses anywhere on the screen.

The Adafruit 3.5″ 320×480 Color TFT breakout guide has been updated for rev B of the breakout. We’ve updated this hardware to use the FT5336 capacitive touch screen controller. The screen and micro SD card are the same but any touchscreen code will need to be updated to use our Arduino or CircuitPython library. We’ve also updated the reset button to be right-angle and added a STEMMA QT port. There’s also an EYESPI connector for easy interfacing with the SPI pins. We have a new Pinouts page, new Arduino example, new CircuitPython example and updated resources on the Downloads page.

Check out the full guide: Adafruit 3.5″ 320×480 Color TFT Breakout

Economy of scale is a wonderful thing, take the switch-mode power supply as an example. Before the rise of the PC, a decent multi-voltage, high current power supply would be pretty expensive. But PCs have meant cheap supplies and sometimes even free as you gut old PCs found in the dumpster. [OneMarcFifty] decided to make a pretty setup for a PC supply that includes a very nice color display with bargraphs and other niceties. You can see the power supply in action in the video below.

The display is a nice TFT driven by an Arduino Nano. The project uses ACS712 current sensor modules, which are nice Hall effect devices that produce a linear output for current and have over 2 KV of voltage isolation.

There are three current sensors, one for each output. Really what makes this impressive compared to many similar projects is the very nice graphical output. The GitHub has all the software as well as PCB layouts. Of course, you’ll have to adapt the enclosure to your specific power supply, but it should be pretty easy to arrange an enclosure.

With only a few buttons, the user interface is a little clunky, but no more so than a lot of other projects. You essentially only use the buttons to change the speed, scale, and resolution of the bar graphs. The output voltages are fixed and there are no current limits.

Another answer is to find a higher voltage supply and mate it with a cheap power supply module. We’ve also seen non-PC power supplies put in a PC case.

Over the last few years, the price of a good digital picture frame has dropped to the point that we don’t often see DIY versions anymore. As much as we might hate to admit it, it’s hard to justify building something yourself when the economies of scale have made it so you can buy the final product for less than the cost of the parts themselves. But of course, there are always fringe cases where building it might be the only way to get what you need.

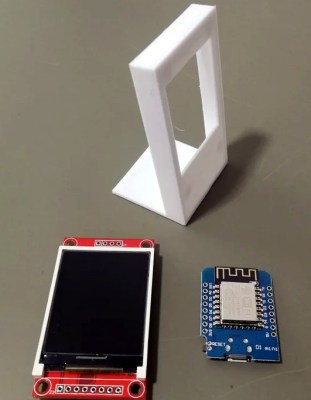
Granted we’re not sure that [Tony Liu] actually needs a 1.8-inch digital picture frame, but we’re sure somebody out there does. The ST7735R display used in this project is a real TFT, so the color and refresh rate is pretty good; but with a resolution of just 128×160, we’d recommend keeping your expectations low in regards to visual fidelity.

What’s really interesting about this project is how low the part count is. All you need is the ST7735R display and the ESP8266 itself (or the development board of your choice, naturally). Even the 3D printed frame is technically optional. The display is driven by SPI, so with the power added in, that’s only eight wires that need to be soldered between the two devices. If you’re looking for an easy way to add a photo slideshow to a small device, say a conference badge, this is about as easy as it gets.

But where are the images coming from? You might think SPIFFS, but in this case [Tony] has converted the images to bitmaps and is loading them into the Arduino Sketch as a header file with PROGMEM. Helpfully, he provides the link for the tool he uses to convert the images into an array the graphics library can understand. This makes adding new images slightly time consuming, but we imagine if you have the need for something like this, it’s probably only showing a pretty specific set of images anyway.

If you’re looking for something bigger, or maybe just an excuse to put that dusty Raspberry Pi to use, you might be interested in one of the more substantial builds we’ve seen over the years.

Jun
02

Optimizing AVR LCD Libraries

arduino hacks, AVR, C, LCD, Microcontroller, microcontrollers, SPI, TFT, TFT Display Comments Off on Optimizing AVR LCD Libraries 

A while ago, [Paul Stoffregen], the creator of the Teensy family of microcontrollers dug into the most popular Arduino library for driving TFT LCDs. The Teensy isn’t an Arduino – it’s much faster – but [Paul]’s library does everything more efficiently.

Even when using a standard Arduino, there are still speed and efficiency gains to be made when driving a TFT. [Xark] recently released his re-mix of the Adafruit GFX library and LCD drivers. It’s several times faster than the Adafruit library, so just in case you haven’t moved on the Teensy platform yet, this is the way to use one of these repurposed cell phone displays.

After reading about [Paul]’s experience with improving the TFT library for the Teensy, [Xark] grabbed an Arduino, an LCD, and an Open Workbench Logic Sniffer to see where the inefficiencies in the Adafruit library were. These displays are driven via SPI, where the clock signal goes low for every byte shifted out over the data line. With the Adafruit library, there was a lot of wasted time in between each clock signal, and with the right code the performance could be improved dramatically.

The writeup on how [Xark] improved the code for these displays is fantastic, and the results are impressive; he can fill a screen with pixels at about 13FPS, making games that don’t redraw too much of the screen at any one time a real possibility.


Filed under: Arduino Hacks, Microcontrollers
Apr
30

A Simple And Inexpensive GPS Navigation Device

arduino, arduino hacks, bitmap, BMP, display, geotiff, Github, gps, LCD, navigation, TFT, uno Comments Off on A Simple And Inexpensive GPS Navigation Device 

There are plenty of GPS navigation units on the market today, but it’s always fun to build something yourself. That’s what [middelbeek] did with his $25 GPS device. He managed to find a few good deals on electronics components online, including and Arduino Uno, a GPS module, and a TFT display.

In order to get the map images on the device, [middelbeek] has to go through a manual process. First he has to download a GEOTIFF of the area he wants mapped. A GEOTIFF is a metadata standard that allows georeferencing information to be embedded into a TIFF image file.  [middelbeek] then has to convert the GEOTIFF into an 8-bit BMP image file. The BMP images get stored on an SD card along with a .dat file that describes the boundaries of each BMP. The .dat file was also manually created.

The Arduino loads this data and displays the correct map onto the 320×240 TFT display. [middelbeek] explains on his github page that he is currently unable to display data from two map files at once, which can lead to problems when the position moves to the edge of the map. We suspect that with some more work and tuning this system could be improved and made easier to use, of course for under $25 you can’t expect too much.


Filed under: Arduino Hacks
Dec
24

Arduino heart rate sensor

arduino, ATmega328, LCD, TFT Comments Off on Arduino heart rate sensor 

An Arduino pulse sensor project from Bajdi:

I found a little heart rate sensor @ ICstation. It is a clone of the open hardware pulse sensor. The sensor is well documented, and it comes with Arduino and Processing example code.
To try it out I connected the sensor to an ATmega328 running at 3.3V and loaded the example Arduino code. I could now see my heart beat on the Arduino serial monitor :)
I then connected a 2.2″ TFT display to the Arduino and tried to figure out how to display the sensor output on it. Sounds simple but unfortunately it isn’t. Updating the full screen (320×240 pixels) is really slow. So I needed some smarter code to update only the pixels that needed to change. I happened to stumble on Matthew McMillans blog, he wrote some smart code to use a similar display as a speedometer. So I borrowed some of his code and mixed it with the example code of the pulse sensor. You can see the result in the above video.

[via]

Arduino heart rate sensor - [Link]

Sep
26

Arduino TFT Color Clock

arduino, clock, microSD, TFT Comments Off on Arduino TFT Color Clock 

FIBMI6CI0C8XQQD.MEDIUM

by Sound Guy @ instructables.com:

You may be familiar with a website in the UK called Colour Clock (http://thecolourclock.co.uk/) which converts the time into a hex value and then uses that value to update the background color. It’s very hypnotic and once you get used to how it works you can actually tell where you are in the day just by glancing at the screen from across the room.

I had an Arduino Uno R3 and an Adafruit 1.8″ Color TFT Shield w/microSD and Joystick that I was trying to use for another project that kept stalling out. One night just for fun I decided to see if I could recreate the Colour Clock and it only took a couple hours. If you’re familiar with Arduino you could easily swap parts out for a simple TFT breakout board and something tiny like a Beetle and make a very compact unit. You could even wear it as a badge.

Arduino TFT Color Clock - [Link]

Aug
19

Arduino GPS Map Navigation System

arduino, gps, TFT Comments Off on Arduino GPS Map Navigation System 

gps-navigation-system-based-on-Auduino

Built on the basis of Arduino UNO, GPS, SD card, TFT, GPS map navigation system is to obtain the real-time position information via GPS, to send it to UNO for calculation, according to the calculating results, and teamed up with the

map file stored in SD card, thus presenting the position on TFT. The GPS system, owing the function to store the current position information, can be applied to running positioning and to record the running tracing.

Arduino GPS Map Navigation System - [Link]

Jun
18

Reflow Oven Controller with graphics TFT

arduino, control, controller, JD-T1800, Oven, PID, Reflow, ST7735R, TFT Comments Off on Reflow Oven Controller with graphics TFT 

CycleWithOverflow

0xPIT @ github.com writes:

This Reflow Oven Controller relies on an Arduino Pro Micro, which is similar to the Leonardo and easily obtainable on eb*y for less than $10, plus my custom shield, which is actually more like a motherboard.

As I believe it is not wise to have a mess of wiring and tiny breakout-boards for operating mains powered equipment, I’ve decided to design custom board with easily obtainable components.

The hardware can be found in the folder hardware, including the Eagle schematics and PCB layout files. It should fit the freemium version of Eagle

Reflow Oven Controller with graphics TFT - [Link]

May
29

The Lightgame Project: A Multiplayer Arduino Game

arduino, arduino hacks, children, game, i2c, Kids, reflex, reflex game, student, TFT, TFT LCD, toy Comments Off on The Lightgame Project: A Multiplayer Arduino Game 

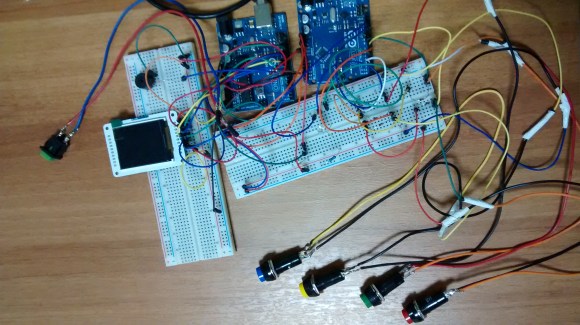
lightgame_3Summer is upon us. The Lightgame Project is a multiplayer reaction time based game built around the Arduino. It’s a perfect rainy day project for those restless kids (and adults!). Designed by two undergraduate students [Efstathios] and [Thodoris] for a semester long project, all the hard work has already been done for you.

There are tons of reasons we love games that you can build yourself. For one, it’s an amazing way to get children interested in hobby electronics, making, and hacking. Especially when they can play the game with (and show off to) their friends. Another reason is that it is a perfect way to share your project with friends and family, showcasing what you have been learning. The game is based on your reaction time and whether or not you press your button when another players color is shown. The project is built around two Arduinos connected via I2C. The master handles the mechanics of the game, while the slave handles the TFT LCD and playing music through a buzzer.

I2C is a great communication protocol to be familiar with and this is a great project to give it a try. [Efstathios] and [Thodoris] did a great job writing up their post, plus they included all the code and schematics needed to build your own. It would be great to see more university professors foster open source hardware and software with their students. A special thanks goes out to [Dr. Dasygenis] for submitting his student’s work to us!


Filed under: Arduino Hacks


  • Newsletter

    Sign up for the PlanetArduino Newsletter, which delivers the most popular articles via e-mail to your inbox every week. Just fill in the information below and submit.

  • Like Us on Facebook