Posts | Comments

Planet Arduino

Archive for the ‘Amateur Radio’ Category

Over the winter, [Michael LeBlanc] thought a good way to spend his time during those long dark nights would be to scratch build his own direct conversion receiver. He was able to find plans for such a project easily enough online, but where’s the fun in following instructions? The final result incorporates what he found online with his own unique tweaks and artistic style.
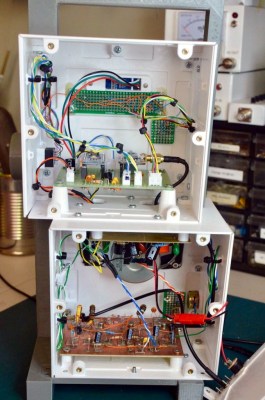
[Michael] based his receiver on a modified approach to the DC40 created by [Ashhar Farhan], a name likely familiar to readers involved in amatuer radio. He further modified the design by swapping out the audio amplifier for a TDA2003A, and bolted on a digital tuner by way of an Arduino and a Si5351 clock generator. There’s a small OLED to show the current frequency, which is adjusted with a high-quality Bourns EM14 optical encoder so he can surf the airwaves in the comfort and style.

The digital tuner mated to the analog DC40 receiver gives the radio an interesting duality, which [Michael] really embraces with his enclosure design. Obsensibly he wanted to keep the two halves of the system in their own boxes to minimize any interference, but the 3D printed case exaggerates that practical consideration into a fascinating conversation piece.

The analog and digital compartments are askew, and their rotary controls are on opposite sides. The radio looks like it might topple over if it wasn’t for the fact that the whole thing is bolted together, complete with brass inserts for the printed parts. The integrated carry handle at the top somehow manages to make it look vintage and ultra-modern at the same time. Rarely do you see a printed enclosure that’s both meticulously designed inside and aesthetically pleasing externally. [Michael] earned his 3D Printing Merit Badge for sure with this one.

Aug
06

$40 Antenna Analyzer with Arduino and AD9850

ad9850, Amateur Radio, antenna analyzer, arduino hacks, dds, ham radio, radio hacks Comments Off on $40 Antenna Analyzer with Arduino and AD9850 

If you are a hacker, you might consider ham radio operators as innovative. Most people, however, just see them as cheap. So it is no surprise that hams like [jmharvey] will build an antenna analyzer from a DDS module and an Arduino instead of dropping a few hundred dollars on a commercial unit. As he points out, you probably only need an analyzer for a day or two while you set up an antenna. Unless you are a big time antenna builder, the unit will then sit idle on the shelf (or will wind up on loan to hams even cheaper than you are).

The design is rooted in another proven design, but changed to take advantage of parts he happened to have on hand. Although the build is on a universal circuit board, [jmharvey] used Eagle to lay out the circuit as though it were a PCB. Since placement can be important with an RF circuit, this isn’t a bad idea. It’s always easier to move stuff around on the screen than on the perf board.

Since this is a no frills, unit, you are expected to grab the output from the Arduino and manually put it in a spreadsheet to plot the results. There is another version of the Arduino code that drives an OLED screen, although you still need a PC to kick the process off. One interesting feature of the Arduino code is how it deals with the nonlinear nature of the diodes used in the circuit. After plotting the values with known loads, [jmharvey] broke the diode operation into three regions and used different equations for each region. Even so, he warns that readings higher than 1:1 VSWR are only accurate to 10% or 20% – still good enough for ham shack use.

If you want an antenna analyzer for $40 (or less, if you have a good stock of parts) this looks like a worthwhile project. If, however, you want to repurpose it to Rickroll your neighbor’s AM radio, you might want to go with the commercial unit.

Click past the break to see the analyzer in action.


Filed under: Arduino Hacks, radio hacks

Anybody can grab a USB TV tuner card and start monitoring the airwaves, but to get into the real meat of radio you’ll need your amateur radio license. Once you have that, the bandwidth really opens up… if you can afford the equipment. However, [spaceneedle] and friends have dramatically lowered the costs while increasing the possibilities of owning a radio by creating this ham radio shield for the Arduino.

The HamShield, is a versatile shield for any standard Arduino that allows it to function like an off-the-shelf radio would, but with a virtually unlimited number of functions. Anything that could be imagined can be programmed into the Arduino for use over the air, including voice and packet applications. The project’s sandbox already includes things like setting up mesh networks, communicating over APRS, setting up repeaters or beacons, monitoring weather stations, and a whole host of other ham radio applications.

HamShield operates on a wide range of frequencies and only uses a 250 mW amplifier. The power draw is small enough that the HamShield team operated it from a small solar panel, making it ideal for people in remote areas. The project is currently gathering funding and has surpassed their goal on Kickstarter, branding itself appropriately as the swiss army of amateur radio. The transceiver seems to be very robust, meaning that the only thing standing in the way of using this tool is simply writing the Arduino code for whatever project you want to do, whether that’s as a police scanner or even just a frequency counter. And if you want to follow along on hackaday.io, the project can be found here.


Filed under: Arduino Hacks, radio hacks
Feb
10

Converting Morse Code to Text with Arduino

Amateur Radio, arduino, arduino hacks, ham, microphone, morse, Morse Code, radio, speaker, translate Comments Off on Converting Morse Code to Text with Arduino 

Morse code used to be widely used around the globe. Before voice transmissions were possible over radio, Morse code was all the rage. Nowadays, it’s been replaced with more sophisticated technologies that allow us to transmit voice, or data much faster and more efficiently. You don’t even need to know Morse code to get an amateur radio license any more. That doesn’t mean that Morse code is dead, though. There are still plenty of hobbyists out there practicing for the fun of it.

[Dan] decided to take a shortcut and use some modern technology to make it easier to translate Morse code back into readable text. His project log is a good example of the natural progression we all make when we are learning something new. He started out with an Arduino and a simple microphone. He wrote a basic sketch to read the input from the microphone and output the perceived volume over a Serial monitor as a series of asterisks. The more asterisks, the louder the signal. He calibrated the system so that a quiet room would read zero.

He found that while this worked, the Arduino was so fast that it detected very short pulses that the human ear could not detect. This would throw off his readings and needed to be smoothed out. If you are familiar with button debouncing then you get the idea. He ended up just averaging a few samples at a time, which worked out nicely.

The next iteration of the software added the ability to detect each legitimate beep from the Morse code signal. He cleared away anything too short. The result was a series of long and short chains of asterisks, representing long or short beeps. The third iteration translated these chains into dots and dashes. This version could also detect longer pauses between words to make things more readable.

Finally, [Dan] added a sort of lookup table to translate the dots and dashes back into ASCII characters. Now he can rest easy while the Arduino does all of the hard work. If you’re wondering why anyone would want to learn Morse code these days, it’s still a very simple way for humans to communicate long distances without the aid of a computer.


Filed under: Arduino Hacks
Apr
30

New in the Maker Shed: Telegraph Decoder and Calculator Kits from Spikenzie Labs

Amateur Radio, arduino, Calculator Kit, ham radio, Morse Code, telegraph Comments Off on New in the Maker Shed: Telegraph Decoder and Calculator Kits from Spikenzie Labs 

MKSKL17-2Spikenzie Labs has a reputation for making innovative, wonderfully designed kits and their new Telegraph Decoder and Calculator Kits are no exception! Both are available now in the Maker Shed.

Read the full article on MAKE


  • Newsletter

    Sign up for the PlanetArduino Newsletter, which delivers the most popular articles via e-mail to your inbox every week. Just fill in the information below and submit.

  • Like Us on Facebook