Posts | Comments

Planet Arduino

Archive for the ‘solid state relay’ Category

Whether you’re using a soldering iron or a table saw, ventilation in the shop is important. Which is why [Atomic Dairy] built a monster air cleaner called the Fanboy that looks like it should be mounted under the wing of an F-15. Realizing a simple switch on the wall wouldn’t do this potent air mover justice, they decided to build a sound activated controller for it.

It’s certainly an elegant idea. The sound created once they kick on their woodworking tools would be difficult to miss by even the most rudimentary of sound-detection hardware. At the most basic level, all they needed was a way for an Arduino to throw a relay once the noise level in the room reached a specific threshold.

Of course it ended up getting a bit more complicated than that, as tends to happen with these kinds of projects. For one, the sound doesn’t directly control the solid state relay used in the fan controller. When the microphone equipped Arduino detects enough noise, it will start a timer that keeps the fan running for two hours. If the tool keeps running, then more time gets added to the clock. This ensures that the air in the room is well circulated even after the cutting and sanding is done.

[Atomic Dairy] also added a few additional features so they could have more direct control over the fan. There’s a button to manually add more time to the clock, and another button to shut it down. There’s even support for a little wireless remote control, so the fan can be operated without having to walk over to the control panel.

We’ve seen some impressive air circulation and dust collection systems over the years, but finding a way to elegantly switch them on and off has always been a problem given the wide array of tools that could be in use at any given time. Sound activation isn’t a perfect solution, but it’s certainly one we’d consider for our own shop.

ssrelay

[Ben Jones] just started a new site called Maker-Guide, where he makes some very informative and well produced DIY videos on anything from homemade photography hacks, to controlling an outlet using a solid-state relay.

It’s not the first time we’ve seen a relay controlled outlet, or this one… but it’s certainly one of the cleanest jobs we’ve seen. In his video guide, [Ben] shows us exactly how to fit a standard solid state relay into a regular outlet box, and easily control it with an Arduino Uno.

It even looks like there might be enough space inside the box for a small wireless setup — maybe using a Trinket even? What about using Power-Line networking to control each box via LAN? Could be the easiest home automation implementation yet! Well, aside from certain NEC (national electrical code) concerns of running high and low voltage in the same box…

Anyway if that wet your whistle, check out the great video guides after the break!

Curious about home automation? Last month one of our writers, [Josh Marsh], wrote a great feature asking what is “Home Automation”?


Filed under: Arduino Hacks, home hacks
May
06

new-grow-controller

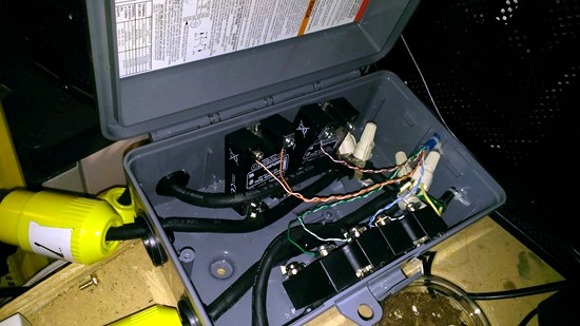
[The Cheap Vegetable Gardener] assembled his first grow controller about three and a half years ago. He’s been very happy with it and knows that he’ll be using it for years, maybe even decades to come. He just finished overhauling the grow controller design to help make sure he doesn’t burn down his garage one day. You have to admit, without knowing anything about the project this rendition does look safer than his original offering.

Pictured above is the weather-proof enclosure he used to house four mains-rated solid state relays. This box is isolated from the control hardware, providing heavy-duty utility plugs to interface with the heater, lights, fan, and water pump.  He mounted the Arduino board which controls the relays to the outside of the box, using the Ethernet wire to switch the SSRs. It uses a manufactured shield he designed which will help ease the pain of fixing the system if parts ever go bad.

Later on in the build he shows the grow light and heaters used in his operation. The heaters simply screw into light sockets; something we’ve never come across before.


Filed under: Arduino Hacks, green hacks


  • Newsletter

    Sign up for the PlanetArduino Newsletter, which delivers the most popular articles via e-mail to your inbox every week. Just fill in the information below and submit.

  • Like Us on Facebook