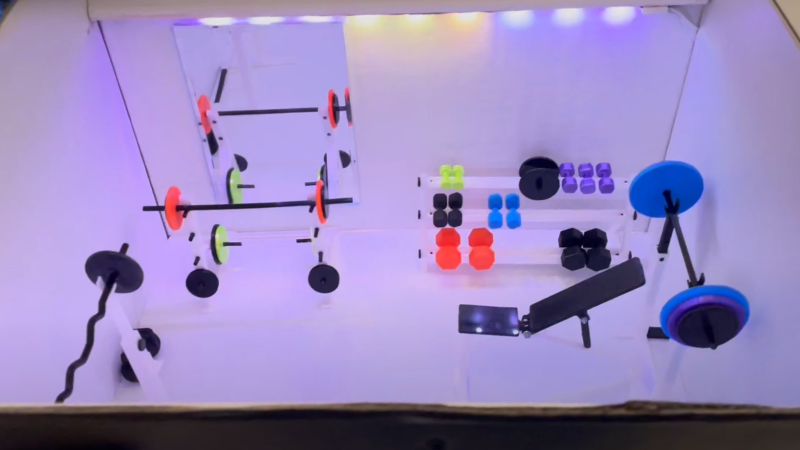
[Duncan McIntyre] lives in the UK but participated in a secret Santa gift exchange for his Dutch friends’ Sinterklaas celebration. In traditional maker fashion, [Duncan] went overboard and created a miniature gym gift box, complete with flashing lights, music and a motorized lid.
[Duncan] used [TanyaAkinora]’s 3D printed tiny gym to outfit the box with tiny equipment, with a tiny mirror added to round out the tiny room. An ATmega328P was used as the main microcontroller to drive the MP3 player module and A4988 stepper motor controller. The stepper motor was attached to a drawer slide via a GT2 timing belt and pulley to actuate the lid. Power is provided through an 18V, 2A power supply with an LM7805 providing power to the ATmega328P and supporting logical elements. As an extra flourish, [Duncan] added some hardware audio signal peak detection, fed from the speaker output, which was then sampled by the ATmega328P to be able to flash the lights in time with the playing music. A micro switch detects when the front miniature door is opened to begin the sequence of lights, song and lid opening.
[Duncan] provides source on GitHub for those curious about the Arduino code and schematics. We’re fans of miniature pieces of ephemera and we’ve featured projects ranging from tiny 3D printed tiny escalators to tiny arcade cabinets.
The great irony of the social media revolution is that it’s not very social at all. Users browse through people’s pictures in the middle of the night while laying in bed, and tap out their approval with all the emotion of clearing their spam folder. Many boast of hundreds or thousands of “friends”, but if push came to shove, they probably couldn’t remember when they had last seen even a fraction of those people in the real world. Assuming they’ve even met them before in the first place. It’s the dystopian future we were all warned about, albeit a lot more colorful than we expected.
Every social action requires that a specific and deliberate physical interaction be performed, which have largely been designed to mimic normal human contact. A pat on the shoulder signifies you want to follow the wearer, and adding them as a friend is as easy as giving a firm handshake. These interactions bring more weight to the decisions users make. For example, if somebody wants to remove you as a friend, they’ll need to muster up the courage to look you in the eye while they hit the button on your chest.
The jacket uses an Arduino to handle the low level functions, and a Raspberry Pi to not only provide the slick visuals of the touch screen display, but record video from the front and rear integrated cameras. That way you’ve even got video of the person who liked or disliked you. As you might expect, there’s a considerable energy requirement for this much hardware, but with a 5200 mAh LiPo battery in the pocket [Tuang] says she’s able to get a run time of 3 to 4 hours.
Considering how much gadgetry is packed into it, the whole thing looks remarkably wearable. We wouldn’t say it’s a practical piece of outerwear when fully decked out, but most of the electronic components can be removed if you feel like going low-key. [Tuang] also points out that for a garment to be functional it really needs to be washable as well, so being able to easily strip off the sensitive components was always an important part of the design in her mind.
Quality software development examples can be hard to come by. Sure, it’s easy to pop over to Google and find a <code> block with all the right keywords, but having everything correctly explained can be hit or miss. And the more niche the subject, the thinner the forum posts get. Bucking the downward trend [HansLuijten] provides an astoundingly thorough set of LED strip patterns in his comprehensive post titled Arduino LED strip effects.
Don’t let the unassuming title lead you astray from the content, because what’s on offer goes beyond your average beginner tutorial on how to setup a strand of NeoPixels. [HansLuijten] is thorough to a fault; providing examples for everything from simple single color fades and classic Cylon eyes to effects that look like meteors falling from the sky. Seriously! Check out the video after the break. Those chasing lights you see around theater signs? Check. Color twinkle and sparkle? Check. Color wipes and rainbow fades? Check, and check.
At this point, an average forum post would be a jumbled mess of source which only works on an authentic Arduino Duemilanove running at 3.3v sitting on top of the 2nd printing of the author’s favorite issue of Make. But not here! These samples work with Adafruit’s easy to use NeoPixel libraryas well asFastLED, the quickest pixel in the West. On top of that the examples are clear and concise and explanation is plentiful. But the best part is definitely that each effect has a video clearly showing what it looks like.
If only everything were this easy to use, the open source revolution would already be here.
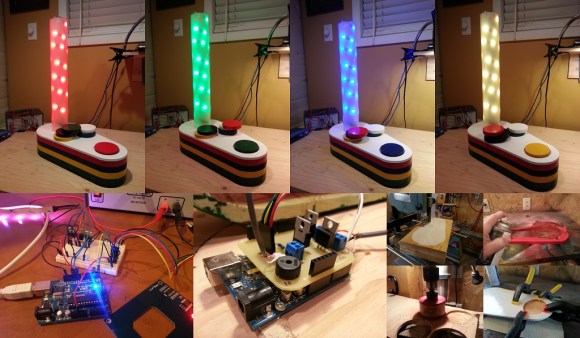
Self-described “Inventor Dad” [pepelepoisson]’s project is called Stecchino (English translation link here) and it’s an Arduino-based physical balancing game that aims to be intuitive to use and play for all ages. Using the Stecchino (‘toothpick’ in Italian) consists of balancing the device on your hand and trying to keep it upright for as long as possible. The LED strip fills up as time passes, and it keeps records of high scores. It was specifically designed to be instantly understood and simple to use by people of all ages, and we think it has succeeded in this brilliantly.
To sense orientation and movement, Stecchino uses an MPU-6050 gyro and accelerometer board. An RGB LED strip gives feedback, and it includes a small li-po cell and charger board for easy recharging via USB. The enclosure is made from a few layers of laser-cut and laser-engraved material that also holds the components in place. The WS2828B LED strip used is technically a 5 V unit, but [pepelepoisson] found that feeding them direct from the 3.7 V cell works just fine; it’s not until the cell drops to about three volts that things start to glitch out. All source code and design files are on GitHub.
Games are great, and the wonderful options available to people today allow for all kinds of interesting experimentation like a blind version of tag, or putting new twists on old classics like testing speed instead of strength.
Old boomboxes make great hacks. Their design is iconic; yes they look dated but that really just builds on the nostalgic urge to have one hanging around. Plus their big cases simply invite adding things inside in a way impossible with contemporary electronics.
[Danc0rp] hacked his JVC M70 boombox to make the speakers glow with animated light, bumping VU meters, and a pulsing horizontal bar above the tape deck. The effect is superb. The cones of the speakers act like a projection surface and the grilles hide the LEDs until they activate, and enhance the effects once unleashed. It is one of the best LED speaker hacks we’ve ever seen.
Custom board with Arduino UNO
The light effects are provided by LED strips, which for the speakers are attached just inside the outer rim. The brains behind it all is an Arduino UNO. To connect to it, he soldered components to a blank Arduino prototyping board. That board takes input from the boombox’s line-out and does some filtering (an attempt to address some ground noise) before passing the signal on to the Arduino. That board also interfaces between the Arduino and the LED strips. The schematic is available on his GitHub page. He’d like to replace the board with a custom PCB instead and is looking for design help.
The result is not only beautiful but professional looking too. This makes us wonder why boomboxes don’t come this way. See it for yourself in the video below.
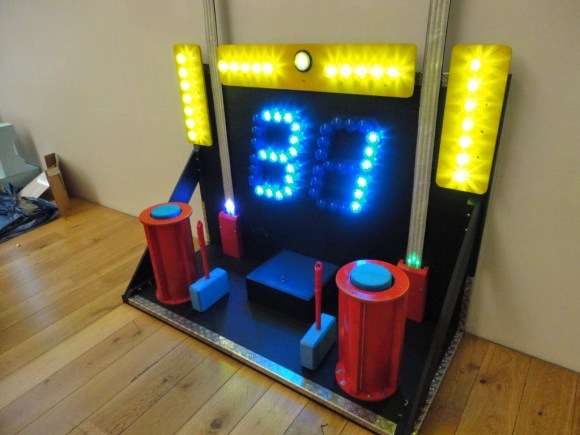
[Jason] is back at it again with another new twist on the technically sophisticated and advanced game of Pong. Fashioned in a ‘Chuck E. Cheese’ style platform, the two players stand side by side each other with large foam hammers. A wack sends the 32 bit ARM powered dot skyward and then back down to the other player, where another wack will send the dot back whence it came. A brightly lit scoreboard keeps track of how many dots slip by.
[Jason] is a veteran of pong inspired games, but putting the HammerPong game together brought with it some new challenges. After being unable to squeeze a few MDF panels into his car, and fighting off flies, yard debris and pet dander that were trying to attach themselves to his freshly painted artwork, [Jason] managed to get his project completed.
The HammerPong is powered by an Arduino Due that controls six WS2812 LED strips and runs the background code. Various latches, shift registers and power transistors control the lights and scoreboard. Be sure to check out the linked project for more detail, and take a look at the video demonstration after the break.
[Philippe Chrétien's] project makes it to our front page just based on its completeness. When you hear about a multicolored lamp which changes based on an RFID tag you might not get too excited. When you look at the refined electronics and the quality of the wooden enclosure it’s another story entirely.
As we’ve said many times before, coming up with the idea for a project is the hardest part… especially when you just want to start hacking. With his kids in mind [Philippe] figured this would be something fun for them to play around with, opening the door to discussing the electronics concepts behind it.
He prototyped on a breadboard using three N-type MOSFETs to drive the colors of an RGB LED strip. The proven circuit was laid out and etched at home to arrive at the clean-looking Arduino shield shown off above. The entire thing gets a custom enclosure cut using layered plywood, a paper template, and a bandsaw.
Need a use for this once the novelty has worn off? Why not mod it to use as a motion activated night light? Alas the actual project link for that one is dead, but you get the idea.
Our friend Matt Mets, along with pals Max Henstell and Marty Mcguire, is developing a cool addressable LED light strip that packs a microprocessor on the strip for easy programming. Look cool? You can get in on the Kickstarter campaign and score some excellent tech. It looks awesome, Matt! Filed […]
Planet Arduino is, or at the moment is wishing to become, an aggregation of public weblogs from around the world written by people who develop, play, think on Arduino platform and his son. The opinions expressed in those weblogs and hence this aggregation are those of the original authors. Entries on this page are owned by their authors. We do not edit, endorse or vouch for the contents of individual posts. For more information about Arduino please visit www.arduino.cc
You are currently browsing the archives for the led strip category.