The Linux Foundation is a non-profit organization that sponsors the work of Linus Torvalds. Supporting companies include HP, IBM, Intel, and a host of other large corporations. The foundation hosts several Linux-related projects. This month they announced Zephyr, an RTOS aimed at the Internet of Things.
The project stresses modularity, security, and the smallest possible footprint. Initial support includes:
Arduino 101
Arduino Due
Intel Galileo Gen 2
NXP FRDM-K64F Freedom
The project (hosted on its own Website) has downloads for the kernel and documentation. Unlike a “normal” Linux kernel, Zephyr builds the kernel with your code to create a monolithic image that runs in a single shared address space. The build system allows you to select what features you want and exclude those you don’t. You can also customize resource utilization of what you do include, and you define resources at compile time.
By default, there is minimal run-time error checking to keep the executable lean. However, there is an optional error-checking infrastructure you can include for debugging.
The API contains the things you expect from an RTOS like fibers (lightweight non-preemptive threads), tasks (preemptively scheduled), semaphores, mutexes, and plenty of messaging primitives. Also, there are common I/O calls for PWM, UARTs, general I/O, and more. The API is consistent across all platforms.
You can find out more about Zephyr in the video below. We’ve seen RTOS systems before, of course. There’s even some for robots. However, having a Linux-heritage RTOS that can target small boards like an Arduino Due and a Freedom board could be a real game changer for sophisticated projects that need an RTOS.
An engineering student at the University of Western Macedonia has just added another appliance to the ever-growing list of Internet enabled things. [Panagiotis] decided to modify an off-the-shelf bread maker to enable remote control via the Internet.
[Panagiotis] had to remove pretty much all of the original control circuitry for this device. The original controller was replaced with an Arduino Uno R3 and an Ethernet shield. The temperature sensor also needed to be replaced, since [Panagiotis] could not find any official documentation describing the specifications of the original. Luckily, the heating element and mixer motor were able to be re-used.
A few holes were drilled into the case to make room for the Ethernet connector as well as a USB connector. Two relays were used to allow the Arduino to switch the heating element and mixer motor on and off. The front panel of the bread maker came with a simple LCD screen and a few control buttons. Rather than let those go to waste, they were also wired into the Arduino.
The Arduino bread maker can be controlled via a web site that runs on a separate server. The website is coded with PHP and runs on Apache. It has a simple interface that allows the user to specify several settings including how much bread is being cooked as well as the desired darkness of the bread. The user can then schedule the bread maker to start. Bread Online also comes with an “offline” mode so that it can be used locally without the need for a computer or web browser. Be sure to check out the video demonstration below.
The new tutorial we want to present you today is more like a guide giving you some basic information about the benefit of accessing Linux shell in Intel® Galileo Gen 2. It also shows you in which way the Intel® Galileo Gen 2 is not only an advanced, more powerful version of Arduino Uno that happens to be layered on top of a Linux system. There is definitely much more that can be done with it and the Linux shell: this tutorial is an entry point to explore it and learn how to:
– preparing a system image;
– accessing the shell in 4 different ways;
– examining the workflow of copying a python script into Intel® Galileo Gen 2 through scp (or pscp);
– running an Arduino sketch;
-retrieving files from Intel® Galileo Gen 2.
The Intel® Galileo Gen 2 includes much of the Arduino Uno’s functionality. Similar to an Uno, it can create a wide variety interactive objects that use input sensors and various outputs. After exploring the many possibilities of using the “Arduino part” of the Intel® Galileo Gen 2 this way, one might start to wonder: what is the next step?
Perhaps you want to write more complex programs using your favorite scripting language like python or javascript. Maybe you’re interested in computer vision or want to have full control over the board and find out more about the inner workings. By accessing to the Linux core, all these will be possible to achieve.
This tutorial will cover the basics of working with Linux by making a simple program that logs button presses. While the example is not very useful, it will help familiarize you with Linux as applied to the Intel® Galileo Gen 2.
The model of this shield named Yun Shield, the feature of this shield is as its name. User can add this shield into Arduino (Leonardo, UNO, MEGA2560 etc) and “turn” the Arduino into device which has similiar features as Arduino Yun: support remote upgrade and use the Bridge library.
With this shield, user can easy to set up communcation between Arduino and Internet (via ethernet , wifi or 3g etc) and add support for USB flash, video. The detail user guide/ manual can be found in the dragino website and most Arduino Yun Sketch / examples can reuse with this Shield. This shield is under production and will be ready within one months time.
Add Linux, WiFi, Ethernet and USB to Arduino - [Link]
We’ve all been there. You are having fun walking around the carnival when you suddenly find yourself walking past the carnival games. The people working the booths are taunting you, trying to get you to play their games. You know the truth, though. Those games are rigged. You don’t know how they do it. You just know that they do… somehow.
Now you can put your worries to rest and build your own carnival game! [John] built his own “Bass Master 3000” style carnival game and posted an Instructable so you can make one too.
The game is pretty straightforward. You have a giant fish-shaped target with a wide open mouth. You take hold of a small fishing reel with a rubber ball on the end. Your goal is to cast the ball out and hit the fish in its big mouth. If you hit the mouth, you get to hear a loud buzzer and see some flashing lights. The system also uses a webcam to take a candid photo of the winner. A computer screen shows all of the winners of the day.
The brain of the system is an Arduino Yún. The Yún is similar to an Uno but it also has some extra features. Some good examples are an Ethernet port, a wireless adapter, and an SD card slot. The mouth sensors are just two piezo elements. Each sensor is hooked up to the Arduino through a small trim pot. This allows you to dial in the sensitivity of each sensor. The lights and the buzzer are controlled via a relay, triggered by a 5V digital pin on the Arduino.
The Yún actually has a small on-board Linux computer that you can communicate with from inside the Arduino environment. This allows [John] to use the Yún to actually take photos directly from a web cam, store them on the local SD card, and display them on a local web server. The web server runs a simple script that displays a slide show of all of the photos stored on the card.
The final piece of the game is the physical target itself. The target is painted using acrylic paint onto a small tarp. The tarp is then attached to a square frame made from PVC pipe. The mouth of the fish is cut out of the tarp. A large piece of felt is then placed behind the hole with the piezo sensors attached. A short length of copper pipe helps to weigh down the bottom of the felt and keep it in place. The important thing is to make sure the felt isn’t touching the tarp. If it touches, it might be overly sensitive and trigger even when a player misses.
Now you know how to build your own Bass Master 3000 carnival game. Whether you rig the game or not is up to you. Also, be sure to check out a video of the system working below.
DM&P has been producing low-power, x86-based Vortex processors for the embedded market for over ten years. Now in a nod to the Arduino market they have released the 86Duino Zero, a low-cost Arduino Leonardo sized board powered by their latest 300 MHz SoC Vortex86EX Processor.
This is a fully static 32-bit x86 processor board compatible with Windows OS, Linux and most other popular 32-bit RTOS. It integrates a PCIE bus, DDR3, ROM controller, xISA, I2C, SPI, IPC (Internal Peripheral Controllers with DMA and interrupt timer/counter included). The 86Duino Zero’s ports include USB 2.0 host and device coastline ports, a 10/100 Ethernet port and a microSD slot on the bottom of the board. The Zero’s baseboard also provides a 7-12V power jack, a reset button and a PCIe expansion connector.
The Zero supplies 14 digital I/O pins, half of which can provide 32-bit resolution PWM outputs and six 11-bit analog input pins. Each standard I/O pin supplies 16 mA while the 3.3 V pins can supply up to 400 mA. Like the Intel Galileo development board announced several weeks ago the 86Duino Zero marries Intel architecture to the Arduino platform. Its $39 price tag makes it an attractive proposition. [via]
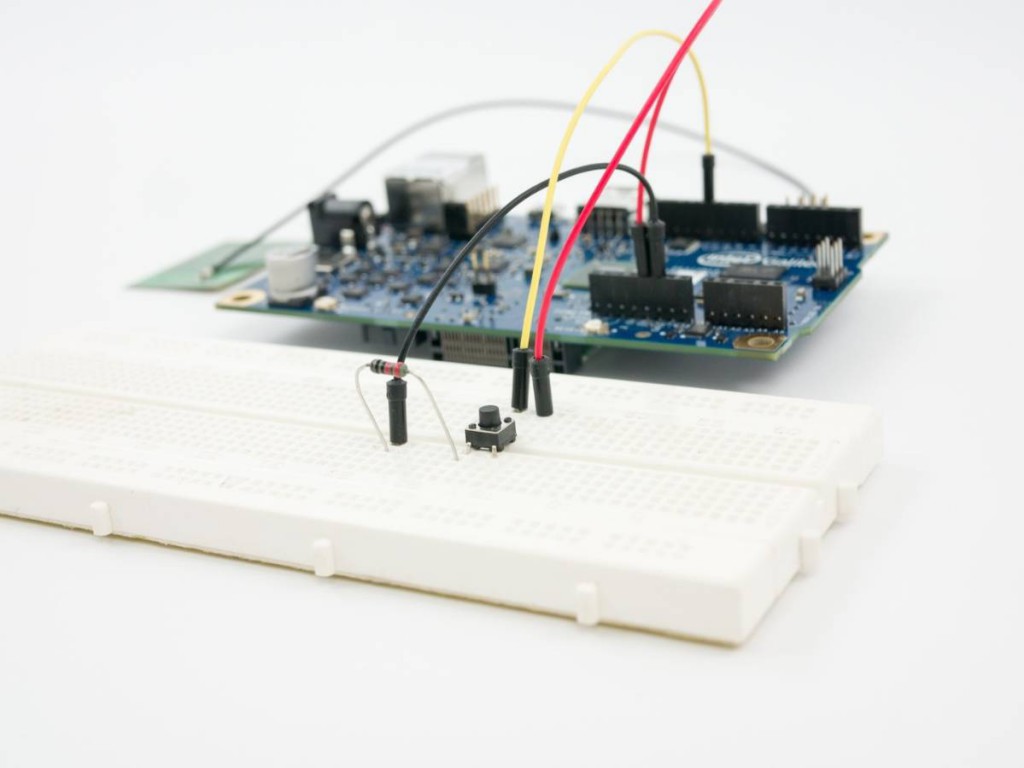
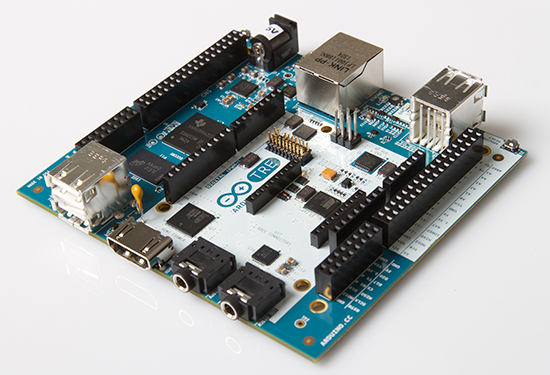
Next saturday 5th of October Massimo Banzi with Jason Kridner and Gerald Coley (Texas Instrument) will talk about the new collaboration on Arduino TRE during a talk at Maker Faire Rome ( from 15.30 in Room G – Archimede).
Thanks to the 1-GHz Sitara AM335x processor, Arduino developers get up to 100 times more performance with the Sitara-processor-based TRE than they do on the Arduino Leonardo or Uno. This performance opens the doors to more advanced Linux-powered applications. The Sitara-processor-based Linux Arduino can run high-performance desktop applications, processing-intensive algorithms or high-speed communications.
The Arduino TRE is two Arduinos in one: the Sitara-processor-based Linux Arduino plus a full AVR-based Arduino, while leveraging the simplicity of the Arduino software experience. The integration of the AVR Arduino enables the Arduino TRE to use the existing shield ecosystem so that innovators can expand the Arduino TRE to develop a wide range of high-performance applications such as 3D printers, gateways for building automation and lighting automation, telemetry hubs that collect data from nearby sensors wirelessly, and other connected applications that require host control plus real-time operations.
In addition, the Arduino TRE is partially the result of a close collaboration between Arduino and the BeagleBoard.org foundation. These open hardware pioneers share a passion for expanding open source development and making technology accessible for artists, designers and hobbyists. The TRE design builds upon the experience of both Arduino and BeagleBoard, combining the benefits of both community based boards.
“By choosing TI’s Sitara AM335x processor to power the Arduino TRE, we’re enabling customers to leverage the capabilities of an exponentially faster processor running full Linux,” said Massimo Banzi, co-founder, Arduino.
“Our customers now have a scalable portfolio at their fingertips, from the microcontroller-based Uno to the TRE Linux computer.”
The Arduino TRE is expected to be available in spring 2014 but you’ll be able to see it live during Maker Faire Rome.
After being announced in May this year, the new Arduino Yún has arrived in the crowded marketplace – and I snapped up one of the first to arrive in Australia for an initial review. The purpose of which is to run through the out of box experience, and to see how easy it was to get the Yún working with the promised new features.
[Update - over time we'll publish tutorials specifically for the Yún, which are listed here.]
The Yún introduces some interesting new combinations of hardware and connectivity, all within the familiar form-factor. Which gives us plenty to examine and write about, so let’s get started. First, a quick look around the Yún:
Notice the stickers on the header sockets, useful for beginners or the absent-minded…
The usual TX/RX and D13 LEDs, plus notifiers for power, WiFi, LAN and USB use…
Ethernet, USB programming, USB host…
Again with the stickers…
The rear is quite busy. You can also see “Made in Taiwan” – a first for Arduino. I believe the reason for this was due to the new Atheros chipset requirements. Did you notice the multiple reset buttons? There are three – one for the Arduino, one for wifi and one to reboot Linino. As you can see there’s a lot of circuity on the bottom of the Yún, so it would be prudent to use some short standoffs to elevate the board and protect the bottom. Before moving on, you might like the following video where the Arduino team introduce the Yún:
Specifications
The Yún is based around the Arduino Leonardo-specification board – thus you have the ATmega32U4 microcontroller and the usual Leonardo functions. Note you cannot feed wild DC voltages into the Vin pin – it must be a regulated 5V. And the DC socket has gone, so for a solid connection you might want to make or buy your own power shield.
However there is so much more… underneath a small metal shield below the digital I/O pins is an Atheros AR9331 CPU running a Linux distribution based on OpenWRT named Linino. This Atheros part of the board is connected to a microSD socket, 10/100 Ethernet port, a USB 2.0 socket for host-mode functions and also has IEEE 802.11b/g/n WiFi, and Power-over-Ethernet support (with an optional adaptor).
And all of that is connected to the Arduino side of things via a simple serial “bridge” connection (with it’s own library) – which gives the Arduino side of the board very simple methods of controlling the other onboard hardware.
Getting started with the Yún WiFi
First thing is to download and install the new IDE, version 1.5.4. This is for Due and Yún, so keep your older installations as well. On the general Arduino side of things nothing has changed, so we’ll move on to the more interesting side of the board. The first of these is to setup and experiment with the onboard WiFi. After connecting your board to USB for power, you can connect to it with your PC’s WiFi:
… at which point you connect to the Yún network. Then visit 192.168.240.1 from a web browser, and you’re presented with a page that asks for the default password, which is … “arduino”:
At which point you’re presented with the relevant details for your Yún:
… such as the IP address, MAC address, etc. Make note of your MAC address, you might need it later. From here you can configure the Yún WiFi details, for example the name and password, and also the details of your existing WiFi network which can be used to access the Yún. Once you save those, the Yún reboots and tells you to connect the PC back to the existing WiFi network:
If for some reason it doesn’t work or you entered the wrong settings – hold down the “WLAN RST” button (next to the USB host socket) for five seconds. This sets the WiFi details in the Yun back to the default … and you can start all over again.
Note that the Yún’s preset IP of 192.168.240.1 may not be suitable for your own network. For example, if your home router is 10.1.1.1 you need to do some detective work to find out the IP address for the Yún. Head into your router’s administration pages and look for your DHCP Client Log. It will show a list of devices that are connected to the network, including their MAC and IP address – for example:
Then it’s a simple matter of finding the MAC address in the list and the matching IP. Once you have the IP address, enter that into a web browser and after being prompted for the Yún’s password, you’re back to the welcome page with the IP, MAC addresses etc.
WiFi Sketch Uploading
Once your Yún is on the same WiFi network as the PC running the IDE – you can upload a sketch over WiFi! This is possible due to the bridge between the Atheros section on the board and the Arduino hardware. Just select the board type as normal in the IDE, and the port (the IP address version):
… then hit Upload as normal, enter the password:
and you’re done. Awesome.
Console-based control of Arduino over WiFi
There’s a neat example that demonstrates how you can control the Arduino over the WiFi using a console terminal on the PC. Upload this sketch (from http://arduino.cc/en/Guide/ArduinoYun#toc13):
#include <Console.h>

const int ledPin = 13; // the pin that the LED is attached to
int incomingByte;      // a variable to read incoming serial data into

void setup() {
  // initialize serial communication:
  Bridge.begin();
  Console.begin();

  while (!Console){
    ; // wait for Console port to connect.
  }
  Console.println("You're connected to the Console!!!!");
  // initialize the LED pin as an output:
  pinMode(ledPin, OUTPUT);
}

void loop() {
  // see if there's incoming serial data:
  if (Console.available() > 0) {
    // read the oldest byte in the serial buffer:
    incomingByte = Console.read();
    // if it's a capital H (ASCII 72), turn on the LED:
    if (incomingByte == 'H') {
      digitalWrite(ledPin, HIGH);
    }
    // if it's an L (ASCII 76) turn off the LED:
    if (incomingByte == 'L') {
      digitalWrite(ledPin, LOW);
    }
  }
}
Then load your terminal software. We use PuTTY on Windows. Run the terminal software, then login as root, then telnet to “localhost 6571″:
You can then send characters to the Yún just as you would with a USB-connected Arduino via the serial monitor. With the example above you’re turning the D13 LED on and off, but you can get the idea.
The “Internet of Things”
Arduino has teamed up with a service called “Temboo” – which gives you over 100 APIs that your Yún can hook up with to do a myriad of things, such as send tweets, get weather data from Yahoo, interact with Dropbox, etc. This is done easily and explained quite well at the Temboo website. After signing up for Temboo (one account seems to be free at the moment) we tried the Yahoo weather API.
You enter the parameters using an online form in Temboo (in our example, the address of the area whose weather forecast we required), and the Temboo site gives you the required Arduno sketch and header file to upload. And you’re done. With this particular example, I wanted the weather in Sydney CBD – and once running the data is returned to the serial monitor, for example:
It was great to see that work the very first time, and a credit to Temboo and Arduino for making it happen. But how?
There is a Temboo client in the Linino OS, which is the gateway to the API via WiFi, and also communicates with the Arduino via the serial bridge. The Arduino Temboo library can then interact with the Linino client without complex code. The weather data is then returned back from the Internet via the Temboo client and fed to the Arduino serial port, where you can parse it with your own code. This looks like a lot of fun, and also could be quite useful – for example capturing data and sending it to a Google Docs spreadsheet. For more information, check out the Temboo website.
However you can delve deeper and create your own APIs, matching code – and perhaps other services will develop their own APIs in the near future. But for now, it’s a good start.
Where to from here? And support?
This article has only scratched the surface (but not bad considering the board arrived a few hours ago). There’s plenty more examples on the getting started page, in the IDE (under “Bridge”) – plus a dedicated Arduino Yún forum. And check out this gmail notifier. In the near future we’ll create some of our own tutorials, so stay tuned.
Is the Yún a completely open-source product?
Well it says “open source electronics prototyping platform” on the rear, but is this true? The Arduino Leonardo-side of the board is. However the Atheros AR9331 chip is not. Nevertheless, are you really going to reproduce your own AR9331? So it doesn’t really matter. Being a pragmatist I propose that the Yún solves the problem of Arduino and Internet connectivity quite well for the non-advanced user – so not being totally OSHW isn’t an issue.
Support
This board is very new to us here, so for questions or support please ask on the dedicated Arduino Yún forum.
Conclusion
Since the popularity of various single-board computers has increased exponentially over the last few months, some may say that the Yún is perhaps too little, too late. After only having the Yún for a few hours before writing this article, personally I disagree with this statement – the Yún is a device that still gives us the wide range of hardware control, and what looks to be a very simple method of connectivity that surely is cheaper and less prone to issues than the original Arduino WiFi shield.
What the Yún gives us is a simple, well-executed method of getting our Arduino connected to the outside world – and in a manner that won’t confuse or put off the beginner or intermediate user. So for now, it’s a win.
What do you think? Leave a comment below.
And for more detail, full-sized images from this article can be found on flickr. And if you’re interested in learning more about Arduino, or want to introduce someone else to the interesting world of Arduino – check out my book (now in a third printing!) “Arduino Workshop” from No Starch Press.
In the meanwhile have fun and keep checking into tronixstuff.com. Why not follow things on twitter, Google+, subscribe for email updates or RSS using the links on the right-hand column? And join our friendly Google Group – dedicated to the projects and related items on this website. Sign up – it’s free, helpful to each other – and we can all learn something.
The subject of our latest kit review is the “Epoch Clock” from Maniacal Labs, a new organisation started by three young lads with some interesting ideas. Regular readers will know we love a clock – so when the opportunity came to review this one, we couldn’t say no.
At this point you may be thinking “what is Epoch time anyway?”. Good question! It is the number of seconds elapsed since the first of January, 1970 (UTC) – and used by Unix-based computers as the start of their time universe. (For more on the theory of Epoch time, check out Wikipedia). For example - 1379226077 Epoch time is Sun, 15 Sep 2013 06:21:17 GMT. That’s a lot of seconds. If you’re curious, you can do more calculations with the EpochTime website.
Moving forward, this clock kit will show Epoch time in full 32-bit binary glory, using a DS1307 real-time clock IC (with backup battery) and is controlled with an ATmega328P-PU – so you can modify the code easily with the Arduino IDE or WinAVR (etc).
Assembly
The creators have spent a lot of time on not only the packaging and out-of-box-experience, but also the documentation and setup guide – so as long as you’re fine with simple through-hole soldering the kit will not present any challenges. The kit arrives in a sturdy box:
… with well packaged components. Everything is included for the finished product, as well as IC sockets, the RTC backup battery and a USB cable so you can power the clock from a USB hub:
The PCB is a good thickness, and has a clear silk-screen and solder mask:
Construction is simple, just follow the step-by-step instructions. Starting with the USB socket for power:
… then the resistors:
… the LEDs:
… all 32 of them. Note that the LEDs don’t sit flush with the PCB, so a little effort is required to keep them aligned:
Then the rest of the components just fit as expected. I’ve also added the included header pins for an FTDI programming cable and ICSP to keep my options open:
Then simply fit the battery, insert the ICs and you’re done:
Using the clock
The microcontroller is pre-programmed, so you can use the clock straight away. You will however need to set the time first. To make this incredibly easy, there is a special web page that displays the current time and Epoch time, which steps you through the process of setting the time using the buttons.
Or with some code available on the kit github page and a programming cable, you can automatically sync it to the clock. Once setup, the battery will keep the current time in the RTC nicely. The clock is powered by 5V, which is easily supplied with the included USB cable, or you can always hack in your own feed.
So what does Epoch time in 32-bit binary look like? Here’s a short video of the clock in action:
Reading the time requires converting the binary number displayed with the LEDs back to a decimal number – which is of course the Epoch count of seconds since 1/1/1970. Math teachers will love this thing.
But wait, there’s more!
If you get tired of the blinking, there’s a test function which is enabled by holding down both buttons for a second, which turns the Epoch Clock into a nifty Larson Scanner:
To create your own sketches or examine the design files in more detail, it’s all on the clock github page. From a hardware perspective you have an ATmega328P-PU development board with a DS1307 battery-backed real-time clock – with 32 LEDs. So you could also create your own kind of clock or other multi-LED blinking project without too much effort. Review the EpochClockSchematic (.pdf) to examine this in more detail.
Conclusion
I really enjoyed this kit – it was easy to assemble, I learned something new and frankly the blinking LEDs can be quite soothing. The clock would make a great for a conversation-starter in the office, or would make an ideal gift for any Sheldon Cooper-types you might be associated with. Or have competitions to see who can convert the display to normal time. After shots.
Nevertheless it’s a fun and imaginative piece of kit, fully Open Hardware-compliant – and if you’ve made it this far – get some and have fun. Full-sized images are on flickr. Interested in Arduino? Check out my new book “Arduino Workshop” from No Starch Press.
In the meanwhile have fun and keep checking into tronixstuff.com. Why not follow things on twitter, Google+, subscribe for email updates or RSS using the links on the right-hand column? And join our friendly Google Group – dedicated to the projects and related items on this website. Sign up – it’s free, helpful to each other – and we can all learn something.
[Note - The kit reviewed was a promotional consideration from Maniacal Labs]
Right now there are two new micro-controller boards seeking funding—one on Kickstarter, and the other on Dragon Innovation's new crowdfunding platform—that are slightly different. These boards aren't just yet another Arduino clone, or yet another possible "Raspberry Pi killer." These two boards, the Tessel from technical.io and the Espruino from Pur3, intend to take the path least travelled and co-op an existing community not traditionally associated with the maker community.
Planet Arduino is, or at the moment is wishing to become, an aggregation of public weblogs from around the world written by people who develop, play, think on Arduino platform and his son. The opinions expressed in those weblogs and hence this aggregation are those of the original authors. Entries on this page are owned by their authors. We do not edit, endorse or vouch for the contents of individual posts. For more information about Arduino please visit www.arduino.cc
You are currently browsing the archives for the Linux category.