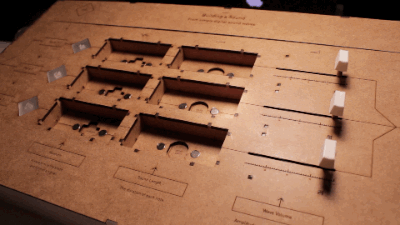
Getting started with electronics and sensing the world around you is now easier than ever with the new all-in-one Arduino Sensor Kit from Arduino, in partnership with Seeed.
The 10 most popular modules and sensors for your Arduino UNO have been integrated onto a single board to provide plug-and-play convenience without the need for any soldering or wiring! Combining basic Grove sensors and actuators for the Arduino UNO, the kit contains a base shield featuring the following modules that can be connected either through the digital, analog or I2C connectors:
An OLED screen
4 digital modules (LED, button, buzzer and potentiometer)
5 sensors (Light, sound, air pressure, temperature, and accelerometer)
Just plug the Arduino Sensor Kit into the Arduino UNO board, then you’re ready to follow the Plug, Sketch & Play online lessons that make getting started a breeze.
The kit is equipped with 16 Grove connectors, which when placed on the board, offer functionality to the various pins. With seven digital connections, four analog connections, four I2C connections, and a UART connection, the base shield can be easily mounted onto an Arduino UNO board and programmed through the Arduino IDE.
Now available from the Arduino Store, the Arduino Sensor Kit comes as a standalone kit for only €23.00 / US$23.00, or can be purchased with the Arduino UNO Rev3 board as a great value bundle for €38.70 / US$38.70. For more details, check out our website here.
Who doesn’t love a good robot? If you don’t — how dare you! — then this charming little scamp might just bring the hint of a smile to your face.
SDDSbot — built out of an old Sony Dynamic Digital Sound system’s reel cover — can’t do much other than turn left, right, or walk forwards on four D/C motor-controlled legs, but it does so using the power of a Pixy camera and an Arduino. The Pixy reads colour combinations that denote stop and go commands from sheets of paper, attempting to keep it in the center of its field of view as it toddles along. Once the robot gets close enough to the ‘go’ colour code, the paper’s orientation directs the robot to steer itself left or right — the goal being the capacity to navigate a maze. While not quite there yet, it’s certainly a handful as it is.
With the care of a maker, [Arno Munukka] takes us under the hood of his robot to show how he’s made clever use of the small space. He designed a duo of custom PCBs for the motors and stuck them near the robot’s top — you can see the resistors used to time the steps poking through the robot’s case, adding a functional cosmetic effect. The Arduino brain is stuck to the rear, the Pixy to the front, and the power boards are snug near the base. Three USB ports pepper the robot’s posterior — a charging port, one for programming the Arduino, and a third to access the Pixy camera.
What do you think — had a change of heart regarding our future overl– uh, silicon-based friends? Yes? Well here’s a beginner bot to will get you started.
Red is an optic-sound electronic object that uses simple light sources and optical elements to create audiovisual performance. The machine was named as a color because at the center of the work there is a red glass crystal and a flexible Fresnel lens. Dmitry Morozov aka :: vtol: : created it using Arduino with pure data and python scripts:
The project includes many reworked electronic devices – a CD-rom, an old scanner, reused electric motors. Multiple moving elements provide wide variability for rather primitive optical elements. It is accomplished by constant change of focal length between the light source, crystal and lens, as well as by changing the crystal’s tilt angle and mechanical distortion of the lens. The object works autonomously, by algorithm with many accidental events tied to feedback, with sensors defining the position of various mechanical elements in relation to the range of their movement. The sound part has up to 4 voices which depend on the activity of various elements. The sound is also in direct interaction with actual position of those elements, and basically is voicing the process of movement, brightness of light, and intensity of the piece.
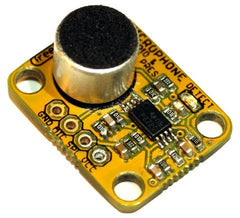
Sound Blocks is a tool to teach children and adults what sound is made of. The project was shortlisted in the Expression category of the IXDA Interaction Awards and it was developed by John Ferreira, Alejandra Molina, Andreas Refsgaard at the CIID using Arduino.
The device allows people to learn how, with a few parameters, it’s possible to create new sounds and, also, imitate real world sounds. Users can control waveform, sound decay or wave length and volume of three channels, all mixed together:
Sound blocks first and foremost was created as a tool to experiment with sound, it is playful and engaging.
Watch the video interview to discover more about the project and hear some noise:
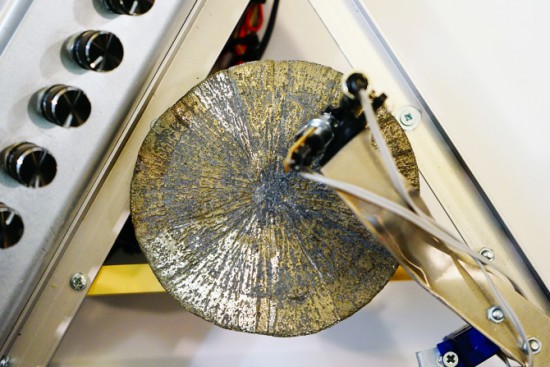
There’s a mineral called pyrite with a interesting nickname, fool’s gold, because it has a superficial resemblance to gold and it’s by far the most frequently mineral mistaken for gold. Even if it’s pretty abundant, there’s a rare form of pyrite which is crystallised in radial shape (as unusual disc spherulites), taking the shape of a disc. The amazing fact is that the only deposit where pyrites of such morphology are found is in Illinois (USA) and the discs are dated around 300 million years ago!
Dmitry Morozov (aka ::vtol::), a media artist living in Moscow, had the chance to use a pyrite disc and created Ra, a sound object / synthesizer running on Arduino Nano. Ra uses laser for scanning the irregularities of the surface of the disc and further transforms this data to produce sound:
This project originated as a result of an interesting set of circumstances – a pyrite disc was given to me as a gift by a mineral seller in Boulder city (USA). Upon hearing about my works, she asked to do something with such crystal, and refused to take payment for getting it. In the same period, I was reading articles on various ways of archiving and preservation of sounds from the first, historical sources of the recorded sound – wax discs and other fragile carriers. All technologies were based on the usage of lasers. Inspired by these projects, I set out to create a self-made laser sound reader which would be able to produce sound from various uneven surfaces, using minimal resources to achive it. Thus emerged the idea to construct an instrument using the pyrite disc and a self-made laser sound reader.
The production of the object was possible thanks to the commission of the Sound Museum in St.-Petersburg which now has Ra in its collection.
int laserPin = 3; // LED connected to digital pin 9 int ledPin = 4; // LED connected to digital pin 9 int MicPin = 1; // potentiometer connected to analog pin 3 int LevelPin = 0; int pos = 0; // variable to store the servo position
int val = 0; // variable to store the read value int val2 = 0; int tick = 500; int TickMod = 500; int Sweep = 0; int LaserPWM = 0; int LaserPWMvector = 1;
int Mirror1 = 0; int Mirror2 = 0;
int Mic = 0; int Level = 0;
int LevelIndex = 0; int LevelBuf[200] = {0, }; int LevelMean = 0;
int LevelValueIndex = 0; int LevelValueBuf[10] = {0, };
int ShutOffBits = 50; int Active = 0;
void setup() { Serial.begin(9600);
pinMode(laserPin, OUTPUT); // sets the pin as output pinMode(ledPin, OUTPUT); // sets the pin as output myservo1.attach(8); // attaches the servo on pin 9 to the servo object myservo2.attach(9); // attaches the servo on pin 9 to the servo object
pos = 30; myservo1.write(pos);
pos = 95; myservo2.write(pos);
digitalWrite(laserPin, HIGH);
randomSeed(analogRead(0));
NumPatterns = sizeof(patterns);
}
void loop() { tick++;
Mic = analogRead(MicPin);
LevelMean = CalcLevelMean();
Level = CalcLevelValue();
if(LevelMean > ShutOffBits) Active = 1; else Active = 0;
if((tick % 10) == 0) { //LaserPWM += LaserPWMvector; val = abs(Level - LevelMean); if(val < 1) val = 1; if(val > 5) val = 5;
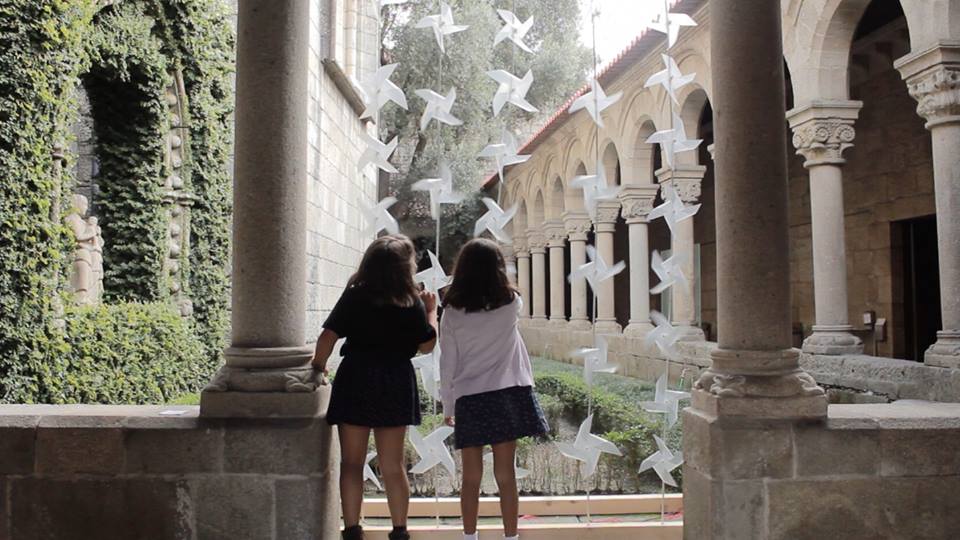
Cata Sopros is interactive sound installation running on Arduino Uno and created by Elas Duas, a multidisciplinary studio based in the city of Guimarães (Portugal). If you translate the title from portuguese it means: Breathe Catchers. In fact the project is a collective musical instrument made with paper windmills transforming the users’ breathe into sounds:
The windmills have inbuilt electret microphones that were connected to an Arduino Uno. The sensor data was then sent to MaxMSP and the sounds were played with Ableton Live. The video was shot at the cloister of the beautiful Alberto Sampaio museum in Guimarães, Portugal.
Planet Arduino is, or at the moment is wishing to become, an aggregation of public weblogs from around the world written by people who develop, play, think on Arduino platform and his son. The opinions expressed in those weblogs and hence this aggregation are those of the original authors. Entries on this page are owned by their authors. We do not edit, endorse or vouch for the contents of individual posts. For more information about Arduino please visit www.arduino.cc
You are currently browsing the archives for the sound category.


.jpg)