Posts | Comments

Planet Arduino

Archive for the ‘open source’ Category

Arduino Open Source Report for 2021

We’re excited to announce the Arduino Open Source Report for 2021 is now available, offering many insights into the development of our open-source ecosystem during the past year.

In this retrospective report you’ll learn about the activities Arduino carried out in the last twelve months, thanks to the hard work of the employees, contractors and volunteers on our team and to the passion of our vibrant community, fueling our mission every day.

We’re proud of the many achievements we celebrated in 2021. It was one of the busiest and most productive years in Arduino’s history of commitment to open source.

We launched a number of new open source hardware products, software tools and libraries. We also upgraded existing assets, heavily refactoring some core pillars of the Arduino framework (IDE, library index and more) ,making them robust enough to support the growing Arduino user base.

The document also highlights key contributions from the Arduino community – libraries, cores and more – that were made during the year. We’re grateful for all the active maintainers and contributors that put Arduino in a league of its own, and strive to give everyone proper credit.

We invite all of you to join the community and become active contributors. There’s a lot to do! For each sub-project, the report points out where you can join us and make a difference.

So, are you ready to dive in? Download the Arduino Open Source Report 2021, and please share your comments and get in touch with us on the Arduino Forum. We want to read your feedback and understand what we can do together in 2022 to ensure Arduino keeps getting better and better.

The post The 2021 Arduino Open Source Report is out appeared first on Arduino Blog.

In our last post, we told you that the Arduino CLI’s primary goal is to provide a flexible yet simple command line tool with all the features and ease of use that made Arduino a successful platform, and enable users to find new ways of improving their workflows. 

The Arduino CLI is not just a command line tool, but contains all you need to build applications around the Arduino ecosystem.

For example, you can:

  • Parse the JSON output of the CLI and easily integrate it into your custom application.
  • Run the CLI as an always-on service that accepts commands via a gRPC interface using your language of choice.
  • Use the CLI in your Go application as a library.

In the video below, we’ll focus on how to start using the Arduino CLI in a terminal session. The tutorial will walk you through setting up all the required tools on your machine to the fastest way to compile and upload a sketch on your target board to allow quick iterations in developing your project with Arduinos.

The Open Source Hardware Association (OSHWA) runs a free program that allows creators to certify that their hardware complies with the community definition of open source hardware.  Whenever you see the certification logo, you know that the certified hardware meets this standard. The certification site includes a full list of […]

Read more on MAKE

The post December 2019 Certified Open Source Hardware appeared first on Make: DIY Projects and Ideas for Makers.

There are few scenes in life more moving than the moment the solder paste melts as the component slides smoothly into place. We’re willing to bet the only reason you don’t have a reflow oven is the cost. Why wouldn’t you want one? Fortunately, the vastly cheaper DIY route has become a whole lot easier since the birth of the Reflowduino – an open source controller for reflow ovens.

This Hackaday Prize entry by [Timothy Woo] provides a super quick way to create your own reflow setup, using any cheap means of heating you have lying around. [Tim] uses a toaster oven he paid $21 for, but anything with a suitable thermal mass will do. The hardware of the Reflowduino is all open source and has been very well documented – both on the main hackaday.io page and over on the project’s GitHub.

The board itself is built around the ATMega32u4 and sports an integrated MAX31855 thermocouple interface (for the all-important PID control), LiPo battery charging, a buzzer for alerting you when input is needed, and Bluetooth. Why Bluetooth? An Android app has been developed for easy control of the Reflowduino, and will even graph the temperature profile.

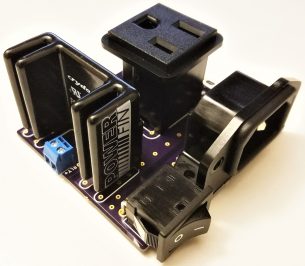
When it comes to controlling the toaster oven/miscellaneous heat source, a “sidekick” board is available, with a solid state relay hooked up to a mains plug. This makes it a breeze to setup any mains appliance for Arduino control.

We actually covered the Reflowduino last year, but since then [Tim] has also created the Reflowduino32 – a backpack for the DOIT ESP32 dev board. There’s also an Indiegogo campaign now, and some new software as well.

If a toaster oven still doesn’t feel hacky enough for you, we’ve got reflowing with hair straighteners, and even car headlights.

Effects pedals: for some an object of overwhelming addiction, but for many, an opportunity to hack. Anyone who plays guitar (or buys presents for someone who does) knows of the infinite choice of pedals available. There are so many pedals because nailing the tone you hear in your head is an addictive quest, an itch that must be scratched. Rising to meet this challenge are a generation of programmable pedals that can tweak effects in clever ways.

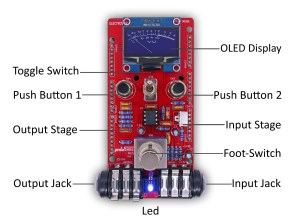
With this in mind, [ElectroSmash] are back at it with another open source offering: the pedalSHIELD MEGA. Aimed at musicians and hackers who want to learn more about audio, DSP and programming, this is an open-hardware/open-software shield for the Arduino MEGA which transforms it into an effects pedal.

The hardware consists of an analog input stage which amplifies and filters the incoming signal before passing it to the Arduino, as well as an output stage which does the DAC-ing from the Arduino’s PWM outputs, and some more filtering/amplifying. Two 8-bit PWM outputs are used simultaneously to make pseudo 16-bit resolution — a technique you can read more about in their handy forum guide.

The list of effects currently implemented covers all the basics you’d expect, and provides a good starting point for writing custom effects. Perhaps a library for some of the commonly used config/operations would be useful? Naturally, there are some computational constraints when using an Arduino for DSP, though it’s up to you whether this is a frustrating fact, or an opportunity to write some nicely optimised code.

[ElectroSmash] don’t just do pedals either: here’s their open source guitar amp.

Stecchino demo by the creator

Self-described “Inventor Dad” [pepelepoisson]’s project is called Stecchino (English translation link here) and it’s an Arduino-based physical balancing game that aims to be intuitive to use and play for all ages. Using the Stecchino (‘toothpick’ in Italian) consists of balancing the device on your hand and trying to keep it upright for as long as possible. The LED strip fills up as time passes, and it keeps records of high scores. It was specifically designed to be instantly understood and simple to use by people of all ages, and we think it has succeeded in this brilliantly.

To sense orientation and movement, Stecchino uses an MPU-6050 gyro and accelerometer board. An RGB LED strip gives feedback, and it includes a small li-po cell and charger board for easy recharging via USB. The enclosure is made from a few layers of laser-cut and laser-engraved material that also holds the components in place. The WS2828B LED strip used is technically a 5 V unit, but [pepelepoisson] found that feeding them direct from the 3.7 V cell works just fine; it’s not until the cell drops to about three volts that things start to glitch out. All source code and design files are on GitHub.

Games are great, and the wonderful options available to people today allow for all kinds of interesting experimentation like a blind version of tag, or putting new twists on old classics like testing speed instead of strength.

Today, at Embedded Linux Conference 2018, Arduino announced the expansion of the number of architectures supported by its Arduino Create platform for the development of IoT applications. With this new release, Arduino Create users can manage and program a wide range of popular Linux® single-board computers like the AAEON® UP² board, Raspberry Pi® and BeagleBone® as if they were regular Arduino boards. Multiple Arduino programs can run simultaneously on a Linux-based board and interact and communicate with each other, leveraging the capabilities provided by the new Arduino Connector. Moreover, IoT devices can be managed and updated remotely, independently from where they are located.

To further simplify the user journey, Arduino has also developed a novel out-of-the-box experience for Raspberry Pi and BeagleBone boards, in addition to Intel®  SBCs, which enables anyone to set up a new device from scratch via the cloud without any previous knowledge by following an intuitive web-based wizard. Arduino plans to continue enriching and expanding the set of features of Arduino Create in the coming months.

“With this release, Arduino extends its reach into edge computing, enabling anybody with Arduino programming experience to manage and develop complex multi-architecture IoT applications on gateways,” said Massimo Banzi, Arduino CTO. “This is an important step forward in democratizing access to the professional Internet of Things.”

“At Arduino we want to empower anyone to be an active player in the digital world. Being able to run Arduino code and manage connected Linux devices is an important step in this direction, especially for IoT applications that need more computing power, like AI and computer vision,” added Fabio Violante, Arduino CEO.

The first time I saw 3D modeling and 3D printing used practically was at a hack day event. We printed simple plastic struts to hold a couple of spring-loaded wires apart. Nothing revolutionary as far as parts go but it was the moment I realized the value of a printer.

Since then, I have used OpenSCAD because that is what I saw the first time but the intuitiveness of other programs led me to develop the OpenVectorKB which allowed the ubiquitous vectors in OpenSCAD to be changed at will while keeping the parametric qualities of the program, and even leveraging them.

All three values in a vector, X, Y, and Z, are modified by twisting encoder knobs. The device acts as a keyboard to

  1. select the relevant value
  2. replace it with an updated value
  3. refresh the display
  4. move the cursor back to the starting point

There is no software to install and it runs off a Teensy-LC so reprogramming it for other programs is possible in any program where rotary encoders may be useful. Additional modes include a mouse, arrow keys, Audacity editing controls, and VLC time searching.

Here’s an article in favor of OpenSCAD and here’s one against it. This article does a good job of explaining OpenSCAD.

[Editor’s note: This is a Hackaday writer’s hack, hence the “I” in place of the usual “we”. We all love custom peripherals though, and a good number of us love OpenSCAD, so you could probably read it either way, but we don’t want to take credit for [Brian]’s work.]


Filed under: 3d Printer hacks, Arduino Hacks

101

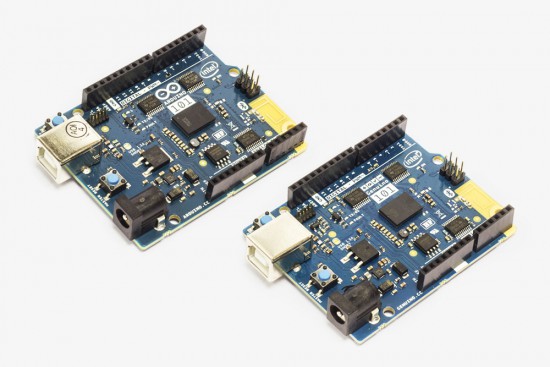
A few weeks ago, an announcement was posted on the Arduino Forum mentioning new improvements on the software side of the Arduino/Genuino 101. With this release, the board–which was developed in collaboration with Intel–is reaching its full potential, with not only better code generation but unlocking useful features to make your sketches even more interactive as well.

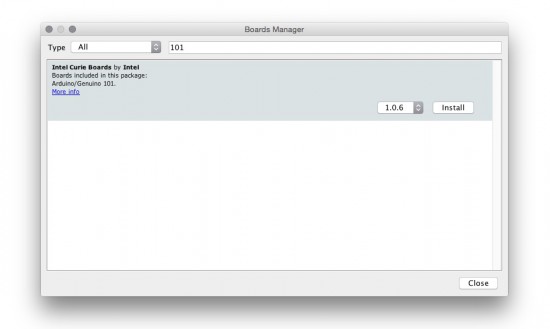
You can easily upgrade the core using the Arduino IDE’s Board Manager (pictured below), while Arduino Create users will be automatically updated, so no action is required–the cool thing about the cloud!

Core-package

In more detail:

  • The GCC compiler has been updated to support hardware extensions to the ARC EM core in the Intel® Curie™ module. This provides significant improvements in floating point operations, bit shifting, and other operations to enhance Sketch performance.
  • The Arduino/Genuino 101 platform offers 2MB Flash storage onboard, which is now enabled for user sketches.
  • An experimental driver has been implemented to enable the I2S interface via the CurieI2S library. Connecting the I2S bus to an external DAC (digital to analog converter) allows users to play high-quality music (HiFi).

Other improvements and bug fixes:

  • Motion Sensor: Several sample sketches, like MotionDetection, have been implemented to demonstrate the application of the IMU data
  • Bluetooth LE: Several new examples for BLE peripheral library added
  • IMU: Correct motion detection setting implemented
  • Library CurieTimerOne APIs are now compatible with the TimerOne library

For comprehensive release notes refer to the Intel Open Source Technology Center on GitHub.

The LEDmePlay is an open-source DIY gaming console powered by an Arduino Mega. Games are displayed on a 32 x 32 RGB LED matrix housed inside an IKEA picture frame, and played using any C64-compatible joystick from the ‘80s. LEDmePlay supports several games, each of which are downloadable for free online, and Makers are encouraged to develop their own as well.

Its creator Mithotronic has also built a handheld variant for on-the-go fun, LEDmePlayBoy. This device is based on the same Arduino Mega, powered by eight AA batteries, and uses an analog thumb joystick and two fire buttons for control.

Interested? You can check out the LEDmePlay’s construction manual, and find all of the games’ source codes here.


  • Newsletter

    Sign up for the PlanetArduino Newsletter, which delivers the most popular articles via e-mail to your inbox every week. Just fill in the information below and submit.

  • Like Us on Facebook