Posts | Comments

Planet Arduino

Archive for the ‘classic hacks’ Category

Is your heaving pile of electronic parts shrinking by the day as you finish old back-burnered projects and come up with new ones? Try an old pastime that never gets old: rolling your own sensors using household objects. [Nematic!] needs a way to sense vibration for an upcoming project. Instead of spending $1 plus shipping and waiting who knows how long for a spring vibration sensor to come in the mail, they made one in a matter of minutes.

A spring vibration sensor is a simple device that can be used as a poor man’s accelerometer, or simply to detect vibration. All you need is a length of conductive wire, a 10 kΩ resistor, and a way to pick up those good vibrations. For the purposes of demonstration, [Nematic!] is using an Arduino Nano in the short build video after the break.

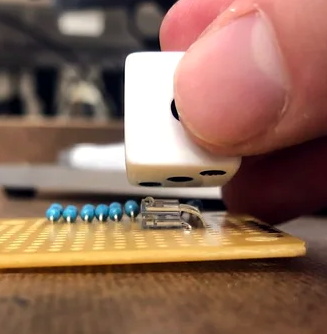
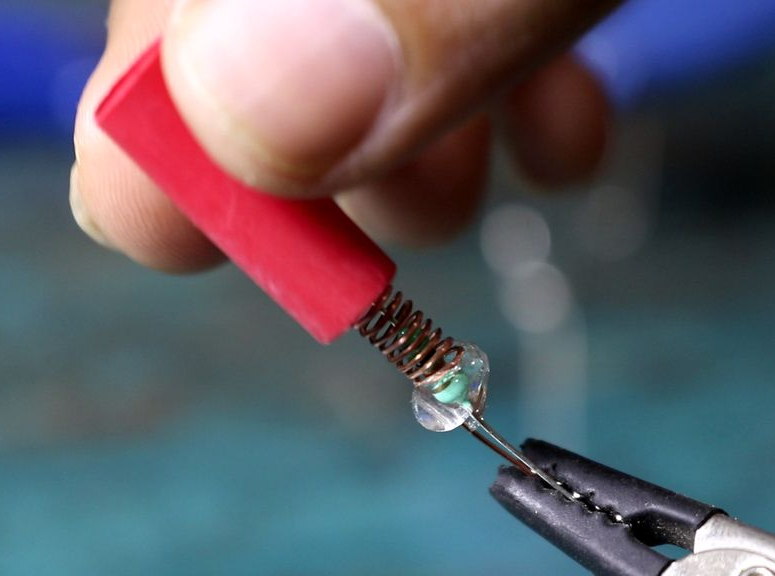
The wire is wound around the threads of a bolt to form a coil that’s just large enough for a resistor to fit inside. One end of the coil is connected to 5 V, and one leg of the resistor connects to an input pin. Together, they form a normally-open switch. When vibrations force the free ends of both to touch, the circuit is complete and the pin is pulled high.

If you make one of these and find the sensitivity is off, just twist up a new coil with stiffer or softer wire depending on the problem. Iterating doesn’t get much cheaper than wrapping wire around a bolt. We can’t wait to see how [Nematic!] will use this sensor. In the meantime, we’re planning to use one to detect when the dryer stops running and send a text.

Speaking of bargain basement sensors, did you know you can detect water leaks with two pennies, an aspirin, and a clothespin? These projects demonstrate the kind of ingenuity that can win you a pile of toys in our new Making Tech At Home contest, running now through July 28th, 2020.

[Andy Geppert] sends in his incredibly clever interactive core memory shield. 

In a great display of one hacker’s work being the base for another’s, [Andy] started out with [Jussi Kilpelainen]’s core memory shield for Arduino.  As he was playing with the shield he had a desire to “see” the core memory flipping and got the idea to add an LED matrix aligned behind the individual cores.

The first iteration worked, but it only showed the state that the Arduino believed the core memory to be in. What he really wanted was a live read on the actual state. He realized that an Adafruit Featherwing 8×8 matrix display also fits behind the core memory. Now the LEDs update based on the read state of the core memory. This allows him to flip the individual bits with a magnetic stylus and see the result. Very cool.

You can see a video of it working after the break.

For anyone who’s ever had to make their own tea, steeping it for the right amount of time can be a pain. That’s precisely the problem that the automatic tea brewing robot solves with its painless approach to brewing tea, built by Slovenian electrical engineering student [Kristjan Berce].

You can use the robot by setting a timer on the knob, at which point the robot raises it arm for the tea bag then dips in the water every 30 seconds until the time has passed. At the end of the timer, the bag is raised clear of the cup to end the brewing. It’s a remarkably simple design that almost evokes chindogu (the Japanese art of useless inventions) if not for the fact that the robot actually serves a useful purpose.

The components for 3D printing the robot are available online, consisting of a case, a container for the Arduino-powered electronics, the lever for holding the tea, and the gear that raises the lever up and down. The device also uses an integrated Li-Ion battery with an accessible charging port and integrated BMS. A 35BYJ46 stepper motor and ULN2003 driver are used to move the 3D printed mechanism. The device uses a potentiometer for setting the steeping time between 1 and 9 minutes, and there’s even a buzzer for indicating once the tea is done brewing.

The Gerber and Arduino code files are open-source for any hackers looking to make their own tea brewers; just take care they operate with “deadly punctuality”.

Getting an old traffic light and wiring it up to do its thing inside your house isn’t exactly a new trick; it’s so common that it wouldn’t normally pass muster for these hallowed pages. Even using one up to show the real-time status of your build or system resource utilization would be pushing it at this point. To get our attention, your traffic light is going to need to have a unique hook.

So how did [Ronald Diaz] manage to get his project to stand out from the rest? Interestingly enough, it’s nothing you can see. His traffic light doesn’t just look the part, it also sounds like the real thing. With far more effort and attention to detail than you’d probably expect, he’s made it so his Australian pedestrian traffic light correctly mimics the complex chirping of the original.

Working from a video of the traffic light on YouTube, [Ronald] was able to extract and isolate the tones he was after. Performing spectral analysis on the audio sample, he was able to figure out the frequency and durations of the eleven individual tones which make up the complete pattern. From the 973 Hz tone that only lasts 25 ms to the continuous 500 Hz “woodpecker”, every element of the sound was meticulously recreated in his Arduino code.

The Arduino Pro Mini used to control the traffic light is not only responsible for playing the tones through a piezo speaker, but as you might expect, for firing off the relays which ultimately control the red and green lamps. With everything carefully orchestrated, [Ronald] can now get that authentic Australian side-of-the-road experience without having to leave the comfort of his own home.

If you’d rather your in-home traffic light be more useful than realistic, we’ve got plenty of prior art for you to check out. This traffic light that tells you how the value of Bitcoin is trending is a great example. Or maybe this one that can tell you if the Internet is down.

There are truisms about dice that you’ve probably already heard: if you have just one of them it’s called a “die”, opposite faces of each die always add up to seven, and those dots that you’re adding together are known as “pips”. But what about the infrared properties of those pips? It turns out they reflect less IR than the white body of the die and that trait can be used to build an automatic die reader.

Great projects have a way of bubbling to the surface. The proof of concept comes from way back in 2009, and while the source blog is now defunct, it’s thankfully been preserved by the Internet Archive. In recreating the project based on that barebones description, [Calvin] reached for a set of five IR transmitter/receiver pairs. Take a close look and you’ll see each transmitter is hidden under its partnered receiver. The light shines up through the receiver and bounces off the pip, or doesn’t if the pip is missing.

This board is only the sensor portion of the design. A 595 shift register provides the ability to control which IR pair is powered, plus five more signals heading out to the analog pins of an Arduino Uno to monitor how much light is being detected by the receivers. Hey, that’s another interesting fact about dice, you only need to read five different pips to establish the value shown!

We wish there were a demo video showing this in action, but alas we couldn’t find one. We were amused to hear [Calvin] mentioned this was a sorting assignment at University and the team didn’t want to build yet another candy sorter. Look, we love an epic M&M sorter just as much as the next electronic geek, but it’s pretty hard to one-up this dice-based random number generator which rolls 1.3 million times each day.

After covering a few of his builds at this point, we think it’s abundantly clear that [Igor Afanasyev] has a keen eye for turning random pieces of antiquated hardware into something that’s equal parts functional and gorgeous. He retains the aspects of the original which give it that unmistakable vintage look, while very slickly integrating modern components and features. His work is getting awfully close to becoming some kind of new art form, but we’re certainly not complaining.

His latest creation takes an old-school “Monopak” electronic flash module and turns it into a desk clock that somehow also manages to look like a vintage television set. The OLED displays glowing behind the original flash diffuser create an awesome visual effect which really sells the whole look; as if the display is some hitherto undiscovered nixie variant.

On the technical side of things, there’s really not much to this particular build. Utilizing two extremely common SSD1306 OLED displays in a 3D printed holder along with an Arduino to drive them, the electronics are quite simple. There’s a rotary encoder on the side to set the time, though it would have been nice to see an RTC module added into the mix for better accuracy. Or perhaps even switch over to the ESP8266 so the clock could update itself from the Internet. But on this build we get the impression [Igor] was more interested in playing with the aesthetics of the final piece than fiddling with the internals, which is hard to argue with when it looks this cool.

Noticing the flash had a sort of classic TV set feel to it, [Igor] took the time to 3D print some detail pieces which really complete the look. The feet on the bottom not only hold the clock at a comfortable viewing angle, but perfectly echo the retro-futuristic look of 50s and 60s consumer electronics. He even went through the trouble of printing a little antenna to fit into the top hot shoe, complete with a metal ring salvaged from a key-chain.

Late last year we were impressed with the effort [Igor] put into creating a retro Raspberry Pi terminal from a legitimate piece of 1970’s laboratory equipment, and more recently his modern take on the lowly cassette player got plenty of debate going. We can’t wait to see what he comes up with next.

The German Enigma device has always been a fascinating gadget for hackers. We’ve seen various replicas and emulators created over the years, and it was recently even the subject of our weekly Hack Chat. But if you think about it it’s not really a surprise; the Enigma has the perfect blend of historical significance and engineering wizardry, with a healthy dash of mystery thrown in. Why do the bad guys always have the coolest toys?

If you’ve ever wanted your own little Enigma replica to explore, [Mark Culross] has put together a project which makes it easier than ever. In fact, it’s so straightforward that some of you reading this post will probably be able to put one together as soon as you’ve read this post from stuff you already have lying around in the parts bin. All you need is an Arduino Uno, an Adafruit 2.8″ TFT Touch Shield, and a penchant for World War II technology.

Thanks to the relatively high-resolution touch screen, [Mark] was able to develop a user interface for his Enigma that really gives you a feel for how the original machine worked. Obviously it’s considerably simplified from the real-world version, but using a stylus to tap the rotors you want to spin or the wires you want plugged in makes for a more immersive experience than many of the previous attempts we’ve seen. With a tap you’re even able to load historical machine configurations, such as how the Enigma aboard the submarine U-262 was configured when the Allies intercepted its encoded messages in 1942.

[Mark] says this project was always about developing the software, and he leaves the actual hardware implementation as an exercise for the user. Just to play around with the software it’s enough to hook up an Arduino and the touch screen, but we’d love to see somebody really take the idea and run with it. Add some batteries, a charging circuit, and put it all in a little wooden box for that authentic Enigma look. Can’t forget that iconic wrinkle finish paint, either.

Over the years, we’ve seen replica Enigma machines in all shapes and sizes. From ones you could mount on your wrist, to full size replicas using modern components. We’ve even seen one variation that you can print out on a couple of sheets of paper. The parade of recreations shows no sign of stopping, and we wouldn’t have it any other way.

These days, you could be forgiven for thinking driving an LCD from a microcontroller is easy. Cheap displays have proliferated, ready to go on breakout boards with controllers already baked in. Load up the right libraries and you’re up and running in a matter of minutes. However, turn your attention to trying to drive a random LCD you’ve yanked out of a piece of old equipment, and suddenly things get harder. [Ivan Kostoski] was in just such a position and decided to get down to work.

[Ivan]’s LCD was a 320×240 STN device salvaged from an old tape library. The display featured no onboard controller, and the original driver wasn’t easily repurposed. Instead, [Ivan] decided to drive it directly from an Arduino Uno.

This is easier said than done. There are stringent timing requirements that push the limits of the 8-bit platform, let alone the need for a negative voltage to drive the screen and further hardware to drive the backlight. These are all tackled in turn, with [Ivan] sharing his tips to get the most flexibility out of the display. Graphics and text modes are discussed, along with optimizations that could be possible through the varied use of available RAM and flash.

The code is available on Github. If you need inspiration for your own controllerless LCD driver. [Ben Heck] has done similar work too, using FPGA grunt to get the job done.

Hackers seem intent on making sure the world doesn’t forget that, for a brief shining moment, everyone thought Big Mouth Billy Bass was a pretty neat idea. Every so often we see a project that takes this classic piece of home decor and manages to shoehorn in some new features or capabilities, and with the rise of voice controlled home automation products from the likes of Amazon and Google, they’ve found a new ingredient du jour when preparing stuffed bass.

[Ben Eagan] has recently completed his entry into the Pantheon of animatronic fish projects, and while we’ll stop short of saying the world needed another Alexa-enabled fish on the wall, we’ve got to admit that he’s done a slick job of it. Rather than trying to convince Billy’s original electronics to play nice with others, he decided to just rip it all out and start from scratch. The end result is arguably one of the most capable Billy Bass updates we’ve come across, if you’re willing to consider flapping around on the wall an actual capability in the first place.

The build process is well detailed in the write-up, and [Ben] provides many pictures so the reader can easily follow along with the modification. The short version of the story is that he cuts out the original control board and wires the three motors up to an Arduino Motor Driver Shield, and when combined with the appropriate code, this gives him full control over Billy’s mouth and body movements. This saved him the trouble of figuring out how to interface with the original electronics, which is probably for the better since they looked rather crusty anyway.

From there, he just needed to give the fish something to get excited about. [Ben] decided to connect the 3.5 mm audio jack of an second generation Echo Dot to one of the analog pins of the Arduino, and wrote some code that can tell him if Amazon’s illuminated hockey puck is currently yammering on about something or not. He even added a LM386 audio amplifier module in there to help drive Billy’s original speaker, since that will now be the audio output of the Dot.

A decade ago we saw Billy reading out Tweets, and last year we presented a different take on adding an Alexa “brain” to everyone’s favorite battery powered fish. What will Billy be up to in 2029? We’re almost too scared to think about it.


  • Newsletter

    Sign up for the PlanetArduino Newsletter, which delivers the most popular articles via e-mail to your inbox every week. Just fill in the information below and submit.

  • Like Us on Facebook