Posts | Comments

Planet Arduino

Archive for the ‘Accelerometer’ Category

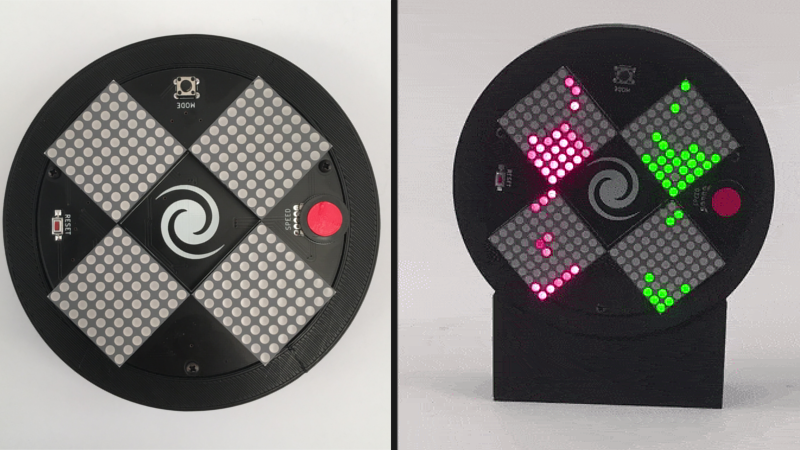
[Fearless Night]’s slick dual hourglass doesn’t just simulate sand with LEDs, it also emulates the effects of gravity on those simulated particles and offers a few different mode options.

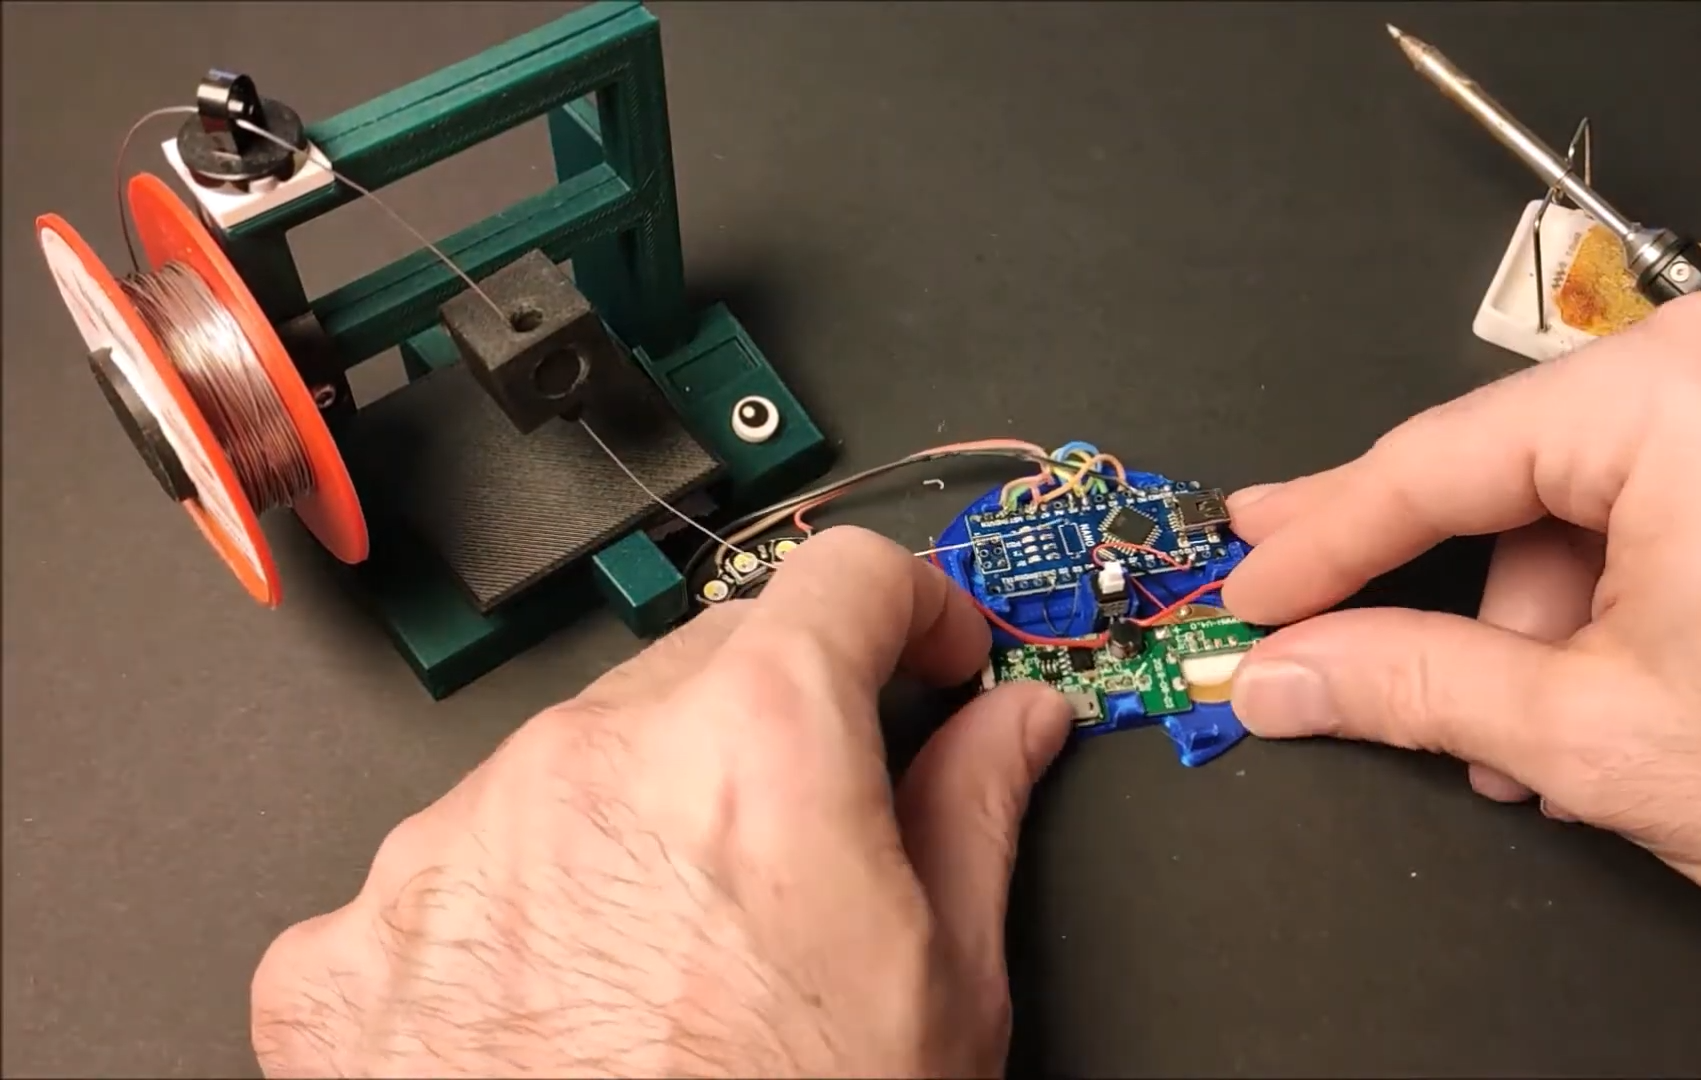
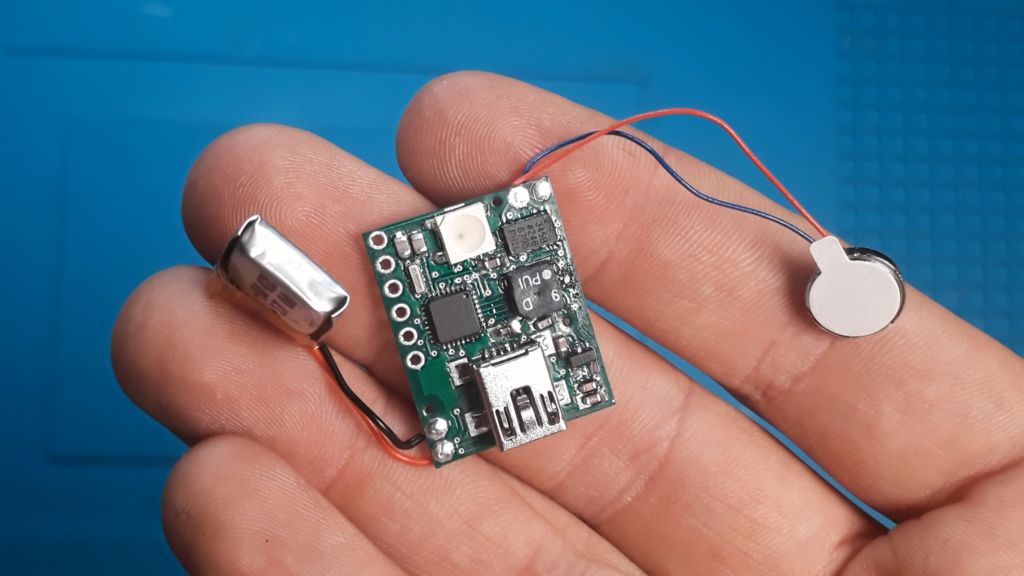
The unit uses an Arduino (with ATMEGA328P) and an MPU-6050 accelerometer breakout board to sense orientation and movement, and the rest is just a matter of software. Both the Arduino and the MPU-6050 board are readily available and not particularly expensive, and the LED matrix displays are just 8×8 arrays of red/green LEDs, each driven by a HT16K33 LED controller IC.

The enclosure and stand are both 3D-printed, and a PCB not only mounts the components but also serves as a top cover, with the silkscreen layer of the PCB making for some handy labels. It’s a clever way to make the PCB pull double-duty, which is a technique [Fearless Night] also used on their earlier optical theremin design.

Those looking to make one of their own will find all the design files and source code handily available from the project page. It might not be able to tell time in the classical sense, but seeing the hourglass displays react to the device’s orientation is a really neat effect.

If you want to waste time in a meaningful way, get yourself an hourglass. It’s simultaneously mesmerizing and terrifying to sit there and watch the seconds slip through the threshold that separates possibility from missed opportunity.

[Ty and Gig]’s LED hourglass is equally beautiful to watch. It doesn’t actually tell time, but that’s perfectly fine by us. What it does do is animate the LEDs to approximate grains of sand in gravity, no matter how the hourglass is tilted.

In either vertical orientation, the sand falls as long as there is some in the top. When the hourglass is horizontal, the LEDs settle just like real sand does. [Ty and Gig] achieved this with a whole lot of code that breaks the animation frames into structure arrays.

By contrast, the hardware part of this build is fairly simple: all that’s needed to replicate this build is some RGB LEDs a beefy power supply to drive them, an accelerometer, and a microcontroller.

[Ty and Gig] were planning to use an ESP8266, but misplaced it and went with an Arduino Mega instead. (You know what they say — buy a replacement and the one you lost will turn up almost immediately.) The beautiful frame is made from leftover purpleheart, a hardwood that turns purple with exposure to air. Check out the build video after the break.

Too lazy to reset your hourglass every hour? Here’s one that flips itself.

Getting started with electronics and sensing the world around you is now easier than ever with the new all-in-one Arduino Sensor Kit from Arduino, in partnership with Seeed.   

The 10 most popular modules and sensors for your Arduino UNO have been integrated onto a single board to provide plug-and-play convenience without the need for any soldering or wiring! Combining basic Grove sensors and actuators for the Arduino UNO, the kit contains a base shield featuring the following modules that can be connected either through the digital, analog or I2C connectors:

  • An OLED screen
  • 4 digital modules (LED, button, buzzer and potentiometer)
  • 5 sensors (Light, sound, air pressure, temperature, and accelerometer)

Just plug the Arduino Sensor Kit into the Arduino UNO board, then you’re ready to follow the  Plug, Sketch & Play online lessons that make getting started a breeze.

The kit is equipped with 16 Grove connectors, which when placed on the board, offer functionality to the various pins. With seven digital connections, four analog connections, four I2C connections, and a UART connection, the base shield can be easily mounted onto an Arduino UNO board and programmed through the Arduino IDE. 

Now available from the Arduino Store, the Arduino Sensor Kit comes as a standalone kit for only €23.00 / US$23.00, or can be purchased with the Arduino UNO Rev3 board as a great value bundle for €38.70 / US$38.70. For more details, check out our website here.

We suppose it’s a bit early to call it just yet, but we definitely have a solid contender for Father of the Year. [DIY_Maxwell] made a light-up hockey game for his young son that looks like fun for all ages. Whenever the puck is hit with the accompanying DIY hockey stick (or anything else), it lights up and produces different sounds based on its acceleration.

Inside the printed puck is an Arduino Nano running an MPU6050 accelerometer, a 12-NeoPixel ring, and a piezo buzzer. [DIY_Maxell] reused a power bank charging circuit to charge up the small LiPo battery.

The original circuit used a pair of coin cells, but the Arduino was randomly freezing up, probably because of the LEDs’ current draw. Be sure to check out the video after the break, which begins with a little stop motion and features a solder stand in the shape of a 3D printer.

Got a house full of carpet or breakables? You could always build an air hockey table instead.

While we’re still far away from returning to a pre-Corona everyday life, people seem to have accepted that toilet paper will neither magically cease to exist, nor become our new global currency. But back at the height of its madness, like most of us, [Jelle Vermandere] found himself in front of empty shelves, and the solution seemed obvious to him: creating a lifelike toilet paper chasing game in hopes to distract the competition.

Using Unity, [Jelle] created a game world of an empty supermarket, with the goal to chase after distribution tubes and collect toilet paper packs into a virtual cart. Inspired by the Wii Wheel, he imitated a shopping cart handle built from — as it appears — a sunshade pole that holds an Arduino and accelerometer in a 3D-printed case as game controller. For an even more realistic feel, he added a sound sensor to the controller, and competing carts to the game, which can be pushed out of the way by simply yelling loud enough. You can witness all of this delightful absurdity in his build video after the break.

From racing shopping carts to racing bicycles

But that’s not all. With the toilet paper situation sorted out, [Jelle] found himself in a different dilemma: a cloud foiled his plans of going for a bicycle ride. In the same manner, he ended up building a cycling racing game, once again with Unity and Arduino. From a 3D-scanned model of himself and his bicycle, to automatically generating tracks on the fly and teaching an AI to ride a bike, [Jelle] clearly doesn’t joke around while he’s joking around.

However, the best part about the game has to be the controller, which is his actual bicycle. Using a magnetic door sensor to detect the speed, and a potentiometer mounted with an obscure Lego construction to the handlebar, it’s at least on par with the shopping cart handle — but judge for yourself in another build video, also attached after the break. The only thing missing now is to level up the difficulty by powering the Arduino with the bicycle itself.


Let’s face it, we probably all sit at our computers for way too long without getting up. Yes, there’s work to be done, games to be played, and the internet abounds with people who are wrong and must be down-voted and/or corrected. We totally get and respect all that. However, if you want to maintain your middle- and long-range vision, you should really get up regularly and gaze out the window for a bit.

In fact, the Arduband does you one better. Its Arduino Nano and accelerometer check your position every ten minutes. If you haven’t changed your Z by the third check, then it’s time for a break. The combination of an RGB LED, buzzer, and vibrating disc motor working together should be enough to pull you out of any computerized stupor, and they won’t give up and go back to sleep until you have stood up and remained upright for one minute.

We like that [ardutronics123] spun up a board and made it small enough to be wrist-mounted using a watch strap. It would work just as well worn around your neck, and would probably even fit in your pocket. Blink a few times before you check out the build video after the break.

Arduband would be great on the go, but who does that anymore? If you spend every day at the same desk, you could point a time-of-flight sensor at your chair and start a timer.

It’s great to see people are out there trying to find fun ways to exercise amid the current crisis. Although jumping up and down isn’t great for the knees, it does give decent cardio. But if you don’t have a rope or a puddle, we admit that jumping can lose its bounce pretty fast.

Quarantine has been a game-filled time for [fridaay]. Somewhere between a handful of FPS games, he decided to try to play Google’s offline dinosaur-based side scroller game by making the dinosaur spring over the saguaros whenever he physically jumps in the air. (Video, embedded below.)

Here’s how it works: [fridaay] holds a transmit circuit that consists of an Arduino UNO, an accelerometer module, and an nRF24L01 transceiver, all running on a 9 V battery. Whenever [fridaay] jumps, the accelerometer reads the change in Z and sends it to the receiving circuit, which is just another UNO and nRF. The receiving UNO is connected to a laptop and configured to press the space bar so the dinosaur canters over the cacti.

We’ve never been able to stay alive long enough in the game to see this happen, but apparently you need to crouch at some point in the game. [fridaay] has yet to implement a control for that, but we’re sure he’ll think of something. Jump past the break to see the video, and hit him up if you need the code.

If you have a lot of parts at your disposal, why not make a physical version?

Via r/duino

When you’re a kid, remote control cars are totally awesome. Even if you can’t go anywhere by yourself, it’s much easier to imagine a nice getaway from the daily grind of elementary school if you have some wheels. And yeah, R/C cars are still awesome once you’re an adult, but actual car-driving experience will probably make you yearn for more realism.

What could be more realistic and fun than an active suspension? Plenty of adults will never get the chance to hit the switches in real car, but after a year of hard work, [snoopybg] is ready to go front and back, side to side, and even drift in this super scale ’63 Oldsmobile Dynamic 88 wagon. We think you’ll agree that [snoopybg] didn’t miss a detail — this thing makes engine noises, and there are LEDs in the dual exhaust pipes to simulate flames.

An Arduino reads data from a triple-axis accelerometer in real time, and adjusts a servo on each wheel accordingly, also in real time, to mimic a real car throwing its weight around on a real suspension system. If that weren’t cool enough, most of the car is printed, including the tires. [snoopybg] started with a drift car chassis, but even that has been hacked and drilled out as needed.

There are a ton of nice pictures on [snoopybg]’s site if you want to see what’s under the hood. We don’t see the code anywhere, but [snoopybg] seems quite open to publishing more details if there is interest out there. Strap yourself in and hold on tight, because we’re gonna take this baby for a spin after the break.

If this is all seems a bit much for you, but you’ve got that R/C itch again, there’s a lot to be said for upgrading the electronics in a stock R/C car.

Via r/duino

There’s a trend in corporate America that has employees wear a step counter — technically a pedometer — and compete in teams to see who can get the most number of steps. We wonder how many people attach the device to an electric drill and win the competition easily. However if you want to do your own measurements, [Ashish Choudhary] has plans for making a pedometer with an Arduino. The device isn’t tiny, but as you can see in the video below it seems to work.

For the extra size, you do get some features. For one, there is a 16×2 LCD display and an ADXL335 accelerometer, and you can probably imagine some other cool features for such a device.

The Arduino computes the magnitude of the acceleration, and if it exceeds a certain threshold it adds a step to the step count. Honestly, this is a fun project but it cries out for a more compact form factor. An ESP8266 for example could ditch the display and connect via WiFi to your phone. Then again, your phone can probably do the same job, as could not to mention many smartwatches. But those don’t have nearly as much geek cred as this project.

This is a little large for a hamster. On the other hand, there’s plenty you can do with the accelerometer after you’ve had enough fun counting steps.

If you are a lover of all-things remote-conteolled, it’s likely that you know a thing or two about controllers. You’ll have one or two of the things, both the familiar two-joystick type and the pistol-grip variety. But had you ever considered that there m ight be another means to do it? [Andrei] over at ELECTRONOOBS has posted a guide to a tilt-controlled RC car. It is a good example of how simple parts can be linked together to make something novel and entertaining, and a great starter project for an aspiring hacker.

An Arduino Nano reads from an accelerometer over an I2C bus, and sends commands over a wireless link, courtesy of a pair of HC-12 wireless modules.  Another Nano mounted to the car decodes the commands, and uses a pair of H-bridges, which we’ve covered in detail, to control the motors.

The tutorial is well done, and includes details on the hardware and all the code you need to get rolling.  Check out the build and demo video after the break.

We’d love to see this idea turned up to 11 by using a more capable base vehicle, and finer controls on the steering– A Honda Civic perhaps?

[Thanks to Baldpower for the tip!]


  • Newsletter

    Sign up for the PlanetArduino Newsletter, which delivers the most popular articles via e-mail to your inbox every week. Just fill in the information below and submit.

  • Like Us on Facebook