Posts | Comments

Planet Arduino

Archive for the ‘Cellphone Hacks’ Category

Ever hear of Microsoft Soundscape? We hadn’t, either. But apparently it and similar apps like Blindsquare provide people with vision problems context about their surroundings. The app is made to run in the background of the user’s mobile device and respond to media controls, but if you are navigating around with a cane, getting to media controls on a phone or even a headset might not be very convenient. [Jazzang] set out to build buttons that could control apps like this that could be integrated with a cane or otherwise located in a convenient location.

There are four buttons of interest. Play/pause, Next, Back, and Home. There’s also a mute button and an additional button you can use with the phone’s accessibility settings. Each button has a special function for Soundscape. For example, Next will describe the point of interest in front of you. Soundscape runs on an iPhone so Bluetooth is the obvious choice for creating the buttons.

To simplify things, the project uses an Adafruit Feather nRF52 Bluefruit board. Given that it’s Arduino compatible and provides a Bluetooth Human Interface Device (HID) out of the box, there’s almost nothing else to do for the hardware but wire up the switches and some pull up resistors. That would make the circuit easy to stick almost anywhere.

Software-wise, things aren’t too hard either. The library provides all the Bluetooth HID device trappings you need, and once that’s set up, it is pretty simple to send keys to the phone. This is a great example of how simple so many tasks have become due to the availability of abstractions that handle all of the details. Since a Bluetooth HID device is just a keyboard, you can probably think of many other uses for this setup with just small changes in the software.

We covered the Bluefruit back when it first appeared. We don’t know about mounting this to a cane, but we do remember something similar attached to a sword.

[Sergey Mironov] sent in his SelfieBot project. His company, Endurance Robots, sells a commercial version of the bot, which leads us to believe that in a strange and maybe brilliant move he decided to just sell the prototype stage of the product development as a kit. Since he also gave away the firmware, STLs, BOM, and made a guide so anyone can build it, we’re not complaining.

The bot is simple enough. Nicely housed hobby servos in a 3D printed case take care of the pan and tilt of the camera. The base of the bot encloses the electronics, which are an Arduino nano, a Bluetooth module, and the support electronics for power and motor driving.

To perform the face tracking, the build assumes you have a second phone. This is silly, but isn’t so unreasonable. Most people who’ve had a smart phone for a few years have a spare one living in a drawer as back-up. One phone runs the face tracking software and points the bot, via Bluetooth, towards the user. The other phone records the video.

The bot is pretty jumpy in the example video, but this can be taken care of with better motors. For a proof-of-concept, it works. A video of it in action after the break.

The HackadayPrize2016 is Sponsored by:

Filed under: Arduino Hacks, Cellphone Hacks, robots hacks, The Hackaday Prize

We live in a connected world, but that world ends not far beyond the outermost cell phone tower. [John Grant] wants to be connected everywhere, even in regions where no mobile network is available, so he is building a solar powered, handheld satellite messenger: The MyComm – his entry for the Hackaday Prize.

The MyComm is a handheld touch-screen device, much like a smartphone, that connects to the Iridium satellite network to send and receive text messages. At the heart of his build, [John] uses a RockBLOCK Mk2 Iridium SatComm Module hooked up to a Teensy 3.1. The firmware is built upon a FreeRTOS port for proper task management. [John] crafted an intuitive GUI that includes an on-screen keyboard to write, send and receive messages. A micro SD card stores all messages and contact list entries. Eventually, the system will be equipped with a solar cell, charging regulator and LiPo battery for worldwide, unconditional connectivity.

2016 will be an interesting year for the Iridium network since the first satellites for the improved (and backward-compatible) “Iridium NEXT” network are expected to launch soon. At times the 66 Iridium satellites currently covering the entire globe were considered a $5B heap of space junk due to deficiencies in reliability and security. Yet, it’s still there, with maker-friendly modems being available at $250 and pay-per-use rates of about 7 ct/kB (free downstream for SDR-Hackers). Enjoy the video of [John] explaining the MyComm user interface:

The HackadayPrize2016 is Sponsored by:

Filed under: Arduino Hacks, Cellphone Hacks, The Hackaday Prize

App development is not fun for everyone, and sometimes you just want to control a device from your phone with minimal work. Blynk appears to be a fairly put-together library for not only hooking up any Arduino or esp8266 to a phone through WiFi, but also through the net if desired.

Install the app onto your iPhone or Android device. Install the libraries on your computer. Next, modify your Arduino source to either pass direct control of a pin to Blynk, or connect Blynk to a virtual pin inside your code for more advanced control. If you want to go the easy route, create an account, log into the app, and drag and drop the interface you’d like. If the idea of letting some corporation host your Arduino project sends shivers down your spine, there is also an option to host your own server. (Editorial snark: Yes, it requires a server. That’s the cost of “simplicity”.)

There have been a few times where we’ve wished we could add app control to our projects, but installing all the libraries and learning a new language just to see a button on a screen didn’t seem worth it. This is a great solution. Have any of you had experience using it?


Filed under: Arduino Hacks, Cellphone Hacks
May
22

A Nokia Shield For The Arduino

arduino, arduino hacks, cell phone, Cellphone Hacks, nokia, Nokia 3100, sms Comments Off on A Nokia Shield For The Arduino 

The Nokia 3100 is a classic in the circles we frequent. The LCD in this phone is a very cheap and very common display, and it was one of the most popular phones since the phone from Bell, making it a very popular source of cool components.

Now everything is an Internet of Thing, and cellular data for microcontroller projects is all the rage. [Charles] thought it would be interesting to use the famous Nokia 3100 to transmit and receive data. After battling with some weird connectors, he succeeded.

The Nokia 3100 doesn’t have a USB connector, as this phone was made before the EU saved us from a menagerie of cell phone chargers. Instead, this phone has a Nokia Pop-Port, a complex connector that still has TX and RX pins running at 115,200 bit/s 8N1. By fitting a USB socket onto a prototyping board, adding a few level shifters, and connecting the pins in the right order, [Charles] was able to get his Arduino talking to an old Nokia Brick.

[Charles] isn’t quite at the level of sending SMS from his confabulation, and even following a tutorial from [Ilias Giechaskiel] didn’t work. [Charles] is looking for help here, and if you have any suggestions, your input would be appreciated.

There is a problem with using a Nokia 3100 as a cheap Arduino cellular shield: it’s only 2G, and sometime soon those cell towers will be shut down. For now, though, it works, and once those 2G towers are shut down, there are plenty of options with cheap, early Android and iOS phones.


Filed under: Arduino Hacks, Cellphone Hacks
Jan
02

Controlling Nokia Phones with Arduino

6310, arduino, arduino hacks, cell phone, Cellphone Hacks, FBus, nokia, sms, text message Comments Off on Controlling Nokia Phones with Arduino 

While [Ilias Giechaskiel] was waiting for his SIM900 shield to arrive, he decided to see what he could do with an old Nokia 6310i and an Arduino. He was researching how to send automated SMS text messages for a home security project, and found it was possible to send AT commands via the headphone jack of Motorola phones. But unfortunately Nokia did not support this, as they use a protocol known as FBus. With little information to go on, [Ilias] was able to break down the complicated protocol and take control with his Arduino.

With the connections in place, [Ilias] was able to communicate with the Nokia phone using a program called Gnokii — a utility written specifically for controlling the phone with a computer. Using the Arduino as an intermediary, he was eventually able tap into the FBus and send SMS messages.

Be sure to check out his blog as [Ilias] goes into great detail on how Nokia’s FBus protocol works, and provides all source code needed to replicate his hack. There is also a video demonstration at the end showing the hack in action.


Filed under: Arduino Hacks, Cellphone Hacks


Hanging out at one side of the Atmel booth at Maker Faire was [Pamungkas Sumasta] who was showing off his Arduino cellphone called Phoenard. We really like the form-factor but its hackability is where it really shines. [Sumasta] showed off the menu system which is quite snappy and makes it simple for you to add your own applications. Software isn’t the only thing you can customize, as there’s a connector at the bottom of the phone. He showed off a breadboard attachment which was hosting LEDs of various colors. Their intensity can be altered using a simple slider app on the touchscreen. But there’s more power if want it. Also on exhibit was a self-balancing robot body which has a connector at the top for the phone.

[Sumasta] won the Atmel Hero contest and we assume that’s how he made it all the way to San Francisco from The Netherlands for Maker Faire. You can learn a few more technical details about Phoenard on the Facebook page.


Filed under: Arduino Hacks, Cellphone Hacks, Featured

smsTempController

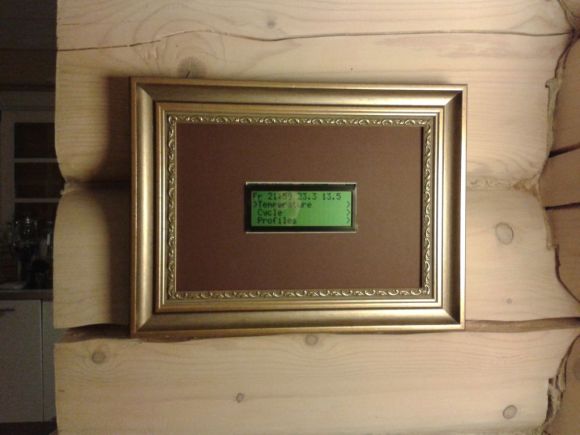
As connected as we are, reliable and affordable internet is still a luxury in the far reaches. [kohleick's] country home is not just remote; with temperatures dropping to -30C in the winter, it’s practically Arctic. His solution for controlling the thermostat from afar was to take advantage of the GSM network and implement a SMS-based heater controller. The unit typically operates in “antifreeze mode,” but sending a simple text message prior to visiting causes the heater to kick it up to a more comfortable setting for your arrival. Daily logs report the system’s status, and an alert will trigger when temperatures fall below a set limit, thus indicating potential faults with the heater.

The build uses a Freeduino paired with an external GSM modem for communication and an LCD to display current status and menus, which users access via three buttons on the side of the picture frame. [kohleick] connected two temperature sensors: one directly to the Freeduino’s shield and a second outside the house. After the temperature sensors detect deviance from the set point, or upon SMS instruction, the Freeduino will crank up the heat through a 5V relay attached to the home’s boiler. Head over to the Instructables page linked above for a bill of materials, schematics, and the code. The Siemens GSM modem in this build is nothing to worry about, but be careful if you try to reproduce this project with an Arduino GSM shield, or your house might really heat up.


Filed under: Arduino Hacks, Cellphone Hacks, home hacks, Microcontrollers
Jul
21

Arduino cellphone

arduino hacks, cellphone, Cellphone Hacks, GPRS, shield, TFT Comments Off on Arduino cellphone 

OLYMPUS DIGITAL CAMERA

The fact that you can build a cellphone around an Arduino is pretty neat. But we’re drawn to this project more as a testament to the advancement of hobby electronics. An [Average Joe] can build this thing with a minimum or background knowledge and without breaking the bank. Wow.

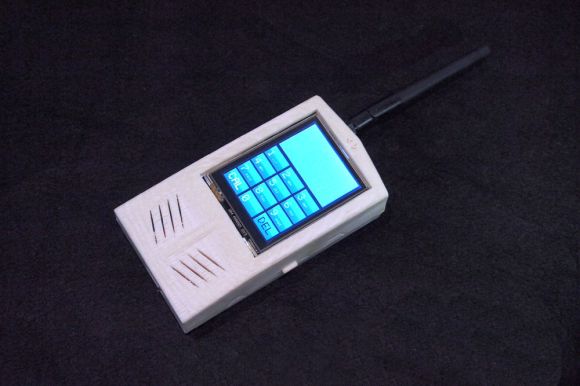
Of course this isn’t the first DIY cellphone we’ve come across. One of our favorites is this one which resides on a home etched PCB. There was even another Arduino offering with similar components back in September. But the one seen above really pulls it all together into a package that is usable for everyday life. The components include and Arduino Uno, GPRS shield from Seeed Studios, a TFT touch screen, Lithium battery and charging circuit, and a few other bobbles. All of it is mounted inside of a 3D printed case.

A simple phone calls for a simple UI and that’s included as well. The main menu has two buttons, one for placing a call, the other for sending a text. From there you get the virtual keypad seen above for typing out the phone number or composing a message.

[Thanks Victorzie]


Filed under: Arduino Hacks, Cellphone Hacks


  • Newsletter

    Sign up for the PlanetArduino Newsletter, which delivers the most popular articles via e-mail to your inbox every week. Just fill in the information below and submit.

  • Like Us on Facebook