Posts | Comments

Planet Arduino

Archive for the ‘video hacks’ Category

Making retro video games on today’s micro controllers brings many challenges, especially when using only the micro controller itself to handle the entire experience. Complex graphics, sound, game logic and input is taxing enough on the small chips, toss in NTSC color graphics and you have a whole different bear on your hands.

[rossum] set out making the Arduinocade retro game system using an overclocked Arduino Uno, and not much more. Supporting 4 voice sound and IR game controllers, the system also boasts 27 simultaneous colors all in software. These colors and the resolution feel like they’re impossible without a graphics chip to offload some of the work. While doing all of this the ATmega328p is also playing some faithful reproductions of classic arcade games.

The uses a couple of interesting tricks. Color is generated with NTSC color artifacts, where the screen is really black and white, but thanks to a delay or two in the signal generation the bits are out of phase from the reference “color burst” signal and appear on-screen as unique colors. This approach was used in the 8 bit Apple II personal computers to generate its colors, and also on the early IBM PC’s with CGA cards to drastically increase color depth. In this case, the chip is overclocked with a 28.6363 MHz crystal (a multiple of NTSC timing) and the SPI hardware leveraged to shift out all the necessary pixels. Check out how great it looks and sounds after the break.

It’s good to see an old trick on a new project and we are off to play some games!


Filed under: Arduino Hacks, video hacks

If you want video support on your project, you might start from a device like a Raspberry Pi that comes with it built in. [Kevinhub88] doesn’t accept such compromises, so he and his Black Mesa Labs have come up with a whole new way to add video support to devices like the Arduino and other cheap controllers. This project is called Mesa-Video, and it can add digital video at a resolution of up to 800 by 600 pixels to any device that has a single serial output.

The video is created by an FT813, a low cost GPU from FTDI that offers a surprising amount of video oomph from a cheap, low power chip (he has demoed it running from a lemon battery), meaning that he is hoping to be able to sell the Mesa-Video for under $50.

However, Mesa-Video is just the beginning. [Kevinhub88] wanted to get around the problem of stacking shields on Arduinos: add more  than one and you get problems. He wanted to create an interface that would be simpler, faster and more open, so he created the Mesa-Bus. This effectively wraps SPI and I2C traffic together over a simple, fast serial connection that doesn’t require much decoding. This means that you can send power and bi-directional data over a handful of wires, and still connect multiple devices at once, swapping them out as required. You could, for instance, do your development work on a PC talking to the prototype devices over Mesa-Bus, them swap the PC out for an Arduino when you have got the first version working in your dev environment. Is the Arduino not cutting it? Because Mesa-Bus is cross-platform and open source, it is easy to swap the Arduino for a Raspberry Pi without having to change your other devices. And, because all the data is going over a simple serial connection in plain text, it is easy to debug.

It’s an ambitious project, and [Kevinhub88] has a way to go: he is currently working on getting his first prototype Mesa-Bus devices up and running, and finalizing the design of the Mesa-Video. But it is an impressive start and we’ll be keeping a close eye on this work. Hopefully he can avoid that head crab problem as well because those things are as itchy as hell.


Filed under: Arduino Hacks, video hacks
Aug
22

TightLight: A 3D projection mapping assistant

3d, 3d graphics, 3d modeling, arduino hacks, photocell, projection, projectors, video hacks Comments Off on TightLight: A 3D projection mapping assistant 

tightLight

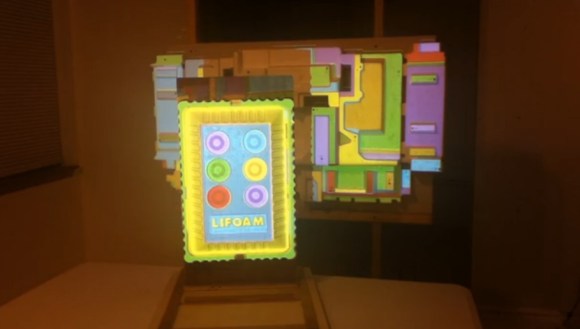
Anyone can grab a projector, plug it in, and fire a movie at the wall. If, however, you want to add some depth to your work–both metaphorical and physical–you’d better start projection mapping. Intricate surfaces like these slabs of styrofoam are excellent candidates for a stunning display, but not without introducing additional complexity to your setup. [Grady] hopes to alleviate some tedium with the TightLight (Warning: “music”).

The video shows the entire mapping process of which the Arduino plays a specific role toward the end. Before tackling any projector calibration, [Grady] needs an accurate 3D model of the projection surface, and boy does it look complicated. Good thing he has a NextEngine 3D laser scanner, which you’ll see lighting the surface red as it cruises along.

Enter the TightLight: essentially 20 CdS photocells hooked up to a Duemilanove, each of which is placed at a previously-marked point on the 3D surface. A quick calibration scan scrolls light from the projector across the X then Y axis, hitting each sensor to determine its exact position. [Grady] then merges the photocell location data with the earlier 3D model using the TouchDesigner platform, and bam: everything lines up and plays nice.


Filed under: Arduino Hacks, video hacks
Jul
24

Easy LCD control for Arduino Mega

arduino hacks, arduino mega, latch, LCD, level converter, TFT, video hacks Comments Off on Easy LCD control for Arduino Mega 

arduino-mega-easy-lcd-adapter

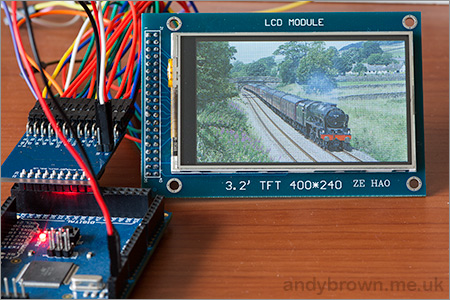
[Andy Brown] wrote in to show off the TFT LCD adapter he’s been working on for connecting inexpensive displays to an Arduino Mega.

These TFT LCD screens can be picked up on eBay for a few dollars. But they’re more suited for 16-bit microcontrollers which operate at 3.3V levels. His adapter board, which plugs directly into the Mega’s dual-row pin header, makes it easier to control these with an 8-bit chip that is running at 5V.

There’s a couple of things that make this happen. First off, he’s included level converter chips to managed the 3.3V/5V issues. Second, he uses latch chips to translate eight pins on the Arduino Mega to sixteen pins on the display. Those chips have a latch pin which holds the output values in memory while the input pins are changed. He manages to drive the latch on just one of the chips using the chip select (CS) line called for by the LCD protocol. This means you don’t lose any extra pins.

Another way to uses the displays with Arduino is to use a smart controller for TFT screens.


Filed under: Arduino Hacks, video hacks


  • Newsletter

    Sign up for the PlanetArduino Newsletter, which delivers the most popular articles via e-mail to your inbox every week. Just fill in the information below and submit.

  • Like Us on Facebook