Posts | Comments

Planet Arduino

Archive for the ‘grbl’ Category

We know, we know. Getting PCBs professionally fabricated anymore is so cheap and easy that making them in-house is increasingly becoming something of a lost art. Like developing your own film. Or even using a camera that has film, for that matter. But when you’re in Brazil and it takes months for shipments to arrive like [Robson Couto] is, sometimes you’re better off sticking with the old ways.

[Robson] writes in to tell us how he decided to buy a ~$150 CNC “engraver” kit from an import site, in hopes that it would allow him to prototype his designs without having to use breadboards all the time. The kit turned out to be decent, but with a series of modifications and a bit of trial and error, he’s improved the performance significantly and is now putting out some very nice looking boards.

The primary hardware issues [Robson] ran into were in the Z axis, as some poor component selections made the stock configuration wobble a bit too much. He replaced some flimsy standoffs as well as swapping in some bushings he salvaged from dead inkjet printers, and the movement got a lot tighter.

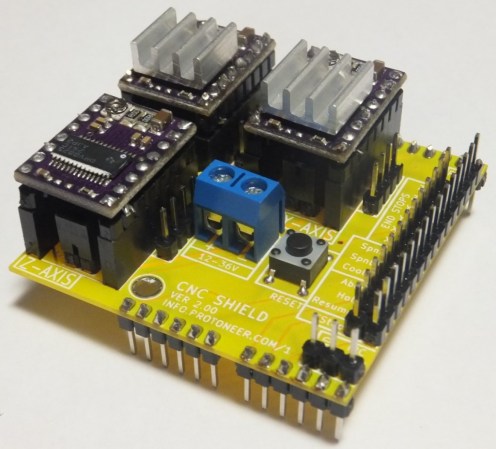
Despite the fact that the version of Grbl flashed onto the engraver’s cloned Arduino Uno supports Z leveling, it’s not actually enabled out of the box. [Robson] just needed to add some extra wiring to use the spindle’s bit as a probe on the copper clad board. He also went ahead and updated to the latest version of Grbl, as the one which ships with the machine is fairly old.

He wraps up the post by going through his software workflow on GNU/Linux, which is useful information even if you’ve taken the completely DIY route for your PCB mill. If you’d like to know more about the ins and outs of milling your own boards, check out this excellent primer by [Adil Malik].

Some people have all the luck. [MakerMan] writes in to gloat tell us about a recent trip to the junkyard where he scored a rather serious looking laser cutter. This is no desktop-sized K40 we’re talking about here; it weighs in at just under 800 pounds (350 Kg), and took a crane to deliver the beast to his house. But his luck only took him so far, as closer inspection of the machine revealed it was missing nearly all of its internal components. Still, he had the frame, working motors, and laser optics, which is a lot more than we’ve ever found in the garbage.

After a whirlwind session with his wire cutters, [MakerMan] stripped away most of the existing wiring and the original control board inside the electronics bay. Replacing the original controller is an Arduino Nano running Grbl, likely giving this revived laser cutter better compatibility with popular open source tools than it had originally. Even though the laser cutter was missing a significant amount of hardware, he did luck out that both the motor drivers were still there (and working) as well as the dual power supplies to run everything.

After a successful motion test, [MakerMan] then goes on to install a new 90W laser tube. Supporting the tube is a rigged up water cooling system using a plastic jug and a cheap bilge pump. He also added an air assist system, complete with side mounted compressor. This pushes air over the laser aperture, helping to keep smoke and debris away from the beam. Finally, a blower was installed in the bottom of the machine with flexible ducting leading outside to vent out the smoke and fumes that are produced when the laser is in operation.

This machine is a considerable upgrade from the previous laser [MakerMan] built, and as impressive as this rebuild is so far, we’re interested in seeing where it goes from here. If you ask us, this thing is begging for an embedded LaserWeb server.

In a project, repetitive tasks that break the flow of development work are incredibly tiresome and even simple automation can make a world of difference. [Simon Merrett] ran into exactly this while testing different stepper motors in a strain-wave gear project. The system that drives the motor accepts G-Code, but he got fed up with the overhead needed just to make a stepper rotate for a bit on demand. His solution? A grbl man-in-the-middle jog pendant that consists of not much more than a rotary encoder and an Arduino Nano. The unit dutifully passes through any commands received from a host controller, but if the encoder knob is turned it sends custom G-Code allowing [Simon] to dial in a bit acceleration-controlled motor rotation on demand. A brief demo video is below, which gives an idea of how much easier it is to focus on the nuts-and-bolts end of hardware when some simple motor movement is just a knob twist away.

[Simon]’s jog pendant moves a single motor which is exactly what he needs to ease development of his 3D printed strain-wave gear using a timing belt, but it could be programmed with any G-Code at all. Speaking of DIY jog pendants for CNC machines, don’t forget this wireless one made from an Atari 2600 joystick that jogs a plasma cutter in X and Y, and zeroes it with a push of the button.


Filed under: Arduino Hacks, cnc hacks
Jul
14

Arduino CNC Shield – 100% GRBL Compatable

arduino, CNC, grbl, RaspberryPi, shield Comments Off on Arduino CNC Shield – 100% GRBL Compatable 

arduino-cnc-shield

by protoneer.co.nz:

We have designed the Arduino CNC Shield to use all the pins that GRBL implemented. We have also added a few extra pins to make things a little easier. GRBL is opensource software that runs on an Arduino Uno that takes G-Code commands via Serial and turns the commands into motor signals. Now compatible with Raspberry PI.

Arduino CNC Shield – 100% GRBL Compatable – [Link]

Jul
28

GRBL compatible Arduino CNC shield

arduino hacks, cnc hacks, g-code, grbl, Motor Driver, pololu, shield Comments Off on GRBL compatible Arduino CNC shield 

arduino-cnc-shield

By the time you get to the point in a home CNC build where you’re adding control electronics you may be ready for the simplest means to an end possible. In that case, grab your Arduino and heat up that etching solution to make your own GRBL compatible shield.

This familiar footprint manages to contain everything you need for a three-axis machine. The purple boards slotted into the pairs of SIL headers are Pololu Stepper motor drivers. Going this route makes replacing a burnt out chip as easy as plugging in a new module. The terminal block in the center feeds the higher voltage rail necessary for driving the motors. The DIL header on the right breaks out all of the connections to the limiting switches (two for each axis), spindle and coolant control, as well as three buttons for pause, resume, and abort. There’s even a header for SPI making it easier to add  custom hardware if necessary.

This is a dual-layer board which may not be ideal for your own fabrication process. [Bert Kruger] posted his Gerber files for download if you want to put in a small run with OSH Park or a similar service.


Filed under: Arduino Hacks, cnc hacks


  • Newsletter

    Sign up for the PlanetArduino Newsletter, which delivers the most popular articles via e-mail to your inbox every week. Just fill in the information below and submit.

  • Like Us on Facebook