Posts | Comments

Planet Arduino

Archive for the ‘atmega32u4’ Category

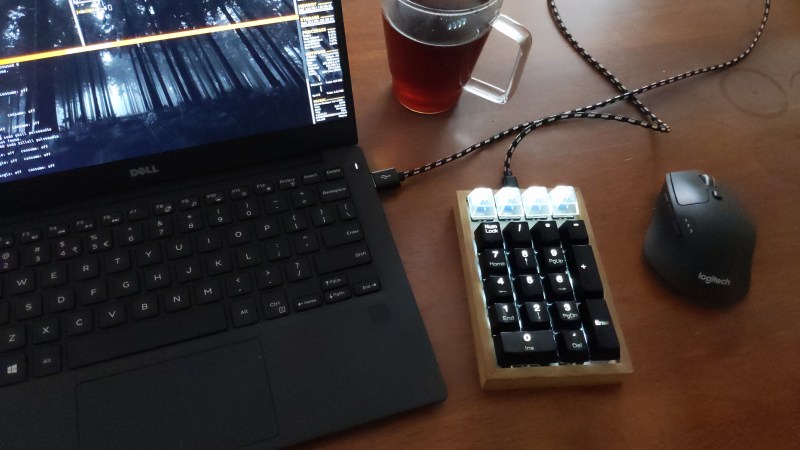
Why buy a num pad or a macropad when you can build something new and beautiful, open source that bad boy, and be a hero to the community? We think that should be all the justification you ever need to build instead of buy, even if you think your thing is Just Another Keypad [JAnK] as [Clewsy] claims.

At first glance, JAnK appears to be a standard number pad with four macro keys across the top. But when you roll your own ‘board, all the keys are programmable. [Clewsy] took advantage of this by adding a second layer that’s accessible with (what else?) the Num Lock key. This switches JAnK over to 21-key macro pad mode.

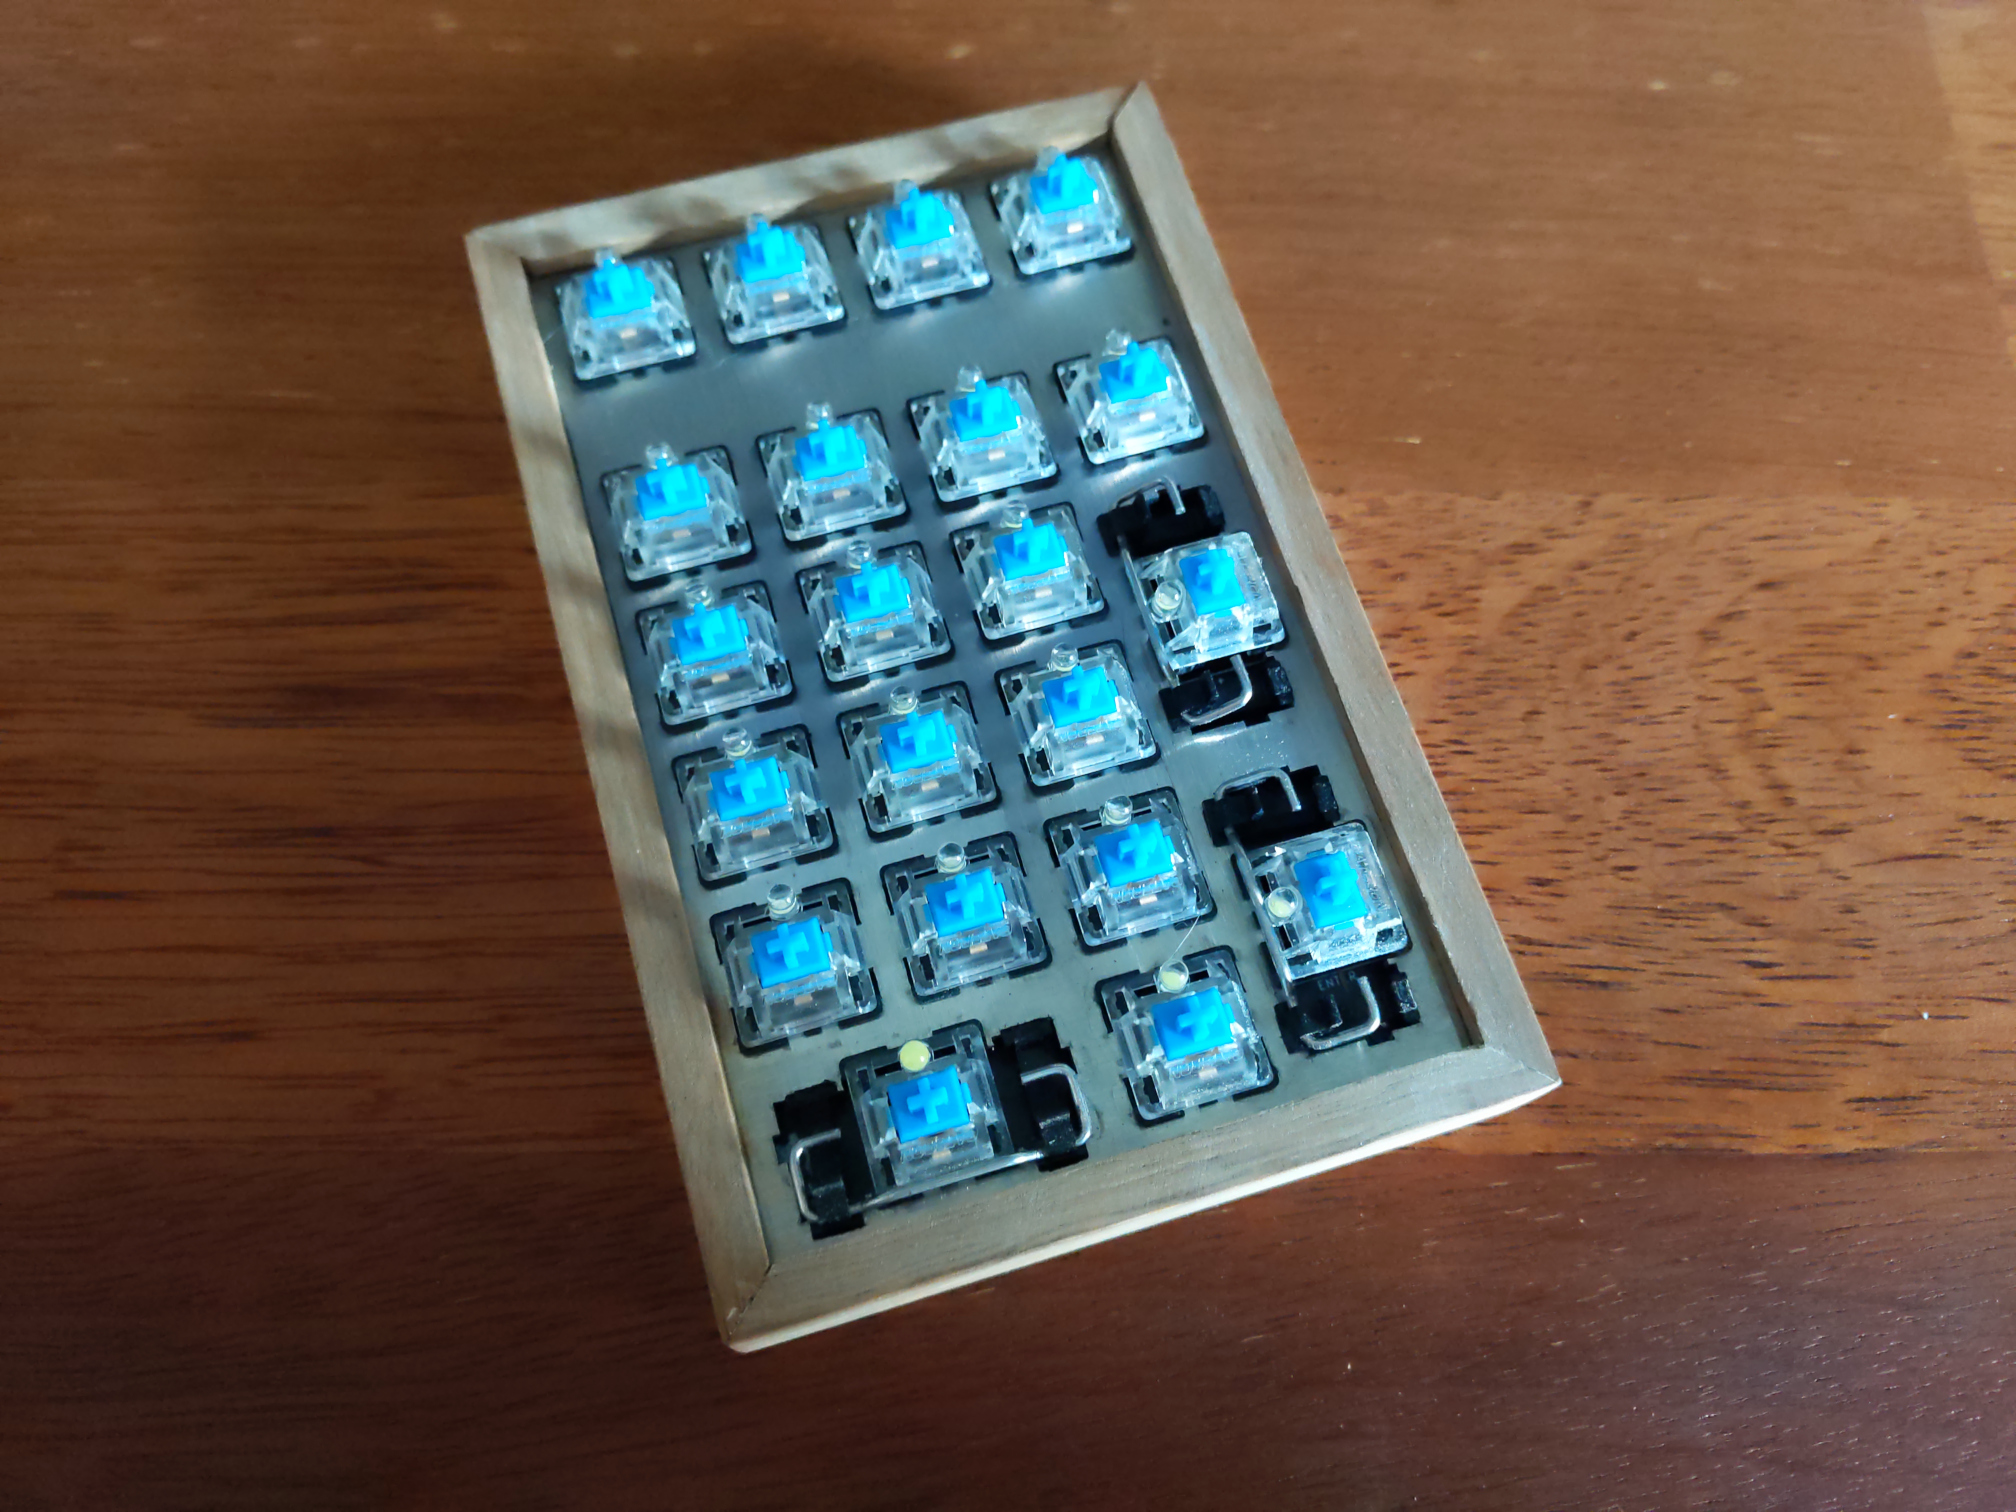
[Clewsy] rolled their own PCB for this and used the venerable ATMega32u4 because of its HID and USB host capabilities. Every key is backlit, and these LEDs are driven by an MP3202 LED driver and PWM from the AVR. [Clewsy] was able to build a prototype by sawing the num pad off of a stainless steel key switch plate from another build, but eventually ordered JAnK its own custom, laser-cut, stainless steel plate. The lovely enclosure is made of spotted gum wood and an acrylic base.

Putting it all together proved to be a bit problematic. [Clewsy] soldered up the minimum viable components for testing and discovered that the ATMega’s VCC and GND pins were both shorted. This killed the AVR programmer, but not the chip itself, and [Clewsy] happened to have a spare. To add insult to injury, the Num Lock light didn’t work, but [Clewsy] was able to simply reverse the LED instead of ordering a new pile of boards. Check out the detailed write-up with code and tons of pictures over on [Clewsy]’s personal site.

One of the awesome things about this build is that [Clewsy] was able to re-use the code from macr0, which began life as a proof of concept for scanning key matrices, and retired to become a music and media controller.

Repetitive tasks in video games often find a way of pushing our buttons. [Facelesstech] got tired of mashing “A” while catching shooting stars in Animal Crossing, so he set out to automate his problem away. After briefly considering rigging up a servo to do the work for him, he recalled a previous effort that used an Arduino Teensy to automate a bowling mini-game in Zelda: Breath of the Wild and decided to use a microcontroller to catch stars for him.

[Facelesstech] programmed an Arduino Pro Micro to fake controller button presses. It starts with a couple of presses to identify itself to the Switch, before generating an endless stream of button presses that automatically catch every shooting star. Hooking it up is easy—an on-the-go adapter allows the Switch’s USB-C port to connect directly to the Arduino’s Micro-USB port, even supplying power!

[Facelesstech] also designed a compact 3D-printed case that packages up the Arduino Pro Micro along with an ISP header for easy updating. The case even lets the Arduino’s power LED shine through so you know that it’s working!

If you, too, need to automate video game button-pushing, [Facelesstech] has kindly uploaded the source code and 3D designs for you to try. If you’d prefer something a little more low-tech, perhaps you might try a mechanical button pusher.


One of the selling points of the Arduboy is how slim [Kevin Bates] was able to get the Arduino-compatible game system, which is perhaps less surprising when you realize that it originally started out as a design for an electronic business card. But compared to the recently unveiled Nano version, it might as well be the old school “brick” Game Boy.

Now to be clear, [Kevin] isn’t looking to put these into official production. Though it does sound like the bare PCBs might be going up for sale in the near future. This was simply an experiment to see how far he could shrink the core Arduboy hardware while still keeping it not only playable but also code-compatible with the full-size version. While “playable” might be a tad subjective in this case, the video after the break clearly demonstrates that it’s fully functional.

Inside the 3D printed case is the same ATmega32U4 that powers the Arduboy, a 64×32 0.49″ OLED display, and a tiny 25 mAh pouch battery. There’s even a miniature piezo speaker for the bleeps and bloops. All of the pinouts have remained the same so existing code can be moved right over, though the screen is now connected over I2C. [Kevin] has released the schematics for the board in keeping with the general open nature of the Arduboy project, though for now he’s decided to hold onto the board files until it’s clear whether or not there’s a commercial future for the Nano.

We’ve seen attempts to shrink the Arduboy down before, most notably down to the point it could fit inside of a Dreamcast Visual Memory Unit, but the Nano certainly raises (or is that lowers?) the bar considerably.

USB-C Power Delivery 3.0 (PD3.0) introduces a new Programmable Power Supply (PPS) mode, which allows a device to negotiate any supply of 3.3-21 V in 20 mV steps, and up to 5 A of current in 50 mA steps. To make use of this new standard, [Ryan Ma] create the PD Micro, an Arduino-compatible development board, and a self-contained software library to allow easy integration of PD3.0 and the older PD2.0 into projects.

The dev board is built around an ATMega32U4 microcontroller and FUSB302 USB-C PHY. The four-layer PCB is densely packed on both sides to fit in the Arduino Pro Micro Form factor. The board can deliver up to 100W (20 V at 5 A) from an appropriate power source and shows visual feedback on the PD status through a set of LEDs.

The primary goal of the project is actually in the software. [Ryan] found that existing software libraries for PD take up a lot of memory, and are difficult to integrate into small projects. Working from the PD specifications and PD PHY chip data sheet, he created a lighter weight and self-contained software library which consumes less than 8 K of flash and 1 K of RAM. This is less than half the Flash and RAM available on the ATmega32U4.

[Ryan] is running a Crowd Supply campaign (video after the break) to get some of these powerful boards out in the wild, and has released all the source code and schematics on GitHub. The PCB design files will be released during the last week of the campaign, around 25 January 2021.

USB-C and power delivery are not simple standards, but the ability to add a high-speed data interface and a programmable power supply into almost any project has real potential.

[Christofer Hiitti] found himself with the latest Microsoft Flight Simulator on his PC, but the joystick he ordered was still a few weeks out. So he grabbed an Arduino, potentiometers and a button and hacked together what a joke-yoke.

The genius part of this hack is the way [Christopher] used his desk drawer for pitch control. One side of a plastic hinge is attached to a potentiometer inside a drawer, while the other side is taped to the top of the desk. The second pot is taped to the front of the drawer for pitch control and the third pot is the throttle. It works remarkably well, as shown in the demo video below.

The linearity of the drawer mechanism probably isn’t great, but it was good enough for a temporary solution. The Arduino Leonardo he used is based on the ATmega32u4 which has a built-in USB, and with libraries like ArduinoJoystickLibrary the computer interface very simple. When [Christopher]’s real joystick finally arrived he augmented it with a button box built using the joke-yoke components.

We’ve seen There is no doubt that Microsoft Flight Simulator 2020 will spawn a lot of great controller and cockpit builds over the next few years. We’ve already covered a new joystick build, and a 3D printed frame to turn an Xbox controller into a joystick.

We’ve been big fans of the Arduboy since [Kevin Bates] showed off the first prototype back in 2014. It’s a fantastic platform for making and playing simple games, but there’s certainly room for improvement. One of the most obvious usability issues has always been that the hardware can only hold one game at a time. But thanks to the development of an official add-on, the Arduboy will soon have enough onboard storage to hold hundreds of games

Even the rear silkscreen was a community effort.

The upgrade takes the form of a small flexible PCB that gets soldered to existing test points on the Arduboy. Equipped with a W25Q128 flash chip, the retrofit board provides an additional 16 MB of flash storage to the handheld’s ATmega32u4 microcontroller; enough to hold essentially every game and program ever written for the platform at once.

Of course, wiring an SPI flash chip to the handheld’s MCU is only half the battle. The system also needs to have its bootloader replaced with one that’s aware of this expanded storage. To that end, the upgrade board also contains an ATtiny85 that’s there to handle this process without the need for an external programmer. While this is a luxury the average Hackaday reader could probably do without, it’s a smart move for an upgrade intended for a wider audience.

The upgrade board is currently available for pre-order, but those who know their way around a soldering iron and a USBasp can upgrade their own hardware right now by following along with the technical discussion between [Kevin] and the community in the “Project Falcon” forum. In fact, the particularly astute reader may notice that this official upgrade has its roots in the community-developed Arduboy cartridge we covered last year.

Fighting fire with robots may take jobs away from humans, but it can also save lives. [Mell Bell Electronics] has built a (supervised) kid-friendly version of a firefighting robot that extinguishes flames by chasing them down and blowing them out.

This hyper-vigilant robot is always on the lookout for fire, and doesn’t waste movement on anything else. As soon as it detects the presence of a flame, it centers itself on the source and speeds over to snuff it out with a fan made from a propeller and a DC motor.

Here comes the science: fire emits infrared light, and hobbyist flame sensors use IR to, well, detect fire. This fire bot has three of these flame sensors across the front that output digital data to what has got to be the world’s smallest Arduino – the ATmega32U4-based PICO board that [Mell Bell] just so happens to sell. Cover your mouth and nose and crawl along the floor toward the break to see how responsive this thing is.

Firefighters aren’t the only brave humans involved in the process of keeping the forests standing, or who feel the rising pressure of automation. Hackaday’s own [Tom Nardi] wrote a piece on a dying breed called fire lookouts that will no doubt ignite your interest.

In the era of touch screens and capacitive buttons, we’d be lying if we said we didn’t have the occasional pang of nostalgia for the good old days when interfacing with devices had a bit more heft to it. The physical clunk and snap of switches never seems to get old, and while you can always pick up a mechanical keyboard for your computer if you want to hear that beautiful staccato sound while firing off your angry Tweets, there’s a definite dearth of mechanical interface devices otherwise.

[Jeremy Cook] decided to take matters into his own hands (literally and figuratively) by designing his own multipurpose USB rotary input device. It’s not a replacement for the mouse or keyboard, but a third pillar of the desktop which offers a unique way of controlling software. It’s naturally suited to controlling things like volume or any other variable which would benefit from some fine tuning, but as demonstrated in the video after the break even has some gaming applications. No doubt the good readers of Hackaday could think of even more potential applications for a gadget like this.

The device is built around the diminutive Arduino-compatible PICO board by MellBell, which features a ATmega32u4 and native USB. This allowed him to very rapidly spin up a USB Human Interface Device (HID) with minimal headaches, all he had to do was hang his buttons and rotary encoder on the PICO’s digital pins. To that end, he [Jeremy] used the fantastic I2C rotary encoder designed by [fattore.saimon], which readers may remember as a finalist in the Open Hardware Design Challenge phase of the 2018 Hackaday Prize. He also added a NeoPixel ring around the encoder to use for some visual feedback and because, well, it just looks cool.

Since all of the core components are digital, there’s not a whole lot required in the way of wiring or passive components. This let [Jeremy] put the whole thing together on a piece of perfboard, freeing him up to spend time designing the 3D printed enclosure complete with translucent lid so he can see the NeoPixel blinkenlights. He got the tolerances tight enough that the whole device can be neatly press-fit together, and even thought to add holes in the bottom of the case so he could push the perfboard back out if he needed to down the line.

[Jeremy] spends a good chunk of the video going over the software setup and development of the firmware, and details some of the nuances he had to wrap his head around when working with the I2C encoder. He also explains the math involved in getting his encoder to emulate a mouse cursor moving in a circle, which he thinks could be useful when emulating games that originally used an encoder such as Tempest or Pong.

We’ve seen similar USB “knobs” in the past for controlling volume, but the additional inputs that [Jeremy] built into his version definitely makes it a bit more practical. Of course we’re suckers for interesting USB input devices to begin with.

If you’ve been hanging around microcontrollers and electronics for a while, you’re surely familiar with the concept of the breakout board. Instead of straining to connect wires and components to ever-shrinking ICs and MCUs, a breakout board makes it easier to interface with the device by essentially making it bigger. The Arduino itself, arguably, is a breakout board of sorts. It takes the ATmega chip, adds the hardware necessary to get it talking to a computer over USB, and brings all the GPIO pins out with easy to manage header pins.

But what if you wanted an even bigger breakout board for the ATmega? Something that really had some leg room. Well, say no more, as [Nick Poole] has you covered with his insane RedBoard Pro Micro-ATX. Combining an ATmega32u4 microcontroller with standard desktop PC hardware is just as ridiculous as you’d hope, but surprisingly does offer a couple tangible benefits.

RedBoard PCB layout

The RedBoard is a fully compliant micro-ATX board, and will fit in pretty much any PC case you may have laying around in the junk pile. Everything from the stand-off placement to the alignment of the expansion card slots have been designed so it can drop right into the case of your choice.

That’s right, expansion slots. It’s not using PCI, but it does have a variation of the standard Arduino “shield” concept using 28 pin edge connectors. There’s a rear I/O panel with a USB port and ISP header, and you can even add water cooling if you really want (the board supports standard LGA 1151 socket cooling accessories).

While blowing an Arduino up to ATX size isn’t exactly practical, the RedBoard is not without legitimate advantages. Specifically, the vast amount of free space on the PCB allowed [Nick] to add 2Mbits of storage. There was even some consideration to making removable banks of “RAM” with EEPROM chips, but you’ve got to draw the line somewhere. The RedBoard also supports standard ATX power supplies, which will give you plenty of juice for add-on hardware that may be populating the expansion slots.

With as cheap and plentiful as the miniITX and microATX cases are, it’s no surprise people seem intent on cramming hardware into them. We’ve covered a number of attempts to drag other pieces of hardware kicking and screaming into that ubiquitous beige-box form factor.


Filed under: Arduino Hacks, computer hacks, Microcontrollers


  • Newsletter

    Sign up for the PlanetArduino Newsletter, which delivers the most popular articles via e-mail to your inbox every week. Just fill in the information below and submit.

  • Like Us on Facebook