Posts | Comments

Planet Arduino

Archive for the ‘space’ Category

We recently invited José Antonio Bagur to join us on EDUvision, to talk about his work on Quetzal-1; Guatemala’s first satellite. It was a hugely popular show with the Arduino and edutech communities, and we ran out of time before we could ask José all your space-based questions!

The range of questions you guys had around open-source, custom-built satellites were too good to go unanswered. So we brought him back for an EDUvision EXTRA. Melissa and Roxana teamed up to dig deeper into his amazing project.

Arduino EDUvision EXTRA about satellites and Quetzal-1

José Antonio Bagur, and Quetzal-1

You can check out José’s first interview, which took place during the EDUvision livestream. But to quickly get you up to speed, let’s give José, and his pride and joy Quetzal-1, a quick introduction.

He’s a mechatronics engineer, university researcher and professor from Guatemala. He’s no stranger to the Arduino community either, as he regularly joins the Arduino team to host the Spanish-language Explore IoT webinars.

There are no formal aerospace science education programs in Guatemala, so José and his colleagues really had their work cut out designing and building the country’s first satellite! Over 100 people were involved in its development, which, of course, made plenty of use of Arduino.

In the EDUvision EXTRA video interview below, you can find out all about the incredible work they achieved. He talks about how they managed to get it into space, how it works, and what kind of challenges they faced throughout the project. Feel free to add any other questions you might have in the comments, over on the forum, or on social media.

Oh, and you’ll also find out where the name Quetzal-1 comes from!

Enjoy this extra slice of EDUvision goodness, and remember to join us on 20th May, 2021, for the next livestream. If you have a project you’d like to see featured live on EDUvision, let us know all about it. If it’s picked to be showcased, we’ll even send you some free Arduino swag.

See you then!

The post EDUvision EXTRA: Quetzal-1 Strikes Back appeared first on Arduino Blog.

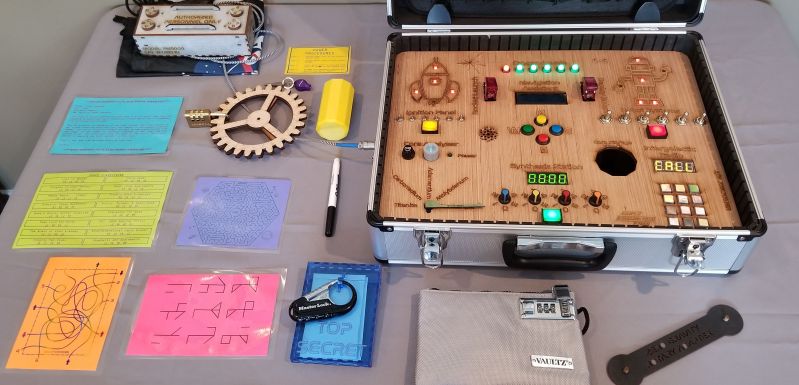
The trick to a fun escape room is layers. For [doktorinjh]’s Spacecase, you start with an enigmatic aluminum briefcase and a NASA drawstring backpack. A gamemaster reads the intro speech to set the mood, and you’re ready to start your escape from the planet. The first layer is the backpack with puzzles you need to solve to get into the briefcase. In there, you discover a hidden compartment and enough sci-fi references to put goofy smiles on our faces. We love to see tools reused as they are in one early puzzle, you use a UV LED to reveal a hidden message, but that light also illuminates puzzle clues later.

All the tech in Spacecase makes it a wonder of mixed media. The physical layer has laser engraved wood featuring the font from the 1975 NASA logo, buttons, knobs, LEDs, toggle switches, and a servo. Beneath the visible faceplate is an RGB sensor, audio player, speaker, and at the center is an Arduino MEGA. We’d love to get our hands on Spacecase for a game, and we’re inspired to pull out all the stops and build games with our personal touches. Maybe something with a mousetrap.

This isn’t the first escape room hardware we’ve seen and [doktorinjh] similarly made a bomb diffusing game.

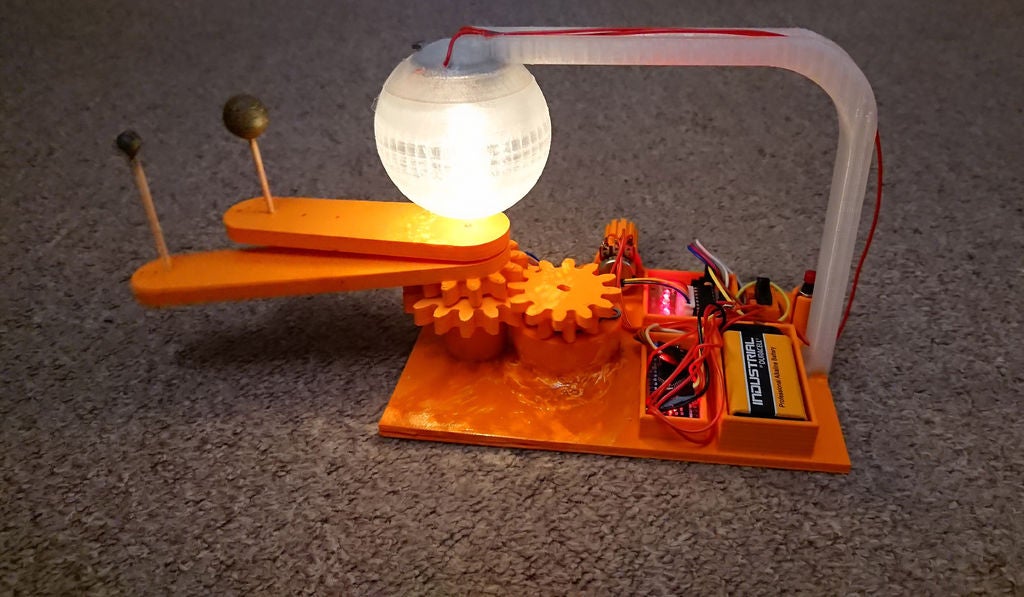
How do we know that planets exist outside of our solar system? While too far away to observe directly, with extremely sensitive equipment like the Kepler space telescope it’s possible to detect changes in light as these exoplanets pass in front of a star. For an excellent visualization of how this all works, check out Marcin Poblock’s simplified model in the video below.

The 3D-printed apparatus employs an Arduino Nano that controls the motion of two planets around a light bulb “star,” via a stepper motor and gear system. The variable light is then sensed by an LDR on a separate Nano-driven device. This sends info to a computer over serial to be graphed in real-time, and can also store it on an SD card for later analysis. 

While this project won’t necessarily help you explore our galaxy, it will provide you with a fun way to learn about the principle of exoplanet detection using the transit method.

If everything goes according to plan, Elon Musk says the first generation of SpaceX’s massive Starship will make an orbital flight before the end of 2020. That’s a pretty bold claim, but when you’ve made landing rockets on their tails as in the old science fiction pulp magazines seem routine, we suppose you’ve earned the right to a bit of bravado. We’re excited to see the vehicle evolve over the next several months, but even if the real one stays grounded, we’ll gladly take this “flying” Starship model from [Chris Chimienti] as a consolation prize.

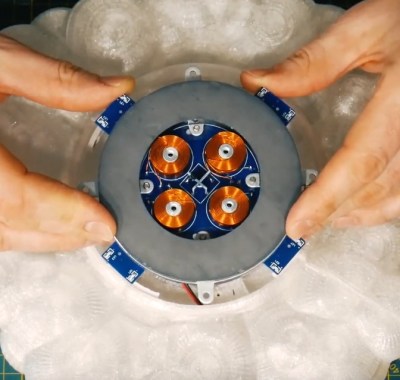
A magnetic levitation module, we’re officially in the future.

Feeling a bit let down by the 3D printable models of the Starship he found online, [Chris] set out to build his own. But it wasn’t enough to just make his bigger, stronger, and more accurate to Starship’s current design; he also wanted to make it a bit more exciting. Some RGB LEDs an Arduino embedded in the “cloud” stand the rocket sits on was a good start, and the landing pad inspired by SpaceX’s real autonomous spaceport drone ship Just Read the Instructions looks great all lit up.

But this is Starship we’re talking about, a vehicle that could literally push humanity towards being a multi-planet species. To do it justice, you’ve really got to knock it out of the park. So [Chris] found a magnetic levitation module online that could support a few hundred grams, and set to work on making his plastic Starship actually hover over the landing pad.

As you might imagine, it was a bit tricky. The first versions of the rocket looked great but came out too heavy, so he switched over to printing the model in so-called “spiral vase mode” which made it entirely hollow. Now far lighter and with a magnetic plate fit into the bottom, it was stable enough to float on its own. For the final touch, [Chris] added some red LEDs and a coin cell battery to the base of the Starship so it looks like the sleek craft is performing a last-second landing burn with its “impossible” full-flow staged combustion engines.

This isn’t the first time we’ve seen a model rocket with an electronic glowing cloud under it, but it’s certainly the first one we’ve seen that could levitate in mid-air. While this little rocket might not make it all the way to Mars, we wouldn’t be surprised to see it touching down on the desks of other hackers and makers in the near future.

Just two weeks ago, the crew from the International Space Station released a photo of their nine crew members – an odd number considering that the facility only has space to house six astronauts at a time. In fact, the crew had just gathered for a celebratory dinner before three of the astronauts were to return home. The new astronauts joining including Hazza Al Mansouri, the first astronaut from the United Arab Emirates (who has since returned from his mission), as well as astronaut Jessica Meir and cosmonaut Oleg Skripochka.

Amidst the excitement over the upcoming 10 (!) spacewalks in the next three months, there’s also been some cool developments in the open source space, with one of the first ESP32s launched into space.

[Nico Maas] from the Microgravity User Support Center (MUSC) at DLR (German Aerospace Center) worked on an experiment launched by MORABA (Mobile Rocket Base) at DLR. The launch site was at the Esrange Space Center in Kiruna, Sweden, with the mission launching on June 13, 2019 at 4:21 am local time.

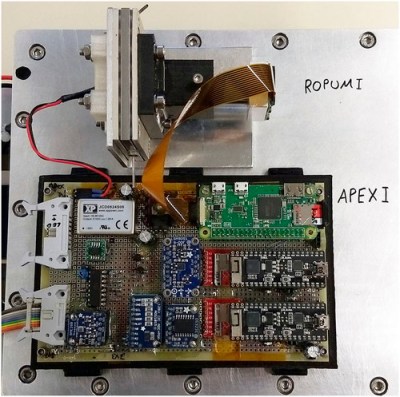
The experiment – APEX (Advanced Processors, Encryption, and Security Experiment) was onboard the ATEK / MAPHEUS-8, mission, rising to an altitude of 240km into space and returning back to earth after six minutes of microgravity.

[via AIP]
The goal of the research was to develop an off-the-shelf computer with a more powerful system for high-speed sensors and image acquisition than the Microchip ATmega328P, the current standard. The flight test measured the speed of the system as well as stress testing its ability to handle compute-intensive tests.

The main board included two ESP32s and a Raspberry Pi Zero W, running resinOS / balenaOS, an operating system designed to run parallel Docker containers and optimized for IoT fleet management.

Prior to the experiment, the standard for on-board computers for use in CubeSats was the ATmega/Arduino-based ARDUSAT. Since it was first made available for use in CubeSats in 2013, the performance has become limited, with improvements needed to perform higher throughput data sampling or operations requiring more computational power.

It’s also cool to note that the system, built using a 3D-printed holder, survived the re-entry (reaching up to 20.6g) with hardly a scratch.

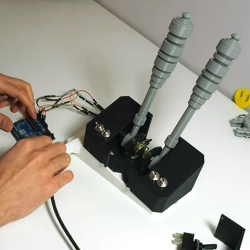
One of the more interesting ideas being experimented with in VR is 1:1 mapping of virtual and real-world objects, so that virtual representations can have physically interaction in a normal way. Tinker Pilot is a VR spaceship simulator project by [LLUÍS and JAVI] that takes this idea and runs with it, aiming for the ability to map a cockpit’s joysticks, switches, and other hardware to real-world representations. What does that mean? It means a virtual cockpit with flight sticks, levers, and switches that have working physical versions that actually exist exactly where they appear to be.

A few things about the project design caught our eye. One is the serial communications protocol intended to interface easily with microcontrollers, allowing for feedback between the program and any custom peripherals. (By the way, this is the same approach Kerbal Space Program took with KSPSerialIO, which enables custom mission control hardware at whatever level of complexity a user may wish to implement.)

The possibilities are demonstrated starting around 1:09 in the teaser trailer (embedded below) in which a custom controller is drawn up in CAD, then 3D-printed and attached to an Arduino, and finally the 3D model is imported into the cockpit as a 1:1 representation of the actual working unit, with visual positional feedback.

Unlike this chair experiment we saw which attached a Vive Tracker to a chair, there is no indication of needing positional trackers on individual controls in Tinker Pilot. In a cockpit layout, controls can be reasonably expected to remain in fixed positions relative to the cockpit, meaning that they can be set up as 1:1 representations of a physical layout and otherwise left alone. The kind of experimentation that is available today even to individual developers or small teams is remarkable, and it’s fascinating to see the ideas being given some experimentation.

  We were glued to our screens last month as NASA successfully landed the InSight module on Mars. (Bet you were, too.) What an amazing sight a Martian sunrise turns out to be! Now, we’ve got the bug. The bigtime Space Bug. Accordingly, our final Humble Bundle ebook deal of […]

Read more on MAKE

The post Catch Some (Major) Air: New Space Humble Bundle! appeared first on Make: DIY Projects and Ideas for Makers.

The cost of getting a piece of hardware into space is now cheaper than ever, thanks in no small part to the rapid progress that’s been made by commercial launch providers such as SpaceX. In the near future, as more low-cost providers come online, it should get even cheaper. Within a few years, we could be seeing per kilogram costs to low Earth orbit that are 1/10th what they were on the Space Shuttle. To be sure, this is a very exciting time to be in the business of designing and building spacecraft.

But no matter how cheap launches to orbit get, it’ll never be cheaper than simply emailing some source code up to the International Space Station (ISS). With that in mind, there are several programs which offer students the closest thing to booking passage on a Falcon 9: the chance to develop software that can be run aboard the Station. At the 2018 World Maker Faire in New York we got a chance to get up close and personal with functional replicas of the hardware that’s already on orbit, known in space parlance as “ground units”.

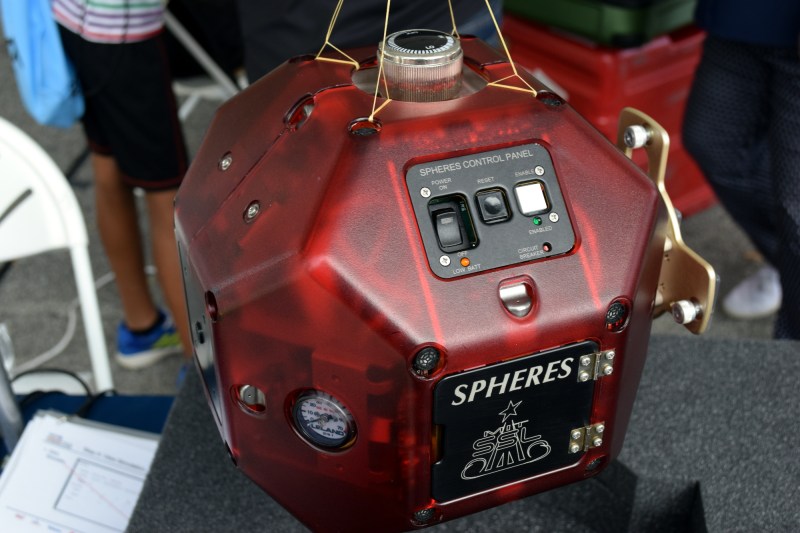
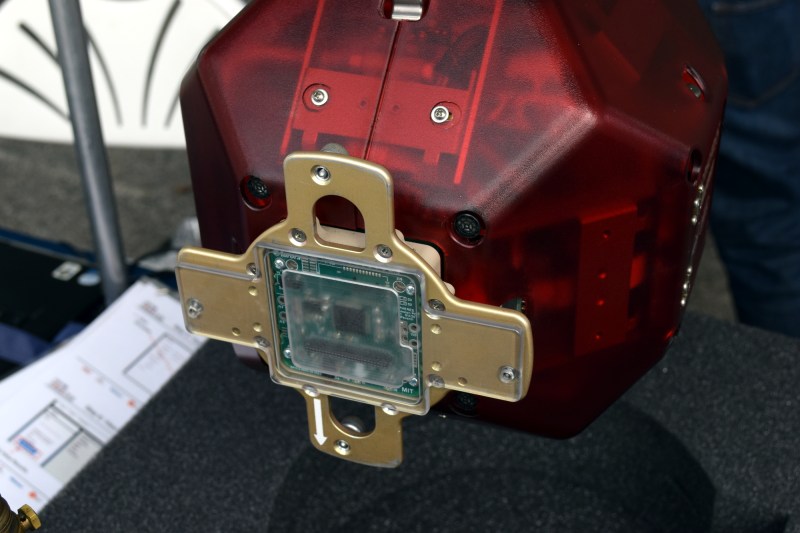
On display was a replica of one of the SPHERES free-flying satellites that have been on the ISS since 2006. They are roughly the size of a soccer ball and utilize CO2 thrusters and ultrasonic sensors to move around inside of the Station. Designed by MIT as a way to study spaceflight techniques such as docking and navigation without the expense and risk of using a full scale vehicle, the SPHERES satellites are perhaps the only operational spacecraft to have never been exposed to space itself.

MIT now runs the annual “Zero Robotics” competition, which tasks middle and high school students with solving a specific challenge using the SPHERES satellites. Competitors run their programs on simulators until the finals, which are conducted using the real hardware on the ISS and live-streamed to schools.

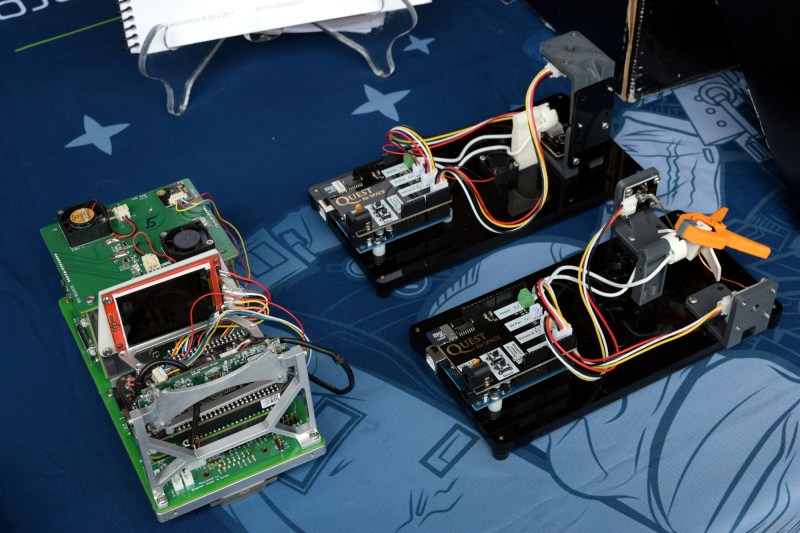
We also saw hardware from “Quest for Space”, which is a company offering curricula for elementary through high school students which include not only the ground units, but training and technical support when and if the school decides to send the code to the matching hardware on the Station. For an additional fee, they will even work with the school to design, launch, and recover a custom hardware experiment.

Their standard hardware is based on off-the-shelf platforms such as Arduino and LEGO Mindstorms EV3, which makes for an easy transition for school’s existing STEM programs. The current hardware in orbit is setup for experiments dealing with heat absorption, humidity, and convection, but “Quest for Space” notes they change out the hardware every two years to provide different experiment opportunities.

Projects such as these, along with previous efforts such as the ArduSat, offer a unique way for the masses to connect with space in ways which would have been unthinkable before the turn of the 21st century. It’s still up for debate if anyone reading Hackaday in 2018 will personally get a chance to slip Earth’s surly bonds, but at least you can rest easy knowing your software bugs can hitch a ride off the planet.

We’ve all enjoyed looking up at a clear night sky and marveled at the majesty of the stars. Some of us have even pointed telescopes at particular celestial objects to get a closer view. Anyone who’s ever looked at anything beyond Jupiter knows the hassle involved.  It is most unfortunate that the planet we reside on happens to rotate about a fixed axis, which makes it somewhat difficult to keep a celestial object in the view of your scope.

It doesn’t take much to strap a few steppers and some silicon brains to a scope to counter the rotation of earth, and such systems have been available for decades. They are unfortunately quite expensive. So [Dessislav Gouzgounov] took matters into his own hands and developed the rDuinoScope – an open source telescope control system.

Based on the Arduino Due, the systems stores a database of 250 stellar objects. Combined with an RTC and GPS, the rDunioScope can locate and lock on to your favorite nebula and track it, allowing you to view it in peace. Be sure to grab the code and let us know when you have your own rDuinoScope set up!


Filed under: Arduino Hacks

[gocivici] threatened us with a tutorial on positional astronomy when we started reading his tutorial on a Arduino Powered Star Pointer and he delivered. We’d pick him to help us take the One Ring to Mordor; we’d never get lost and his threat-delivery-rate makes him less likely to pull a Boromir.

As we mentioned he starts off with a really succinct and well written tutorial on celestial coordinates that antiquity would have killed to have. If we were writing a bit of code to do our own positional astronomy system, this is the tab we’d have open. Incidentally, that’s exactly what he encourages those who have followed the tutorial to do.

The star pointer itself is a high powered green laser pointer (battery powered), 3D printed parts, and an amalgam of fourteen dollars of Chinese tech cruft. The project uses two Arduino clones to process serial commands and manage two 28byj-48 stepper motors. The 2nd Arduino clone was purely to supplement the digital pins of the first; we paused a bit at that, but then we realized that import arduinos have gotten so cheap they probably are more affordable than an I2C breakout board or stepper driver these days. The body was designed with a mixture of Tinkercad and something we’d not heard of, OpenJsCAD.

Once it’s all assembled and tested the only thing left to do is go outside with your contraption. After making sure that you’ve followed all the local regulations for not pointing lasers at airplanes, point the laser at the north star. After that you can plug in any star coordinate and the laser will swing towards it and track its location in the sky. Pretty cool.


Filed under: Arduino Hacks, cnc hacks, news, solar hacks


  • Newsletter

    Sign up for the PlanetArduino Newsletter, which delivers the most popular articles via e-mail to your inbox every week. Just fill in the information below and submit.

  • Like Us on Facebook