Posts | Comments

Planet Arduino

Archive for the ‘Motor Driver’ Category

It’s a common enough situation, that when an older piece of equipment dies, and nobody wants to spend the money to repair it. Why fix the old one, when the newer version with all the latest bells and whistles isn’t much more expensive? We all understand the decision from a business standpoint, but as hackers, it always feels a bit wrong.

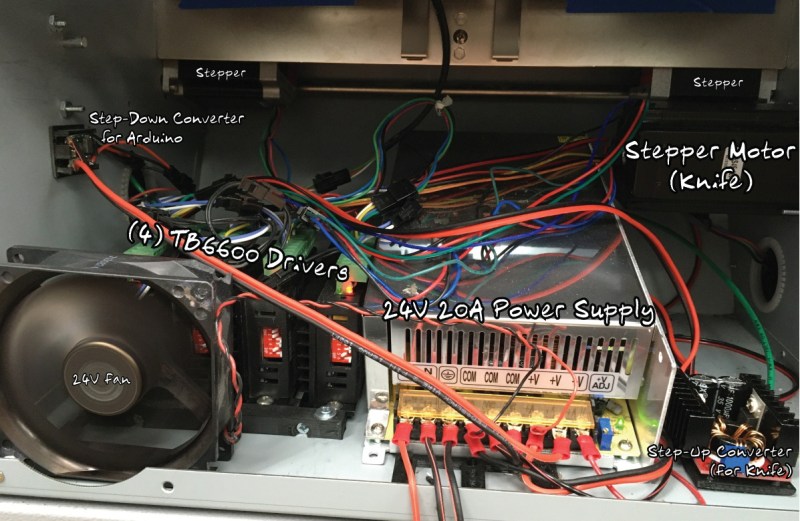
Which is exactly why [tommycoolman] decided to rebuild the office’s recently deceased Duplo CC-330 heavy duty business card cutter. It sounds like nobody really knows what happened to the machine in the first place, but since the majority of the internals were cooked, some kind of power surge seems likely. Whatever the reason, almost none of the original electronics were reused. From the buttons on the front panel to the motor drivers, everything has been implemented from scratch.

An Arduino Mega 2560 clone is used to control four TB6600 stepper motor drivers, with a common OLED display module installed where the original display went. The keypad next to the screen has been replaced with 10 arcade-style buttons soldered to a scrap of perfboard, though in the end [tommycoolman] covers them with a very professional looking printed vinyl sheet. There’s also a 24 V power supply onboard, with the expected assortment of step up and step down converters necessary to feed the various electronics their intended voltages.

In the end, [tommycoolman] estimates it took about $200 and 30 hours of work to get the card cutter up and running again. The argument could be made that the value of his time needs to be factored into the repair bill as well, but even still, it sounds like a bargain to us; these machines have a four-figure price tag on them when new.

Stories like this one are important reminders of the all wondrous things you can find hiding in the trash. Any time a machine like this can be rescued from the junkyard, it’s an accomplishment worthy of praise in our book.

It’s fair to say that building electronic gadgets is easier now than it ever has been in the past. With low-cost modular components, there’s often just a couple dozen lines of code and a few jumper wires standing between your idea and a functioning prototype. Driving stepper motors is a perfect example: you can grab a cheap controller board, hook it up to a microcontroller, and the rest is essentially just software. But recently [mechatronicsguy] wondered if even that was more hardware than was technically necessary to get the job done.

It’s not that he was intentionally looking to make things more complicated for himself, of course. His rationale was entirely economic; if you’re looking to drive a dozen or more stepper motors, even the “cheap” controllers can add up. So he started to wonder if he could skip the controller entirely and connect the stepper motor directly to the digital pins of an Arduino. Generally speaking this is a bad idea, but if you’re careful and are willing to take the risk, [mechatronicsguy] is living proof it’s possible

So what’s the trick to running a whopping seventeen individual stepper motors directly from the digital pins of an Arduino Mega? Well, to start with you’re not going to be running the beefy NEMA 17 motors like you might find in a 3D printer. [mechatronicsguy] is using the diminutive (and dirt cheap) 28BYJ-48, a light duty stepper used in many consumer products. Even with this relatively tiny motor, you need to crack open the case and cut a trace on the PCB to switch it from unipolar to bipolar.

Beyond that, you need to be careful. [mechatronicsguy] reports he’s had success running as many as ten of them at once, but realistically the fewer operating simultaneously the better. This is actually made easier due to the relatively poor specs of the 28BYJ-48 motor; its huge eleven degree step size means its not really susceptible to the same kind of slippage you’d get on a NEMA 17 when powered down. This means you can cut power to all but the actively moving motor and be fairly sure they’ll all stay where you left them.

With as popular as the 28BYJ-48 stepper is, there are several projects this “quick and dirty” method of interfacing could potentially work with. This small “barn door” star tracker is an obvious example, but we’ve also seen some very nice robotic arms built with these low-cost motors which could benefit from the technique.

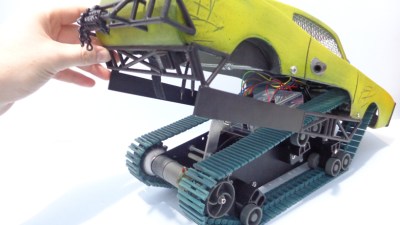
[Dickel] always liked tracked vehicles. Taking inspiration from the ‘Peacemaker’ tracked vehicle in Mad Max: Fury Road, he replicated it as the Mad Mech. The vehicle is remote-controlled and the tank treads are partly from a VEX robotics tank tread kit. Control is via a DIY wireless controller using an Arduino and NRF24L01 modules. The vehicle itself uses an Arduino UNO with an L298N motor driver. Power is from three Li-Po cells.

The real artistic work is in the body. [Dickel] used a papercraft tool called Pepakura (non-free software, but this Blender plugin is an alternative free approach) for the design to make the body out of thin cardboard. The cardboard design was then modified to make it match the body of the Peacemaker as much as possible. It was coated in fiberglass for strength, then the rest of the work was done with body filler and sanding for a smooth finish. After a few more details and a good paint job, it was ready to roll.

There’s a lot of great effort that went into this build, and [Dickel] shows his work and process on his project page and in the videos embedded below. The first video shows the finished Mad Mech being taken for some test drives. The second is a montage showing key parts of the build process.

Paper and cardboard are very versatile and accessible materials for making things. It’s what was used to do some target practice with this working paper and cardboard gun. With the right techniques foam core can be worked into an astonishing variety of shapes, and we also made a case for the value of a desktop vinyl cutter on any well-equipped hacker’s workbench.

Jul
28

GRBL compatible Arduino CNC shield

arduino hacks, cnc hacks, g-code, grbl, Motor Driver, pololu, shield Comments Off on GRBL compatible Arduino CNC shield 

arduino-cnc-shield

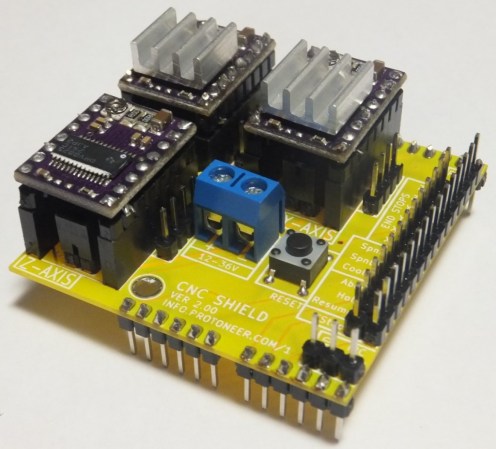
By the time you get to the point in a home CNC build where you’re adding control electronics you may be ready for the simplest means to an end possible. In that case, grab your Arduino and heat up that etching solution to make your own GRBL compatible shield.

This familiar footprint manages to contain everything you need for a three-axis machine. The purple boards slotted into the pairs of SIL headers are Pololu Stepper motor drivers. Going this route makes replacing a burnt out chip as easy as plugging in a new module. The terminal block in the center feeds the higher voltage rail necessary for driving the motors. The DIL header on the right breaks out all of the connections to the limiting switches (two for each axis), spindle and coolant control, as well as three buttons for pause, resume, and abort. There’s even a header for SPI making it easier to add  custom hardware if necessary.

This is a dual-layer board which may not be ideal for your own fabrication process. [Bert Kruger] posted his Gerber files for download if you want to put in a small run with OSH Park or a similar service.


Filed under: Arduino Hacks, cnc hacks
Dec
19

Arduino/Android Wireless Robot

Android, arduino, Ethernet shield, gallery, Motor Driver, wireless robot Comments Off on Arduino/Android Wireless Robot 


Another Robot, another App(lication) of Arduino. The user [shreks7] built up an Android App for controlling the robot wirelessly and stream live video off an android phone placed on the robot.

The robot has an inbuilt wireless router and two brush-less DC motors and runs on a power source of 26-30V(depends on the requirement) power supply.

The robot streams live video back to the app and can be used for navigation.
Also there is a console for Windows to control the robot and debug it .

It uses Arduino Mega 1280 + Ethernet Shield + Pololu Motor Driver (It is by far the best one i have used) + Belkin Router & Two Android Devices .

There is also a [video] where you can see the robot in action.

SyRen 10A Regenerative Motor Driver

SyRen 10A Regenerative Motor Driver

We have added some new products from Dimension Engineering to the Arduino Fun Shop. We are offering a 25% Discount Coupon, good Friday – Monday on these products! Use coupon code BFCM09 when completing your shopping cart order.

The SyRen motor driver is one of the most versatile, efficient and easy to use motor drivers on the market. It is suitable for medium powered robots – up to 30lbs in combat or 100lbs for general purpose robotics.

With just one SyRen driver you can control a motor with: analog voltage, radio control, serial and packetized serial. You can build many different robots of increasing complexity for years to come with a SyRen. Owning two SyRens allows you to build differential drive (tank style) robots because they can work in tandem with built in mixing.

The operating mode is set with the onboard DIP switches so there are no jumpers to lose. The SyRen features screw terminal connectors – making it possible for you to build a robot without even soldering.

SyRen is the first synchronous regenerative motor driver in its class. The regenerative topology means that your batteries get recharged whenever you command your robot to slow down or reverse. SyRen also allows you to make very fast stops and reverses – giving your robot a quick and nimble edge.

Buffered 2g Accelerometer

Buffered 2g Accelerometer

The DE-ACCM2G is an off the shelf 2 axis 2g accelerometer solution with analog outputs. It features integrated op amp buffers for direct connection to a microcontroller’s analog inputs, or for driving heavier loads.

To maximise usability, it is designed to fit in the DIP-14 form factor, making the DE-ACCM2G suitable for breadboarding, perfboarding, and insertion into standard chip sockets. To keep things as simple as possible, there are only 4 pins – two for power, and two for the X and Y analog outputs.

Additional circuitry ensures that the product won’t be damaged by reversed power connections, and it has an onboard voltage regulator to allow operation from a wide range of inputs.

5V 1A Switching Voltage Regulator

5V 1A Switching Voltage Regulator

The DE-SW0XX family of switch mode voltage regulators are designed to be the easiest possible way to add the benefits of switch-mode power to a new or existing project. A DE-SW050 will allow you to take a higher voltage and it step down a 5V output in a compact, efficient manner. The DE-SW0XX family is pin-compatible with the common 78XX family of linear voltage regulators. They have integrated decoupling capacitors, so external capacitors are not generally necessary.

What is wrong with a linear regulator?
Linear regulators are great for powering very low powered devices. They are easy to use and cheap, and therefore are very popular. However, due to the way they work, they are extremely inefficient.

How is a switching regulator better?
A switching regulator works by taking small chunks of energy, bit by bit, from the input voltage source, and moving them to the output. This is accomplished with the help of an electrical switch and a controller which regulates the rate at which energy is transferred to the output (hence the term “switching regulator”).

The energy losses involved in moving chunks of energy around in this way are relatively small, and the result is that a switching regulator can typically have 85% efficiency. Since their efficiency is less dependent on input voltage, they can power useful loads from higher voltage sources.

Switch-mode regulators are used in devices like portable phones, video game platforms, robots, digital cameras, and your computer.

AnyVolt 3

AnyVolt 3

The AnyVolt 3 Universal DC-DC Converter is an adjustable step up / step down 3A switching regulator. The output is adjustable from 3 to 24V. The output voltage is set with a small screw potentiometer on the back of the AnyVolt 3. Once the output voltage is set, it does not matter whether input voltage is higher, lower, or the same as the desired output. The potential applications are endless and only limited by the unit’s specifications and your collection of gadgets that require DC power at a different voltage than their supply.

Input power and output loads are connected with reusable screw terminals, so no soldering is necessary.

Share/Bookmark


  • Newsletter

    Sign up for the PlanetArduino Newsletter, which delivers the most popular articles via e-mail to your inbox every week. Just fill in the information below and submit.

  • Like Us on Facebook