An oscilloscope.
[update: usage photos 12/05/2010]
Since returning to the world of electronics and general gadgetry, an oscilloscope has always been on my shopping list. However, they are not cheap. Sure, I could get a second-hand one from eBay, but here in Australia there are not that many floating around; the used ‘scopes are generally ex-defence or education and looked pretty whipped. However, being an impatient person a kit from JYETech (the same people who make the capacitance meter kit I reviewed in March) really grabbed my imagination – a kit digital oscilloscope! Cheap, low specification, but interesting nevertheless. After thinking about it too much, and after watching all the youtube videos about it… I ordered one.
Let’s see what happens…
After a week my parcel arrived. Once again JYE Tech have not spared any expense on the packaging for the actual kit, just enough for everything to be safe.

The kit has some nice panels, front and rear, and a great solder-masked, silkscreened PCB. Thankfully I ordered the version that had the SMD components already soldered. (This kit is available in three versions: full kit, SMD soldered, and totally assembled [not really a kit...!]).

And time to check all the pieces have been included. There is no list inclued, so you have to check off against the BOM from the JYE Tech website for your particular version of the kit. This is not a kit you can just jump into and solder…

The instructions are very… sparse, confusing and time-consuming. One double-sided A4 piece of paper, one side with the schematic, and the other with a “quick reference”, internet links to support and a photo of the populated PCB. Thankfully, the JYETech website has all the documentation ready for download, and they also run a very well supported Google Group. Phew. They even publish the .dxf CAD files. So after downloading and printing off all of the documentation, it was time to review it and have lunch.

There is an amusing line in the instructions – “you will probably need to make a simple probe”. Yes, indeed. Included are enough parts to make a simple probe – with alligator clips at the end. Let’s call them semi-useful. They will do for the meanwhile, however a real probe set will be ordered shortly.
Anyhow, enough preparation and reading. Time to build. NOTE: There are several versions of this kit – please double-check you have the correct assembly instructions. Look at your PCB – there is a white sticker on the edge with a code such as “06202KP…” - make sure that you have the correct sheet for your kit. There is no guarantee the correct sheet will ship with the meter!

Thankfully due to the SMD nature of most of the parts, there isn’t that much to solder. Firstly, I wanted to get the 7805 regulator and heatsink in:

… and the rest of the parts – 7 capacitors, a diode and an inductor. You really need to have your wits about you – there are places on the PCB and parts in the schematic for which you are not to use – it is easy to get lost if you don’t concentrate. Just remember to match the physical components supplied against the BOM from the website, and only install those – after considering the assembly instructions. Another caveat is that you need to check you have the correct documentation for your PCB. For example, mine was a 06202KP, whereas the website had something different. Thankfully the Google Group had the correct .pdf file.

Remember that positive pins of capacitors into square pads. There seems to be an ambiguity in the instructions regarding C14 – for the 06202 model, C14 positive is on the right hand side.
Next, the sockets for signal and DC, switches and push buttons. You need to get the switches and buttons flush with the PCB, otherwise you will have issues with the top panel and button caps.

Don’t forget the 2×4 pin header – solder it in before the LCD! Now for the LCD.
Stop now. Make sure you run the power tests as per the assembly instructions. Once that LCD is soldered in, having to take it out again will be a huge PITA.

When you look at the rear of the LCD module, there are two rows of 20 holes – solder the row of pins into the row with markings (GND~NC). I found the easiest way to do this was to sit the row of pins into the main PCB, sit the LCD on top and solder the pins into the LCD module. The solder in the 2 pairs of pins that support the LCD. You may find the heatsink blocks one of the pins – just cut one pin off and use that then.
Now it is seven hours later. To cut a long story short – be very careful when soldering the LCD pins. It is very easy to cause a bridge which will wreak havoc and short out something, which cooks the LCD, 7805 and the microprocessor. If your unit heats up like a stove, unplug it and triple check your soldering under a magnifying glass. Run continuity tests to be sure you haven’t shorted out anything.
But thankfully – after all my time working on it, hunched over a hot iron in a dark room, and staring through a magnifying glass:

Woohoo! We have life!
I had that heatsink on just in case - didn’t take it off for the photo. Now it is time to assemble the body and make it look presentable:

And of course … I’ll need a set of probes. So I assembled them using the parts included in the kit. They will have to do until my real one arrives.

Finally – I can clean up the desk and wash my hands. Originally I was going to write a whole section explaining how oscilloscopes work and the terminology. But thankfully the good people at Tektronix have done this already and made a nice little e-book for us. So here it is: XYZs of Oscilloscopes (Tektronix) PDF.
Now, let’s spend some time examining what this baby can do. Just a note at this point, if you didn’t install the heatsink, you should install a clip-on heatsink over the 7805. After sitting on my desk for around 30 minutes the 7805 does get warm.
[update] Here are some photos of the scope in use:

14.2 volts AC. The scope should have displayed the minimum and maximum, but for some reason has clipped them.

In order to see half of the full wave, the V.POS was lowered to the minimum. This is indicated by the tiny marker at the bottom left of the LCD

Again with V.POS at the minimum, the time period was altered, and the display frozen to see the maximum.

5 volts DC at 5 volts per division

5 volts DC at 2 volts per division

By dropping V.POS to the minimum, you can increase the maximum amplitude possible. Note the tiny marker at the bottom-left of the screen, indicating the new 0V line.

5 volts DC using 1 volt per division.

2 volts DC at 0.5 volts per division (using x5 and 0.1 settings)

1.25 volts DC at 0.5 volts per division

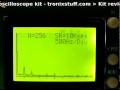
By default it shows 50Hz as that is the frequency of mains voltage in Australia (probes not connected, it gets the default frequency through the power supply [Australia is 240V 50 Hz]).
And now for a video, a short compilation of various measurements: DC voltage, frequency, FFT and pulse-width modulation.
You can also upgrade the firmware and save screen shots if you attach a cable to the jumpers on the rear of the main PCB. If you were to do this often enough, it would be wise to cut a rectangle out of the back panel.
Conclusion.
To be honest, I found this kit very challenging to assemble, finding the correct instructions the second time around was very frustrating, and the documentation is very poor. This is not a kit for beginners, more of a curiosity for those experienced in electronics work and fault-finding. In saying that, I’m glad I had a go – assembling and getting it to work taught me a lot about my own abilities, fault-finding, and tested my patience. But it gave me a real buzz once I got it working.
It was rather annoying to use such a low screen resolution, you won’t be detecting too much ripple on your DC power supplies with this one. But for the price, it is an interesting piece of gear. I will probably end up giving it away as a prize or something. It has a maximum of 50 volts peak to peak input amplitude, but I couldn’t for the life of me hone the display down to show 12 volts AC without cutting off the minimum and maximum. Will persevere and spend more time with it.
Furthermore, it is a good stepping stone to acquiring a full oscilloscope – if you find yourself using this one and getting frustrated with the limitations, it’s time you bought a full ‘scope!
This kit is available from a variety of sources, and Little Bird Electronics has all three variants available in stock.
Thank you for reading and I look forward to your comments and so on. High resolution photos are available on flickr.
Please subscribe (see the top right of this page) to receive notifications of new articles. If you have any questions at all please leave a comment (below).
[Note - this kit was purchased by myself personally and reviewed without notifying the manufacturer or retailer]


