Posts | Comments

Planet Arduino

Archive for the ‘gmail’ Category

One of the tasks I dread is configuring a web server to send email correctly via Gmail. The simplest way of sending emails is SMTP, and there are a number of scripts out there that provide a simple method to send mail that way with a minimum of configuration. There’s even PHP mail(), although it’s less than reliable.

Out of the box, Gmail requires OAUTH2 for authentication and to share user data, which has the major advantage of not requiring that you store your username and password in the application that requires access to your account. While they have an ‘allow less secure apps’ option that allows SMTP access for legacy products like Microsoft Outlook, it just doesn’t seem like the right way forward. Google documents how to interact with their API with OAUTH2, so why not just use that instead of putting my username and password in plaintext in a bunch of prototypes and test scripts?

Those are the thoughts that run through my head every time this comes up for a project, and each time I’ve somehow forgotten the steps to do it, also forgotten to write it down, and end up wasting quite a bit of time due to my own foolishness. As penance, I’ve decided to document the process and share it with all of you, and then also make it work on an ESP8266 board running the Arduino development environment.

Before we continue, now would be a good time for a non-technical refresher on how OAUTH works. The main differences between OAUTH and OAUTH2 are that the latter requires HTTPS, and the access tokens that allow an application to use specific services in a user account have an expiry.

To use Gmail with OAUTH2, we will need to start with five things: An application registered in the Google APIs, its client ID and client secret, a computer running LAMP (a by-the-hour VPS works just fine here), and a domain name that points to it.

Registering an application with Google API is easy. Go to the Google API console, log in, create a new project, and enter it. Enable the Gmail API; it should be suggested on the front page.
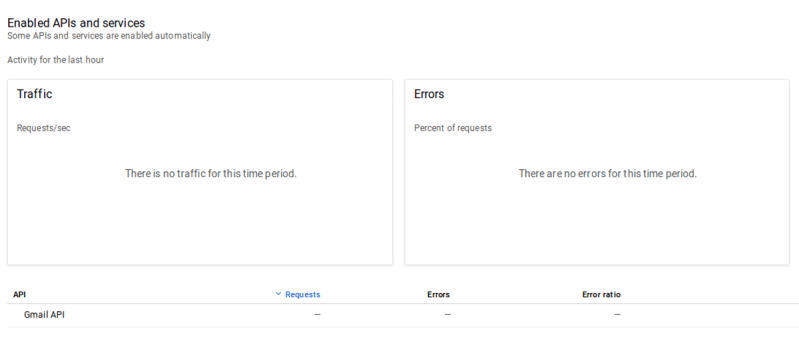
With the project created and the Gmail API enabled, the dashboard should look something like this

Then click on ‘credentials’ on the sidebar, create credentials, and finally ‘create OAUTH Client ID’. Before you can continue, you need to create a consent screen. The only entry you really need to fill out at this time is ‘Product Name Shown to Users’.
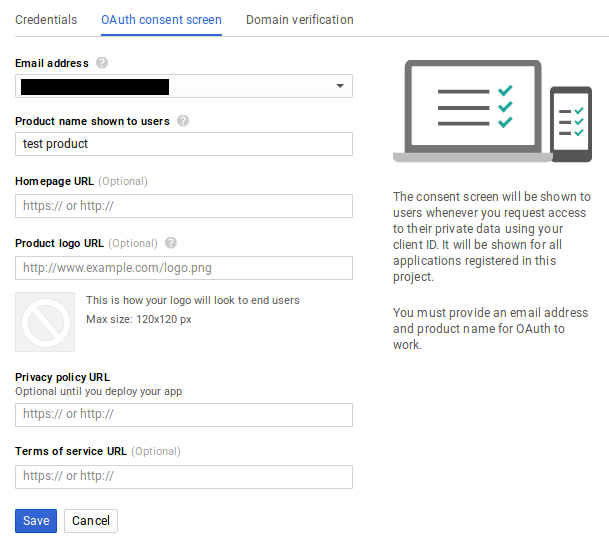
After saving that form, select ‘Web Application’ as your application type. Note the field called ‘Authorized redirect URIs’, we’ll return to it later. It’s important that it be correctly set for us to be able to receive a refresh token later on in this process.

For now, just press ‘Create’. A pop-up will display containing your Client ID and Client secret. You’ll need them soon, so best to copy/paste them into a local file on your computer for now.

Next, we will use those two pieces of data to request an access token and refresh token. We may as well accomplish two things at the same time here by installing the popular PHP email sender called PHPMailer on our web server. It includes a tool to request an OAUTH2 access/refresh token as well as being easily capable of sending a quick test email. To install it, we’ll use the Composer PHP dependency management tool:

$sudo apt-get install composer

Then we should navigate to our web-accessible directory, in my case /var/www/html, and install a few PHP scripts. Note that this should not be done as root, so create another user if needed and give them access to the directory:

$composer require phpmailer/phpmailer
$composer require league/oauth2-client
$composer require league/oauth2-google

Now enter the directory vendor/phpmailer/phpmailer. There will be a script called get_oauth_token.php. Move this script up three directories into the directory you just ran the ‘composer’ commands from. The location of this script as seen from the web needs to be entered into the ‘Authorized redirect URIs’ field of the Google API that we saw earlier. In this case it would have been https://mydomain.com/get_oauth_token.php. Public IP addresses will not work, this is why a domain name pointed to your web server is a requirement.

Now, open get_oauth_token.php in a text editor and paste in your Client ID and Client Secret where needed. Don’t try to run the script locally, it will fail. Open up a web browser on any computer, and navigate to the URL you entered as the ‘Authorized redirect URI’. Then select Google from the list of email services – at this point if it worked you will be asked to log in and then authorize the unverified application, under ‘Advanced’ under the warning prompt, at which point you will finally receive a refresh token. If you only want an access token for some reason you’ll have to edit the script to echo it back.

If that didn’t work, there are two common reasons: a wrong redirect URI or the script cannot find its dependencies. In the former case, the error message from Google will tell you the script URL as it sees it, and you can use that information to update the redirect URI in the Google API Console to fix the issue. For the latter, check your apache error log, probably located in /var/log/apache2/error.log, to see what dependency is not being found. You might see something like this:

PHP Warning: require(vendor/autoload.php): failed to open stream: No such file or directory in /var/www/html/mydomain/get_oauth_token.php on line 59, referer: http://mydomain.com/get_oauth_token.php

If you have received your refresh token, congratulations: the painful part is over. You can just go to the PHPMailer Github page and fill out their OAUTH2 example (gmail_xoauth.phps), and it ought to just work. If all you needed to do is send mail from a project on your VPS, you’re more or less ready to move on to more interesting parts of your project:

$email = 'someone@gmail.com';
$clientId = 'RANDOMCHARS-----duv1n2.apps.googleusercontent.com';
$clientSecret = 'RANDOMCHARS-----lGyjPcRtvP';
//Obtained by configuring and running get_oauth_token.php
//after setting up an app in Google Developer Console.
$refreshToken = 'RANDOMCHARS-----DWxgOvPT003r-yFUV49TQYag7_Aod7y0';

Remember to clean up any unnecessary scripts that contain your refresh token and other sensitive data before continuing.

ESP8266: We Don’t Need No Stinking Servers

Now what if we wanted to use these tokens to send email directly from project on a Raspberry Pi without needing a server in the middle? It turns out that once we have the client ID, client secret, and refresh token, we no longer require the server and domain name we’ve been using so far, and a mail-sending application, e.g. PHPMailer, can be installed on a computer anywhere with Internet access as long as it is configured with those values.

Things get a little more complicated when we try to do this on an ESP8266. OAUTH2 requires that we use SSL, and access tokens regularly expire and need to be refreshed. Thankfully, [jalmeroth] generously wrote a proof-of-concept and published it on GitHub. If provided with an access token, it can access your Gmail account and use it to send an email. It can also directly update/get data from Google Sheets, but I didn’t test this. However, if the access token was expired, it couldn’t detect that, although it did include working code to actually request a new token, but not parse it out and use it.

In an attempt to add to the functionality of that proof of concept, I forked the project and made a few changes. First, I changed to order of operations in the code to make it check if the current access token was valid before doing anything else. Second, Google API was responding ‘400 Bad Request’ if the access token was invalid, and everything but ‘200 OK’ responses were being filtered out by the code. Finally, I wrote a couple of JSON parsers that check the reason for the ‘400 Bad Request’ and extract and use the access token returned by Google API when a new one is requested.

It works, but it’s hardly reliable – not surprising considering I’ve never really used the Arduino platform before. Notably, the SHA1 fingerprint for Google API fails often. Checking from my local machine, the SHA1 fingerprint varies between two signatures there too. It would be fairly easy to check for either of them, or just keep trying, but I’d rather understand what’s going on first. (Is it just a CDN or something else?) Or perhaps I should rewrite the whole application in Lua where I’m more competent.

A fun little application built on the above was to place a button on my office that sends an email to my phone. I don’t want people to contact me at that email address frivolously, but do want to know immediately if someone is waiting outside my office. The big red button is for normal requests, but urgent requests require lockpicking. If it’s urgent it better also be interesting.

Finally, did you know that Hackaday provides an API for accessing hackaday.io? It uses the simpler OAUTH (not OAUTH2) authentication, so should be more straightforward than the above to implement on the ESP8266. Have any of you used it?


Filed under: Arduino Hacks, google hacks, how-to, Original Art
Sep
13

Making a Gmail Lamp with Arduino Yún

arduino, Arduino Yún, gmail, Hardware, lamp, Yun Comments Off on Making a Gmail Lamp with Arduino Yún 

Arduino Yún

I am delighted to welcome Stefano Guglielmetti who, together with other Arduino friends/supporters, accepted to start experimenting with  Arduino Yun and write a blog post to present some hands-on results. Starting today we are going to host a series of guest bloggers exploring different unique features of our new board.

Stefano, has more than 16 years of experience in the Internet industry, working both with small companies and start-ups up to very big and complex environments. His post below was orginally published at this link.

————-

Finally!!! Finally I put my hands on a brand new  Arduino Yún. I’ve been waiting for this a long, loooong time. I’ve been playing with Arduino since the “diecimila” model came out and I, as a lot of people, always suffered the lack of connectivity and of real computing power. I tried to solve some of these problems using RaspberryPi and/or Electric Imp, but I always missed the Arduino approach… easy, lots of shields and Arduino ready parts, a lot of documentation, a strong community and the freedom of Open Source.

Now one of my dreams came true, and every time I go deeper into the discovery of the Yún’s capabilities, I find something amazing, very smart and very well done.

I won’t describe the platform itself, as many articles talking about that are already published and there will be many more to come. I’ll start directly with a real life example, in just a few hours I finally built something really, really useful to me, something I already built several times in various ways but none of which really satisfied me.

The task is pretty simple, and I believe it will be very useful to many people: I need to be alerted in real time when I receive some important emails. Not all the emails: we provide customer care for many clients, with different SLAs, and I need to be alerted only for the most important ones. Moreover, sometimes I look forward to receiving a precise email… a shipment confirmation, a mail from a special someone… I need something flexible, eye catching, that doesn’t depend on my computer or my cellphone (that always has only 1% battery)

So I decided to build a GMail Lamp and Arduino Yún was the perfect choice (and now that I built it, I can confirm that. It is perfect)

The working principle is very straightforward: On GMail, I defined a new label, so I can quickly change the rules for the messages that will go under it, then I tell to Arduino Yún which label to watch for (via REST APIs… amazing) and that’s it! The lamp (actually only just a led, the lamp will come in the future) turns on every time I get new messages under that label. It’s the bat-signal principle! :)

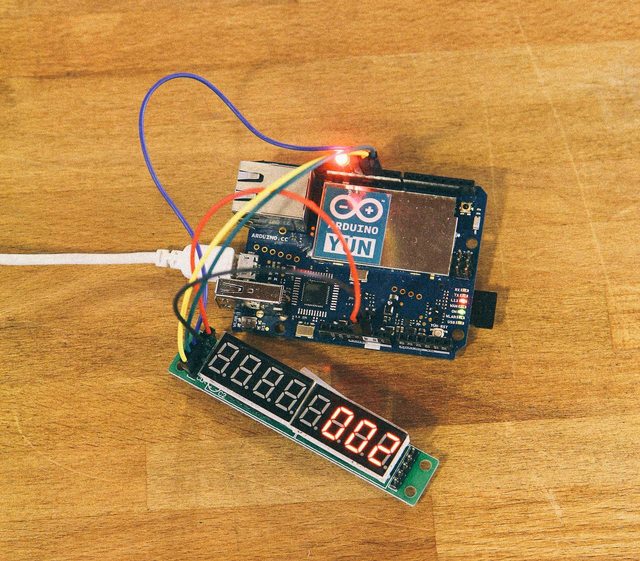
LED Display with Arduino Yún

Okay, now let’s get a bit more technical… how did I do it?

The hardware

  • An Arduino Yún, and it must be connected to the internet.
  •  A LED (or a relay if you want to turn on a real lamp, as I will do in the future)

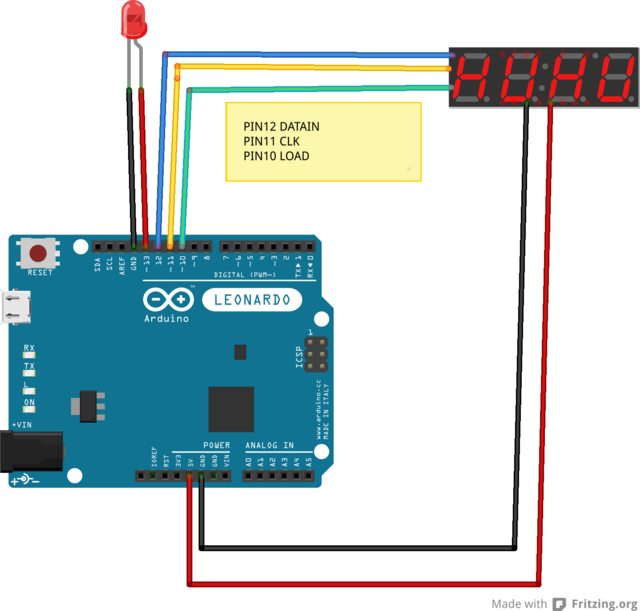
This is the connection scheme (supersimple)

The LED goes on Digital Pin 13
The LED Display uses pins 10,11,12 and, obviously, GND and +5V

Schematic -  Arduino Yún

Ok, the hardware is ready. When you will program the Yún for the first time, even if you can program it over the wifi network, I suggest you use the serial port via USB because it’s faster and I still use the serial port to debug (even if you have a brand new Console object :) . But it’s just a personal choice.

Now, the Code

Even if it’s short, I think it’s very interesting because I used many new features of the Yún. I’m not going to describe all the code, that you can freely download or fork from GitHub (https://github.com/amicojeko/Arduino-Yun-Gmail-Check). I’ll try to describe only the parts that involve brand new code and that are peculiar of the Yún

Let’s start from the beginning

#include <Process.h>

With the Process library, you can run some code on the Linux side of the Yún and catch the stdout on Arduino. It’s amazing because you can delegate to Linux all the dirty jobs and the heavy computing. In this case, I use the Linux “curl” command to get the ATOM feed of my label from GMail.

The Process library also includes the Bridge library, that allows you to pass information between the two sides of the Yún (Linux and Arduino) using a key/value pairing. And it gives you the power of REST APIs, I use it to configure the label to observe.

#include <FileIO.h>

With this library, you can use the inernal memory or a micro SD card/USB key for storage. All these features are native on the Yún!

#include "LedControl.h"  
/* Downloaded From http://playground.arduino.cc/Main/LedControl */

I use this library to control the 7 segment LED Display

const int ledPin = 13;

I’ve used the pin 13 for the led. As I told you before, you can replace the LED with a relay in order to turn on and off a real lamp!

const char* settings_file = "/root/gmail_settings\0"; 
/* This is the settings file */

I’m saving under “/root” cause /tmp and /var will be erased at every reboot.

Bridge.get("label", labelbuffer, 256);

This is a supercool line of code that uses an übercool Yún’s feature. I’m telling Arduino to listen for a REST call on the URL http://arduino.local/data/put/label/LABEL

When I get some data, it will put the value of LABEL in the localbuffer. The localbuffer was initialized like that

char labelbuffer[256];

That means that you can actually talk with your Arduino while it runs projects! You can get or put variables, you can finally make dynamic projects! I used it to tell Arduino which label to observe, but I can, and I will go further, I promise.

label = String(labelbuffer);
File settings = FileSystem.open(settings_file, FILE_WRITE);
settings.print(label);
settings.close();

This is cool too. Using the FileIO object, I save the label in a local file on the Linux side of Arduino, so when I will turn it off and on again, It will remember my settings.

File settings = FileSystem.open(settings_file, FILE_READ);
while (settings.available() > 0){
  char c = settings.read();
  label += c;
}
settings.close();

This is how I read a file from the filesystem.

Process p;

p.runShellCommand("curl -u " + username + ":" + password + " 
\"https://mail.google.com/mail/feed/atom/" + label + "\" -k --silent |grep -o \"
<fullcount>[0-9]*</fullcount>\" |grep -o \"[0-9]*\"");

while(p.running()); // do nothing until the process finishes, so you get the whole output
int result = p.parseInt();

This is another bit of Yún’s magic. I run the curl command to get the ATOM feed of a specific label, and then I parse it with the grep command, and finally I get the number of unread messages for that label. Even if on the Yún’s Linux stack there are both Python and Lua, I thought that this solution was the most simple and stupid, and I love to KISS.

That’s it, now i just have to turn the LED on and to display the number of unread messages on the LED Display…

In a single day I learned how to use the Bridge library to get data from REST webservices, how to save and load data from the Linux filesystem, and how to run processes on the Linux side and get the STDOUT results. I already knew how to use the LED Display but I hope that someone learned something new even about that :)

Now I will build the actual lamp, improving both the Hardware and the Software sides, I will make it gorgeous and fully configurable, and I will keep you informed about that!
Cheers to everybody and happy hacking!

——

Text and pictures by Stefano Guglielmetti


  • Newsletter

    Sign up for the PlanetArduino Newsletter, which delivers the most popular articles via e-mail to your inbox every week. Just fill in the information below and submit.

  • Like Us on Facebook