Posts | Comments

Planet Arduino

Archive for the ‘laser hacks’ Category

What’s the best way to image a room? A picture? Hah — don’t be so old-fashioned! You want a LIDAR rig to scan the space and reconstruct it as a 3D point map in your computer.

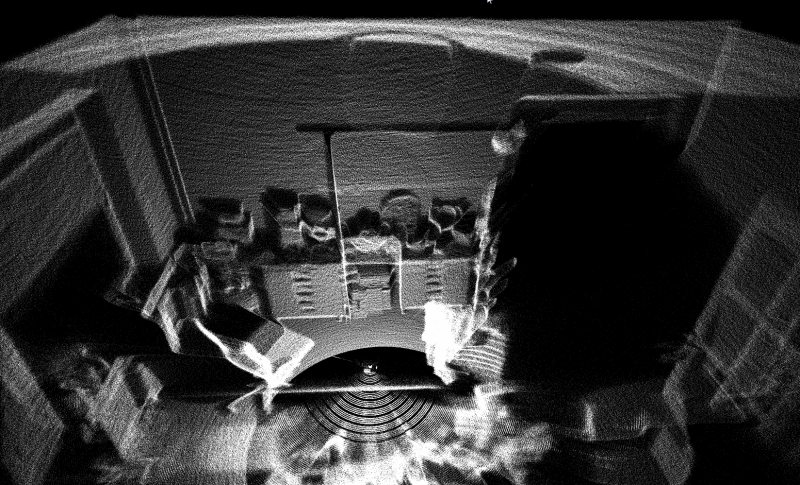
Hot on the heels of [Saulius Lukse]’s scanning thermometer, he’s replaced the thermal camera on their pan/tilt setup with a time-of-flight (TOF) camera — a Garmin LIDAR — capable of 500 samples per second and end up scanning their room in a mere fifteen minutes. Position data is combined with the ranging information to produce a point cloud using Python. Open that file in a 3D manipulation program and you’ll be treated to a sight like this:

That’s an image generated of a 4.7 million point cloud. It’s not perfect, but it’ll certainly do.

[Lukse] laments that the camera requires ideal lighting conditions that make it unsuitable to for a lot of outdoor imaging and is similarly limited to shorter ranges. It also necessitates hauling a laptop around so he’s considering making it an all-in-one package down the road.

Want to more about how LIDAR works? Check out this teardown video of a police speed enforcement LIDAR ‘gun.’ Or have a look at this (faster) completely DIY laser scanner.


Filed under: Arduino Hacks, laser hacks

We don’t know what cats see when they see a red laser beam, but we know it isn’t what we see. The reaction, at least for many cats — is instant and extreme. Of course, your cat expects you to quit your job and play with it on demand. While [fluxaxiom] wanted to comply, he also knew that no job would lead to no cat food. To resolve the dilemma, he built an automated cat laser. In addition to the laser module, the device uses a few servos and a microcontroller in a 3D printed case. You can see a video, below. Dogs apparently like it too, but of course they aren’t the reason it was built.

If you don’t have a 3D printer, you can still cobble something together. The microcontroller is an Adafruit Pro Trinket, which is essentially an Arduino Pro Mini with some extra pins and a USB port.

There are twelve different patterns the device cycles through at random to attempt to confuse your cat. We couldn’t help but wonder if this ought to be on the Internet so you could take control and manually play with your cat. Sounds like a job for Blynk. The last time we saw a cat laser, it was a little more mobile.


Filed under: 3d Printer hacks, Arduino Hacks, laser hacks

There’s just something about wielding a laser pointer on a dark, foggy night. Watching the beam cut through the mist is fun – makes you feel a little Jedi-esque. If you can’t get enough of lasers and mist, you might want to check out this DIY “laser sky” effect projector.

The laser sky effect will probably remind you of other sci-fi movies – think of the “egg scene” from Alien. The effect is achieved by sweeping a laser beam in a plane through swirling smoke or mist. The laser highlights a cross section of the otherwise hidden air currents and makes for some trippy displays. The working principle of [Chris Guichet]’s projector is simplicity itself – an octagonal mirror spun by an old brushless fan motor and a laser pointer. But after a quick proof of concept build, he added the extras that took this from prototype to product. The little laser pointer was replaced with a 200mW laser module, the hexagonal mirror mount and case were 3D printed, and the mirrors were painstakingly aligned so the laser sweeps out a plane. An Arduino was added to control the motor and provide safety interlocks to make sure the laser fires only when the mirror is up to speed. The effect of the deep ruby red laser cutting through smoke is mesmerizing.

If laser sky is a little too one-dimensional for you, expand into two dimensions with this vector laser projector, and if monochrome isn’t your thing try an RGB vector projector.


Filed under: Arduino Hacks, laser hacks
[Markus] is attending the Royal Institute of Technology in Stockholm. For his Advanced Prototyping class he had to make something using rapid prototyping technology — i.e. 3D printers, laser cutters, and breadboards. He chose to make a fantastic looking clock.

He started by designing the entire thing in CAD. The base is 3D printed on a Ultimaker. The world clock display is a piece of laser engraved acrylic which he heated up and curved to fit. Using an Arduino and a 16×2 LCD matrix he created a simple clock program with the ability to show different time zones. The way you select them is very clever.

A thin strip of brass is located at the bottom of the display, which acts as a touch-sensitive resistor strip.

Depending on where you press it, the resistance changes and the Arduino switches to that timezone. It’s a clever use of an awesome sensor which really gives the project a nice touch. Not bad for a 6 week school project!

Speaking of laser cut clocks, check out this absolutely ridiculous geared pendulum clock made out of acrylic!

[via r/DIY]


Filed under: 3d Printer hacks, Arduino Hacks, laser hacks

In case your blissfully unaware of the radiation levels in your own home and city, did you know you can buy Arduino compatible Geiger Counters? They aren’t even that expensive! But, like any Arduino compatible board –they need a bit of dressing up to look like the real deal. [Folkert van Heusden] shows us his design, complete with directional LEDs and a laser cut enclosure.

He bought his first Geiger counter module a few years ago from Sparkfun — they retail for about 150 bones so they aren’t exactly cheap. But then he found an equivalent one on Aliexpres for about a quarter the cost — what did he have to lose? Really, he just wanted a cheap one he could walk around with and maybe scare his coworkers. 

Using his trusty laser cutter, he built an enclosure for the board and his Arduino. Then he populated it with LEDs to display more information. A nice big 7-segment display shows off the number of radioactive particles detected in the past hour, and past minute, and an LED bar display shows the count to the last second — i.e. if this thing is fully lit up you’d probably better get out of there!

Curious to learn more about radiation? [Veritasium] filmed an excellent adventure — to some of the most radioactive places on earth.

We’ve seen lots of Geiger counter builds over the years, and one of our favorites is this solid state version [Toumal] built.


Filed under: Arduino Hacks, laser hacks, tool hacks
Mar
25

Playing Space Invaders with Real Fire and Lasers

arduino hacks, laser cutter, laser hacks, lasers, Raynsford, space invaders Comments Off on Playing Space Invaders with Real Fire and Lasers 

Making a Space Invaders game is up there on the list of most unconventional things you could do with a laser cutter. In watching the tiny little ships burst into flames, [Martin Raynsford’s] modification has got to be one of the more dangerous looking ones we’ve seen as well.

[Martin] always had the desire to make a tangible version of the classic game. Since his Whitetooth A1 laser cutter already contained the bulk of the moving hardware needed, not to mention an actual high powered laser to “pew pew” with, he decided it was the perfect starting point for such a project. The game is played looking down into the cutter since the laser of course fires in that direction, however a basic webcam is mounted to the laser assembly so that you can view the game on a computer screen at the proper perspective. An Arduino Mini is responsible for stepper control, allowing the player to jog back and forth and fire with a keyboard. [Martin] added an extra gear to the z-axis bed-leveler so that it could drive rows of paper invaders left and right across the bottom. Paperclips wedged into slots along a modified backboard hold each of the paper slips in place. This works ideally since they can be reloaded easily and won’t be maimed during use.

Due to the heat of the laser, landing a well positioned shot will likely nuke all of the nearby invaders as well, making for a theatrical inferno and easy win. Now to step up the difficulty level and figure out how to make them fire back…

If safety is more your thing you can go the route of Space Ivaders clock, 16×2 Character display game, or head-to-head on an FPGA.


Filed under: Arduino Hacks, laser hacks
Mar
16

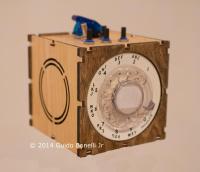
[Guido] was recently commissioned to build a kinetic sculpture for a client who wanted something unique. What he came up with is really awesome.

It’s called ORBIS: The Wooden Kinetic & Lighting Sculpture. It mounts to the wall and provides a focal point for the room – a bright flashy spinning one at that! Does it just stay there and do random things? Nope, of course not! [Guido] built it with a unique control box, two Arduino 2560’s and an Xbee to communicate between them.

Orbit Kinetic Sculpture

He was told to design it using old and new technologies so he’s got a rotary phone dial on the side of the box which allows the user to change through the different modes.

Switches on top also let you change the color of the sculpture and the speed at which it moves around. Since it’s wireless it can be easily set on the coffee table and become an instant conversation starter.

See it in action after the break.


Filed under: Arduino Hacks, laser hacks, led hacks
Mar
11

Adding a Manual Z-axis To Your Laser

arduino hacks, laser hacks, z-axis replacement Comments Off on Adding a Manual Z-axis To Your Laser 

DSC07543 (Custom)

[Martin Raynsford] sells lasers, and laser cuts stuff for a living — we’re kinda jealous. Anyway, laser cutters from China are great, but sometimes lack certain functionality, so he decided to add his own z-axis feature!

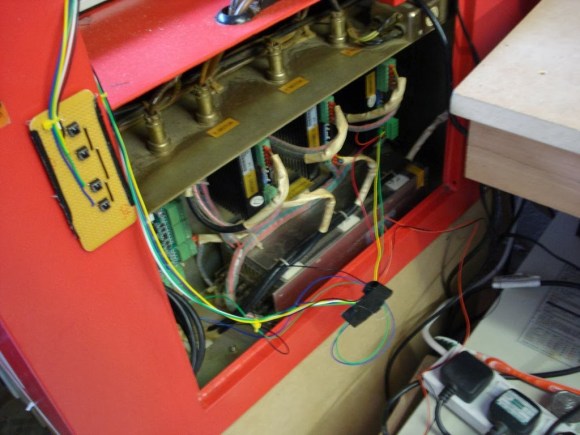
The main laser cutter he uses has a very slow z-axis, and it’s also difficult to control — a job can’t be paused to adjust the height offset, the datum must be set every time manually, and you have to be in the very top level of the menu in order to do anything with it! With this in mind, [Martin] decided to add his own z-axis control, completely separate from the laser’s on board control system.

He’s using an Arduino Pro Mini to control the stepper motor with PWM. His new controller has four buttons — fast and slow, in each direction. He’s used the original end stops to protect the axis, and he’s also added a feature to set a datum by holding down both fast and slow buttons at the same time. It ended up being a very cheap upgrade to his system, and he’s also shared the source for anyone looking to recreate it.

For other useful laser cutter hacks, don’t forget to check out this super cheap method of making your own laser mirrors! Or how about a cheap honeycomb bed made out of a radiator?


Filed under: Arduino Hacks, laser hacks
Nov
24

Hack-a-Day Logo Laser Light Show

arduino hacks, laser, laser hacks, logo, Processing, scanning, servo, software hacks Comments Off on Hack-a-Day Logo Laser Light Show 

hackaday-laser-2

The Hack-a-Day logo challenge keeps on bearing fruit. This tip comes from [Enrico Lamperti] from Argentina who posted his follies as well as success creating a Hack-a-Day logo using a home built scanning laser projector.

The build consists of a couple small servos, a hacked up pen laser and an Arduino with some stored coordinates to draw out the image. As usual the first challenge is powering your external peripheral devices like servos. [Enrico] tackled this problem using 6 Ni-MH batteries and an LM2956 simple switcher power converter. The servos and Arduino get power directly from the battery pack and the Arduino controls the PWM signals to the servos as they trace out the stored coordinate data. The laser is connected to the servo assembly and is engaged and powered by an Arduino pin via an NPN transistor. He also incorporated a potentiometer to adjust the servo calibration point.

His first imported coordinate data generated from some Python script was not very successful. But later he used processing with an SVG file to process a click-made path the Arduino could use as map data to draw the Hack-a-Day logo. It requires a long exposure time to photograph the completed drawing in a dark room but the results are impressive.

It’s an excellent project where [Enrico] shares what he learned about using Servo.writeMicroseconds() instead of Servo.write() for performance along with several other tweaks. He also shared the BOM, Fritzing diagram, Processing Creator and Simulator tools and serial commands on GitHub. He wraps up with some options that he thinks would improve his device, and he requests any help others may want to provide for better performance. And if you want you could step it up a notch and create a laser video projector with an ATMega16 AVR microcontroller and some clever spinning tilted mirrors.


Filed under: Arduino Hacks, laser hacks, software hacks

sidebyside

If infinity mirrors aren’t cool enough, the 10-foot-tall infinity portal should blow you away. Strictly speaking, the mirror itself is only 7′x4′, but you’ll still find yourself engulfed in the archway. The portal began as a simple prototype that we covered earlier this summer, which was just a frame of 2×4′s, some acrylic and LED strips. It works by putting lights between a two-way mirror and another mirror, reflecting most light internally and creating the illusion of depth.

The giant archway also began as a small-scale prototype, its shape and engravings carved out by a laser cutter. Once they were satisfied with its design, it was time to scale things up. The full-sized portal needed a a tremendous amount of stability, so the guys at Freeside built the base from wooden palettes. They needed the portal to travel to a few different venues, so the rest of the frame breaks down into components, including a removable wooden frame from which the acrylic hangs. A Teensy 3.0 runs all the WS2812 LED strips, which were chosen because each of their LEDs is individually addressable.

Check out the video below for an extremely detailed build log, which should give you a better idea of how massive and impressive this portal really is!


Filed under: Arduino Hacks, Hackerspaces, laser hacks, led hacks, Microcontrollers


  • Newsletter

    Sign up for the PlanetArduino Newsletter, which delivers the most popular articles via e-mail to your inbox every week. Just fill in the information below and submit.

  • Like Us on Facebook