Posts | Comments

Planet Arduino

Archive for the ‘projects’ Category

The Weird and Wonderful History of Chess-Playing Robots

Who said robots had to be all work and no play? For many years, people have been designing and building robots not just to help with chores, but to help us win games. Possibly the most famous examples of this are the robots that play chess.

In this article, we’ll take a look at the history of chess-playing robots, how they’ve evolved over time, and share three famous examples.

And do not forget that with the right inspiration, Arduino, and the Arduino Cloud, creating a robot is not a dream anymore!

The history of robots in chess — Three famous robotic chess prodigies

Chess is an old game. Humans have been playing it for 1,400 years, and for the vast majority of that time, their only opponents were other humans.

As time went on and technology became more advanced, people started to turn their thoughts to ways of using tech to win at chess. One of the first (somewhat clumsy) attempts came in the 18th century.

The Turk

The Mechanical Turk, developed in 1770 by Wolfgang von Kempelen, stunned audiences by repeatedly holding its own against human opponents. The world had changed forever — were machines finally beginning to outsmart their makers!?

Well… not exactly. The Turk actually turned out to be a case of fraud — and featured a human chess player hiding inside the machine and controlling its movements. False alarm.

The Mechanical Turk was destroyed by fire in 1854, after a perplexingly long career.

Boris Handroid

Throughout the 20th century, people worked furiously to build machines that could beat humans at chess. Progress slowly chugged along, and in 1980 the first commercially available chess robot came into being.

It was based on a chess computer called Boris and was extremely rare and limited, to the point where many people doubted it even existed. Due to its incredibly exclusive nature, it’s no surprise that the Handroid never became a household name.

The Milton Bradley Computers

Although the Handroid was not exactly a success story, it did show the world that there was at least an appetite for chess-playing robots, if they could be made effectively and at scale.

In the early 1980s, American board game giant Milton Bradley decided to take on the challenge. Working with computer scientists, they began to develop a robotic chess game that would move the pieces reliably enough to be sold at a mass scale.

The result was actually three different models: the Grandmaster that hit the US market, the Milton which was sold in Germany, France, and the Netherlands, and the Phantom which was built for the British market — although all three devices were extremely similar.

The Milton Bradley chessboard was able to detect where pieces were and used magnets attached to motor-driven belts to pull the pieces around the board. Unlike most of its predecessors, the Milton Bradley chess robot was a success and sold many copies in the US and Europe. 

For chess aficionados, an important moment had arrived — you could now play chess at home without the need for a human opponent.

Deep Blue

Although it’s more of a computer program than a robot per se, no article about chess-playing robots would be complete without a mention of Deep Blue. Built on an IBM supercomputer, Deep Blue was the culmination of many years of grueling research and programming — a computer that could finally challenge a human chess champion.

In a series of games over the course of 1996 and 1997 — 10 years after development began on the project at Carnegie Mellon University — Deep Blue beat chess grandmaster Garry Kasparov.

It was a groundbreaking moment not just for chess, but for humanity as a whole — a reminder that, as advanced and intelligent as we are, the machines might just be catching us up.

Build your own chess robots

Today, you don’t need to rely on astronomically expensive novelty gadgets to experience the wonders of chess-playing robots — you can easily make your own at home. With tools like Arduino, amateur tech enthusiasts can assemble chess-playing machines for relatively low cost and without the need for a highly specialized skillset.

The Arduino Project Hub is home to a ton of chess-related projects, including some robots. YouTuber RobotAvatar built this machine that uses 64 reed switches to direct an Arduino Uno where each chess piece is.

Meanwhile, a computer running a Python program takes care of the “thinking” and sends signals to the device to move pieces. It’s a pretty straightforward device that literally adds an extra dimension to the game of computerized chess — allowing you to play games against machines in a much more tangible way.

Another amazing project, created by Greg06 on Instructables, is the automated chessboard that can not only tell where specific pieces are moved but also play against an actual opponent while moving its own pieces.

Chess isn’t the only thing Arduino is capable of. Check out our homepage to learn more about how it all works, the kinds of projects you can build, and how you can get started.

The post The weird and wonderful history of chess-playing robots appeared first on Arduino Blog.

Humans have domesticated animals since the dawn of time. Dogs (our oldest furry friends) were owned by humans as far back as 30,000 years ago, and since then we’ve formed bonds with all kinds of different creatures.

It was only in the last century, though, that we started to actually build our own pets. The history of robot pets is a short but fascinating one, going from barely recognisable gadgets to incredibly sophisticated devices in just a few decades.

In this article, we’ll look at some of the biggest milestones in the evolution of robotic pets, and show you a few neat examples from the Arduino Project Hub.

A history of robot pets

The Phony Pony

Built in 1968 at the University of Southern California, the Phony Pony marked the beginning of a new era. As the first ever autonomous quadrupedal robot, it is the common ancestor to which all of today’s robot dogs and cats can be traced back (despite being named after a different species).

By today’s standards, the Pony wasn’t all that sophisticated. It featured four legs, each with its own hip and knee joint, attached to a frame. But, it worked — the Pony was able to walk around at various slow speeds. It wasn’t wireless but, come on, it was the ‘60s.

The Tamagotchi

Here’s one for the ‘90s kids. The Tamagotchi, released in 1996 in Japan by Bandai, soon made its way to the rest of the world. This simple, handheld device containing an animated pet which needed to be fed, watered, and cared for like any living animal soon became a smash hit — selling over 80 million units to date.

Anyone who has been through the traumatizing experience of losing their Tamagotchi will testify that these bundles of pixels can inspire surprising amounts of love and devotion from their owners.

The Furby

Another ‘90s classic here — the robotic, furry Furbies were popular throughout the world and sold more than 40 million units. While they weren’t the pinnacle of sophistication in terms of what they could actually do, it’s clear that people enjoyed the novelty of a robotic pet that was, in some small way, kind of alive.

BigDog

Released in 2005, the BigDog was the debut project of the now-famous robotics company Boston Dynamics. The BigDog was designed to be used in the military, and is equipped to do tasks like move easily over challenging terrain and carry up to 154 kg of weight.

Unfortunately, in spite of its physical prowess, the BigDog never quite made the cut, as its engine was deemed to be too noisy to be effectively used in combat situations. However, since then Boston Dynamics have been refining and optimizing their robot war dogs, and the latest iterations look very fearsome indeed.

Pleo the Dinosaur

UGOBE, based in California, set out to build a robotic creature that was also imbued with its own operating system, giving it an uncanny resemblance to a living thing. The result was Pleo — a pet dinosaur that uses cutting-edge research in fields like robotics, sociology, and even philosophy to appear very life-like indeed.

ANYmal Robotic Dog

Developed by Swiss robotics company ANYbotics, the ANYmal Robotic Dog was designed to safely inspect unsafe industrial environments. It comes equipped with an arsenal of tools like laser inspection sensors and the ability to autonomously navigate through different environments, collecting and sharing an impressive amount of data.

Make your own

Inspired by the idea of building your very own robotic pet? The Arduino Project Hub has a number of examples from people who have tried their hands at just that. Let’s take a look at a few.

The Nerd

Built in the same mold as the Tamagotchi, The Nerd is an electronic pet that lives in your pocket (or wherever you put it down) and survives by eating WiFi SSIDs (it also needs rest and sunlight).

To properly care for your Nerd, you need to make sure it has just the right balance of offline and online mode, along with sufficient levels of light and darkness. If it’s disconnected from that tasty WiFi for too long, The Nerd will emit a desperate plea in Morse code, 

You can build your own Nerd using the Arduino MKR IoT Bundle, a few other components like an RGB LED, phototransistor, and buzzer, and some code. Just make sure it doesn’t go too hungry — The Nerd makes a lot of noise when it dies.
And you can now create your own Nerd with just one click with the ready-to-use The Nerd Arduino Cloud template. Read the full tutorial to learn more about how to use it.

Roger Bot

Arduino user hannu_hell built the Roger Bot in their very own home using an Arduino and a few other components. The Roger Bot features a robotic arm and the ability to move around on flat surfaces. It also contains built-in sensors that collect sensory data and display them on an LCD screen.

While it isn’t well-equipped to handle uneven or challenging terrain just now, this is something hannu_hell is working on for the future. 

Build your own with Arduino

With an Arduino, a few simple components, and a free subscription to the Arduino Cloud, you too can create your very own robotic pet. Add to the ranks of historical robotic companions and gain a faithful and useful friend. And who knows… with the way AI is developing, maybe a truly autonomous robot pet is only just around the corner.

Check out the Arduino Cloud homepage to learn more and find your inspiration.

The post A history of robotic pets (and how to make your own) appeared first on Arduino Blog.

The challenge

Pest monitoring is essential for the proper management of any vineyard as it allows for the early detection and management of any potential pest infestations. By regularly monitoring the vineyard, growers can identify pests at early stages and take action to prevent further damage. Monitoring can also provide valuable data on pest behaviour, seasonality, and population size. This information can be used to adjust management strategies and protect the quality of grapes harvested from the vineyard.

One of the most effective ways to monitor pests is with pheromone traps. Pheromone traps use synthetic hormone-like compounds to attract specific insects and correctly estimate their overall presence based on their number, preventing major damage and disease to the plants. Using pheromone traps can help protect vines from serious infestations, reduce pesticide use, and ensure a healthy crop. Additionally, these traps can be used to track the activity of a particular species over time which is useful for predicting when pest populations are likely to peak or decline. By knowing when insect pressure is high or low, winemakers can better plan for treatments and cultivate their land accordingly. 

The value of conservation and pest control initiatives is immeasurable as the effects of climate change, biodiversity loss, and species invasions become more evident. Traps are widely used for population detection, tracking progress on projects, determining management solutions; in addition to assessing treatment performance.

Popillia japonica

Vineyard Pest Monitoring is the practice of monitoring and controlling vineyard pests, such as Popillia japonica. Popillia japonica is a species of scarab beetle native to Japan that feeds on grapevine leaves and can cause significant damage in vineyards. Traditional pest management techniques involve manual monitoring with traps or pheromone traps. These methods are labor-intensive and may not provide accurate and timely monitoring or pest control.

Our solution

We propose a solution for estimating Popillia japonica populations in vineyards using pheromone traps and Computer Vision.  

This system utilizes LoRa® technology to enable remote monitoring of Popillia japonica in vineyards. Arduino Pro allows farmers to monitor Popillia japonica activity with pheromone traps and collect the data remotely. This makes it easier for farmers to detect infestations early and take action, leading to improved efficiency and higher yields. The IoT technology also helps reduce labor costs associated with manual monitoring.

By using Computer Vision in combination with LoRa® technology, real-time data of pest activity can be collected. This information allows growers to better understand the dynamics of Vineyard pests such as Popillia japonica, helping them to make more informed decisions and reduce their environmental impact. With the right monitoring tools, vineyards can now be better prepared to face the increased risk of Japanese beetle outbreaks posed by climate change.  With IoT devices, there is no longer any excuse not to employ pest monitoring in vineyards. The use of IoT-based pest monitoring is not only cost-effective, but also helps to reduce the environmental impact of pesticide applications. This makes it an important tool for vineyard managers looking to protect their crops in an ever-changing environment. The future of vineyard management lies in the hands of innovative technologies like this one, enabling farmers to ensure their crops are healthy and safe.  By taking advantage of the latest technologies, vineyard managers can make sure their crops are protected from infestations and ensure a successful harvest season year after year.

To address the challenge we will devise a pest monitoring system based on sensor nodes that monitor areas in the vineyard and send the collected data to a LoRa® gateway that can either display it locally or push it toward a cloud solution where further computation can be done. Either at the gateway level or in the cloud, alerts can be set based on certain thresholds considered relevant. 

Bug counting

For monitoring the number of Popillia Japonica in each section of the vineyard we have chosen the Arduino Nicla Vision which is ideal for this project because of its advanced image processing capabilities. It combines a powerful Dual ARM® Cortex® M7/M4 IC processor with a 2MP color camera that supports TinyML in a compact format. The full datasheet is available here. For training the object detection model, we have chosen the Edge Impulse platform where we can easily train and deploy a model that will allow us to detect the number of bugs in the view of the camera. After the deployment, no further need of internet connectivity is needed for the camera and only the number of bugs will be relayed to the Arduino MKR WAN 1310 through UART.

Connectivity

The Arduino MKR WAN 1310 is a powerful and versatile IoT development board based on the ARM Cortex®-M0+ 32-bit processor, perfect for building connected projects. It supports the LoRa® communication protocol, making it suitable for long-range applications such as vineyard pest monitoring. Moreover, it also supports the UART, I2C, and SPI communication protocols so it can easily be interfaced with other devices. Additionally, the MKR WAN 1310 features an integrated LiPo battery charger to keep your project running 24/7. With its compact size and low energy consumption, this board can be used in a wide range of projects where connectivity is required without sacrificing power efficiency.

Thanks to its radio connectivity via LoRa® radio transceivers, the data can be sent directly to the nearest LoRa® gateway which forwards it to the Arduino IoT Cloud. The gateway, Arduino Pro WisGate Edge Pro powered by RAKwireless™ 
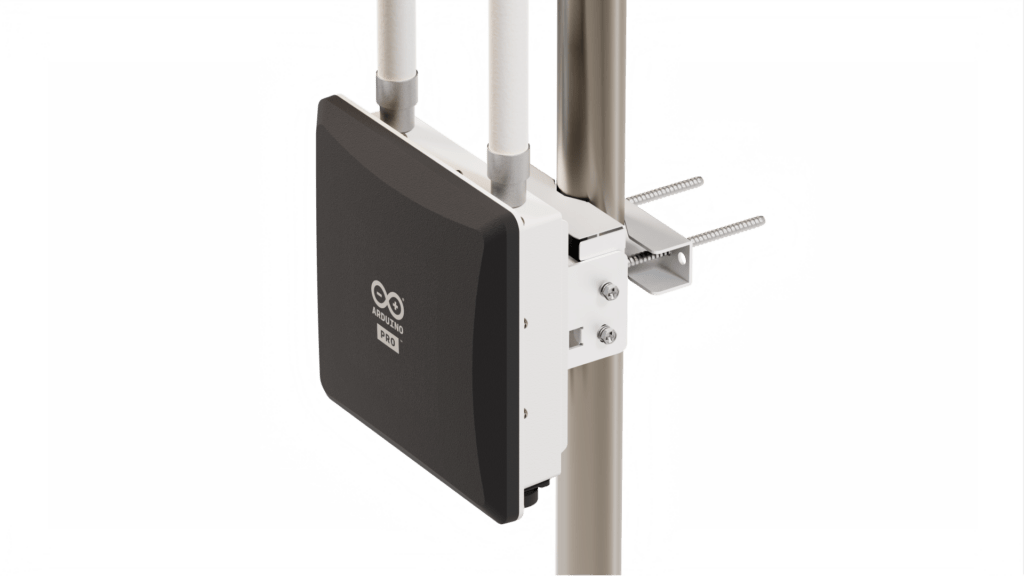
ensures secure and reliable connectivity for a wide range of professional applications and is suitable for medium-sized to wide area coverage in industrial environments and remote regions. Its high transmission power and 2x fiberglass antennas with 5dBi gain provide extensive coverage in open environments, making it the perfect fit for IoT commercial outdoor deployment – required for example for parking sensors, remote fleet management, livestock tracking and geofencing, and soil monitoring solutions that maximize crops’ yield.

Solving it with Arduino Pro

Now let’s explore how we could put all of this together and what we would need for deployment both in terms of hardware and software stack. The Arduino Pro ecosystem is the latest generation of Arduino solutions bringing users the simplicity of integration and scalable, secure, professionally supported services.

Hardware requirements

Software requirements

The Nicla Vision has been programmed in MicroPython since the Edge Impulse model was created/tested using the OpenMV IDE and thus we have also sent the number of detected bugs to the Arduino MKR WAN 1310 via UART.

The Arduino MKR WAN 1310 has been programmed in C/C++ using the Arduino IDE and the Arduino IoT Cloud and registered on the The Things Stack (TTS) platform. The Arduino MKR WAN 1310 acts as an end device programmed to receive the number of detected Popilia Japonica bugs from the Nicla Vision through UART and forward it to the Arduino IoT Cloud through the nearest LoRa® gateway connected to the TTS service.

Here is a screenshot from a dashboard created directly in the Arduino IoT Cloud showcasing data received from the sensor nodes:

Here is an overview of the software stack and how a minimum deployment with one of each hardware module communicates to fulfill the proposed solution:

Conclusion

By combining Computer Vision with LoRa® technology, farmers can create a reliable vineyard pest monitoring system that is capable of estimating the population of Popillia japonica quickly and accurately. With this IoT-based op-solution, farmers can monitor Popillia japonica activity in their vineyard and take action before Popillia japonica causes significant damage. This helps protect the vineyard from Popillia japonica infestations and ensures higher yields for the farmer.  With Vineyard Pest Monitoring with Arduino Pro, farmers no longer need to rely on labor-intensive manual methods for Popillia japonica monitoring. Instead, they can use IoT technology to create an efficient and cost-effective pest monitoring system that provides accurate data about Popillia japonica activity in their vineyards. 

In summary, pheromone traps are an important tool for protecting vineyards from pests and ensuring a healthy harvest season and great wines. Salute! 

The post Vineyard pest monitoring with Arduino Pro appeared first on Arduino Blog.

Get More Out of Your Smartphone with Arduino

Our smartphones go pretty much everywhere with us, and we use them for more things than we even realize. From literally the very moment we’re startled into life in the morning, until the one final doom scroll through social media before bed, our phones are with us.

It makes sense, then, to think about ways to connect your smartphone to your Arduino projects, adding another layer of user-friendliness and convenience. In this article, we’ll take a look at some of the best tips and hacks for bringing your phone and your home automation projects closer together, and we’ll share some examples from the Arduino community.
Arduino Cloud is the perfect companion for building automated projects, and the IoT Cloud Remote mobile app makes things a lot easier. In this article we’ll see some companion apps and you can check out more compatible projects in our Home Automation website.

Use the iRobbie app

The iRobbie app is designed specifically to connect your smartphone to your Arduino projects. It’s actually a fairly simple concept, using Bluetooth to connect your phone to the Arduino board. Once connected, you can access a ton of features like object recognition and tracking, all via the phone’s camera. iRobbie allows your Arduino projects to recognise and track over 60 objects.

Other features include:

You can learn more about iRobbie and how to get started with it here.

Notification IoT Using NeoPixel and Smartphone

If there’s one thing phones are good for, it’s receiving updates. But what about when you miss important updates? What about when your phone is on the other side of the room, or the TV is playing loud, or you just missed that vibration?

Speaking of vibrations, wouldn’t it be cool if there were a slightly less annoying way to get notifications from your phone?

Well, step forward Arduino user notiduin, who used NeoPixel and Arduino to find a solution. This project allows you to get notifications in the form of LED lights of different colours. By combining HC-06 Bluetooth, Arduino Uno, Neo Pixel and an Android App, it’s possible to have all your phone’s notifications sent to an Arduino where they can turn on different colours of LED.

You can even assign a certain colour to each type of notification. For example, a Facebook notification can light up the blue LED, an SMS message can trigger the yellow light, and a new email can cause the red light to flash — it’s entirely up to you. The project works with any of the apps on your smartphone.

Check out the full project description here.

More user projects

3D printed smartphone camera slider

Getting the perfect smartphone photo can be a tougher task than it first appears. Stores across the world now have their shelves lined with tripods, stands, and other gadgets to make snapping that perfect shot more manageable than ever… but sometimes you just need to take matters into your own hands.

That’s what Reddit user u/careyi4 did. He 3D-printed his very own smartphone camera slider, powered by an Arduino, to make it easier than ever to line up pro-level smartphone photoshoots. Check out the video for more information.

Make any Arduino smartphone-controlled with just a few lines of code

You don’t need to be a programming genius to make your own Arduino projects smartphone-controlled. Reddit user u/TylerTimoj used just a few lines of simple code to make their projects easily controlled from their smartphone, and anyone can emulate it.

You can check out the full project here, along with a video where u/TylerTimoj shows you how it’s done.

Did you know that your phone is an IoT device?

The Arduino IoT Remote app (available for Android and iOS) was created to enable you to remotely manage and monitor your devices through the Arduino Cloud dashboards, offering complete control at your fingertips from anywhere you are. Arduino has gone a BIG step further and enabled you to use the app as an IoT device, utilizing some of the sensors in your mobile phone such as accelerometer, GPS, microphone, compass or barometer to collect data and transmit it to the Arduino Cloud. This feature automatically creates in the Arduino Cloud everything needed to monitor the sensors (the Device, the Thing and a dashboard) and share the data with other devices.

Starting to play with real hardware can be tricky for non-experienced users, so this feature enables users to get familiar with the Arduino Cloud device management environment using their own phone. Easy, right?

But you can also use the data from your phone sensors in your projects. Imagine the endless possibilities using that information. For instance, you can use virtual geographic boundaries for geofencing to initiate actions based on your location. You can also automate home-based tasks such as turning off lights when you depart and turning them on when you return, securing doors, and adjusting home climate control. Moreover, you can track your loved ones with geofencing and receive immediate notifications if they leave a designated area. The accelerometer in your phone can also be utilized to detect accidents or falls, and you can even use your phone as a remote control for games or robots. 

Only your imagination sets the boundaries of what you can do with this new feature.

If you want to learn more about the “Phone as Device” feature, don’t miss this article on the documentation.

Unlock a whole new side to your smartphone

With Arduino, a few basic components, and a bit of knowledge, anyone can bring entirely new capabilities to their smartphone and start doing a whole range of new tasks with it. I mean, if it’s going to be with you all day, you might as well get as much out of it as possible, right?

Check out the Arduino Home Automation page to learn more and get started with your own projects.

The post Get More Out of Your Smartphone with Arduino appeared first on Arduino Blog.

After the successful launch of the new Project Hub at the end of last year, we are ready for a new challenge and the opportunity for you to be rewarded for your awesome work.

Starting February 1st, we are launching a new ‘Arduino Project of the Month’ competition for everyone in our community. 

Simply share your best project on the new Project Hub.

Every month, our team will then select up to three projects and their creators will receive fabulous gifts!

  • First selected will receive a gift card worth $500.
  • Second selected will receive a gift card worth $300
  • Third selected will  receive a gift card worth $100.

(Gift cards can only be redeemed on the Arduino Store.)

We will officially start considering projects uploaded after February 1, 2023.

Please keep in mind the general rules to enter the competition:

  • All the participants must be 18+ years of age.
  • All projects accepted for Project Hub will be evaluated by the Arduino Team. If your project is shortlisted you will be contacted with further instructions.
  • Please make sure that you are uploading your project using your Arduino account. Projects submitted using Hackster.io accounts will not be accepted.
  • The Arduino team will evaluate the projects based on the quality of the project itself, not on the number of projects a user updates. But obviously the more projects you add, the more you increase your chances of  being selected.
  • Projects submitted by companies won’t be considered part of this competition.
  • The Arduino Team is solely responsible for monthly selection(s). Each selection is final and will not be amended.
  • Projects can only be submitted to the challenge once. It is not permitted to delete a project and then re-submit it again in the following month(s).
  • Complete Terms and Conditions can be found here.

So, what are you waiting for? Upload your project on the new Arduino Project Hub for a chance to receive a $500 gift card to help make your next project even more amazing!

The post Arduino Project Hub: Share and compete in Project of the Month! appeared first on Arduino Blog.

To say it’s been another challenging year would be an understatement, but it’s reassuring to see that the top 10 Arduino blog posts of 2021 show us that makers have persevered, undaunted.

As we sprint headlong into 2022 with hope for a return to normality (whatever that might actually look like!) we wanted to cast an eye back over the Arduino blog. These are the top posts from 2021, which prove that you can’t keep good maker down.

The Arduino community has been creating some of the best projects we’ve ever seen. It’s also exciting to note that it’s been another year when newcomers have taken up the electronics hobby. The presence of Arduino software posts in our top 10 Arduino blog posts of ‘21 suggests lots of people have been getting into the Arduino scene.

Learn how to build your own massive 3D-printed CNC router

If you want an affordable option, this guide shows you how to build Ivan Miranda’s 3D-printed CNC machine design.

Announcing the Arduino IDE 2.0 (beta)

It was a great day when the famous Arduino IDE reached version 2.0 in March of 2021.

Hacking a USB battery bank to gather telemetry

Keenan Johnson needed more info for a new project and so he hacked a USB battery bank to gather telemetry.

The new Arduino CLI 0.19.0 is out and better than ever!

This release delivered tons of great enhancements, exciting new features and heaps of bug fixes.

Arduino MKR IoT Carrier: Control what you want, how you want to!

By popular demand, we were pleased to announce in early 2021 that it’s possible to buy the Arduino MKR IoT Carrier.

Cascading LED stair lights prevent late night tumbles

Stephen Gidge and his roommate could have installed a new hall light, but they were both experienced with Arduino and so they created these cascading LED star lights instead.

One board to rule them all: History of the Arduino UNO

With the UNO Mini Limited Edition flying off the shelves, we took a heartfelt look at the history of its inspiration, the ubiquitous UNO.

The Arduino Nano RP2040 Connect is here

The first Arduino board to include Raspberry Pi silicon arrived in 2021, to much fanfare.

Arduino Cloud now supports ESP32 devices

Support for ESP32 devices (on top of existing support for ESP8266) became available on the Arduino IoT Cloud in May, 2021. A huge step forward in bringing IoT devices of all kinds together.

Introducing the Arduino UNO Mini Limited Edition: Pre-orders now open

Even though it only launched a couple of weeks ago, the Arduino UNO Mini Limited Edition announcement is one of the most viewed pages this year.

Happy New Year from all of us at Arduino!

The post Top 10 Arduino blog posts of 2021 appeared first on Arduino Blog.

Counting to a Billion is probably the longest running Arduino project ever.

Good design counts for everything

Designer Che-Wei Wang built a simple Arduino project that’s counting to a billion, and has been doing so for over 10 years. Could this be the longest continually running Arduino project in the world?

Che-Wei has a background in art, architecture and industrial design. He now runs a boutique design studio with is wife Taylor, called CW&T. But it was during his time at university that he first discovered his love for Arduino.

“I first started using Arduino when I went to [the Interactive Telecommunications Program] at NYU in 2007,” he explains. “I got hooked the moment I got an LED to blink and went on to build a fuzzy GPS robot that guides you to places around the city.”

Even now there’s a clear technological slant to his design work. As you look through the products CW&T has created, more than a few have embedded electronics at their core. He also has a rare eye for the beauty of minimalism, both in terms of design and function. Which is probably why one of his first Arduino projects is both simple, and stunning.

“As a kid, I would challenge myself to count to as high of a number as possible,” he laughs. “I don’t remember how high I got. Probably not past a few hundred. So I built this device as a way to fulfil my childhood dream of counting to an insanely high number!”

The Counting to a Billion project

Back in 2009, Che-Wei created his next project to help him achieve that childhood objective. Counting to a Billion has an Arduino board with a text-to-speech converter and a speaker that continually reads out the next number. When it gets to billion, it’ll stop.

“It lives in our basement, so every time you go downstairs, there’s a voice just counting away.”

Che-Wei clearly gave this a lot of thought in his initial designs. Like a lot of minimalist product designs, there’s a lot of work needed to make them look so simple. Counting at one number per second, continually, you’re looking at over 31 years to get to a billion. That means this apparently simple project needs to be incredibly robust.

Counting to a Billion is encased in a machined aluminium housing for safety. It writes the last number to EEPROM, in case of catastrophic power failure. And there’s a rechargeable backup battery so it keeps counting whenever the devices needs to be moved or unplugged.

It was activated at 9AM on May, 9th, 2009 and is still happily running, without interruption. It’s hard to imagine there are many other Arduino projects that have been running continuously for this long. If there are, we definitely want you to tell us all about them!

Down for the count

“I still use Arduino all the time,” Che-Wei continues, “for work, for home projects, and gifts.”

The Counting to a Billion project has actually provided inspiration for CW&T’s current products. In their shop is a strangely attractive device, called Nothing Lasts Forever. This sealed glass capsule has an e-ink display that counts up ever time you press the button on the machined aluminium cap. If and when it reaches 999,999, the device will stop functioning. Although the electronics are custom, it still uses the EEPROM method developed for Counting to a Billion to keep track of the number.

So, you’re probably wondering what number Che-Wei’s project is currently at? To recap, at the exact moment of writing, it’s now been running continuously for 12 years, one month and five days, or:

  • 145 months
  • 631 weeks
  • 4419 days
  • 106,046 hours
  • 6,362,764 minutes
  • 381,765,878 seconds

“As of right now, on June 8th, 2021, 10:42AM,” Che-Wei concludes, when we spoke about his project, “the count is at 47,684,610.”

Have you built a project that’s been running for a long time? We want to hear all about it! Share it on the Arduino Project Hub, in the comments, on social media, or over on the forum.

The post This Arduino project is counting to a billion appeared first on Arduino Blog.

We’re on the lookout for the most creative and innovative Arduino projects made by you – our EDUvision viewers!

Each week, we’ll feature the projects we think should be put in the spotlight. If your project is featured, we’ll send you a selection of some super cool Arduino merchandise, such as:

  • Lanyards
  • Water bottles
  • Notebook
  • Hats
  • Beanies
  • Stickers
  • Stationary
Featured Arduino Projects for EDUvision

How to share your Arduino project

All you need to do is shoot a short video (maximum one minute) of your project, explaining what it’s all about, what it does, and how it works. Because we’re featuring these on the show, and on the Arduino channels, we want you to make your video looks as great as possible.

Here are some tips:

  • Make sure you shoot in landscape (horizontal)
  • You can send in .mp4 or .mov video files
  • A voice over is effective, to help explain your project
  • Make sure the lighting is good
  • Reduce background noise as much as possible

Video files can only be submitted if they’re less than 10MB in size. If yours is bigger, you can upload it to a file sharing service like Dropbox, Google Drive or WeTransfer and put the link into your application form instead. Even then, please keep them to one minute.

You’ll also need a project name and a short written description.

The necessary bit: First we need you to read and accept these terms and conditions.

If you’re under 18, you’ll also need to provide permission from a parent or guardian to share your Arduino projects. You can take care of that in the application form.

Finally, you’ll need to be a registered Arduino user to be able to send your project in. It’s totally free to sign up if you aren’t already, and comes with lots of great benefits including being able to participate in the forum and get Arduino news as it happens.

Make sure you join us each week on the EDUvision livestream to see which projects have been featured!

We can’t wait to see what you’ve been building!

The post Share your Arduino projects on EDUvision appeared first on Arduino Blog.

Hokey religions and ancient weapons might not be a match for a good blaster, but Arduino Star Wars projects certainly are. To celebrate May the 4th (also known as Star Wars Day), we’ve put together a list of inspired builds from a galaxy far, far away that you can make yourself.

Arduino Star Wars Projects

So I Fixed a Broken Hasbro Lightsaber

It’s a rite of passage for every Jedi to build their own lightsaber. That goes for Arduino Jedi, too.

Alan Wang expertly upcycled a broken lightsaber toy by adding a Nano, an MP3 player module and a NeoPixel ring. The result is a Jedi weapon that’s far superior to the original toy.


Star Wars Mouse Droid with Hidden Payload

One of the first droids we meet in Star Wars is a mouse droid. The quirky little bots that zoom about the floor of the Death Star, getting under Stormtrooper’s feet.

They never actually appear to do all that much. But this zippy little droid by PotentPrintables has a hidden LED matrix that lets it deliver messages. And lots of terrible Star Wars puns, of course.


Imperial March on a Toaster

If you’re looking for sci-fi toasters, Red Dwarf is usually the first choice. But this hilarious video from Device Orchestra brings the dark side to your devices.

An Arduino controls the electromagnet in this toaster to turn it into a tuneful buzzer. Accompanied by toothbrushes and a typewriter, we get the immortal Imperial March played by droids.


Mini Arduino Star Wars Shoot ‘Em Up

A game that’s as simple as it is small and cute (like R2!), all run on a Nano on a breadboard.

And just consider how its graphics are comparable to those of the Death Star’s display as it moves into range of Yavin. Talk about human-cyborg relations!


Build a Life-Size BB8 Droid (Phone Controlled)

It was a pretty big deal when it turned out Lucasfilm built an actual droid for Star Wars Episode VII. It would have been easier to make BB8 in CGI. But we’re glad they went the practical route, as the cool ball droid has inspired a lot of makers.

Not least of them being Angelo, who built his very own amazing life-size BB8 using Arduino.


Recreating the Death Star Trench Run Scene with LEGO

As much as Wani Kim’s recreation of the iconic trench run is an incredible feat of LEGO engineering, it wouldn’t be complete without Arduino. The whole diorama is embedded with a galaxy-full of LEDs, bringing the scene to life.

That’s no moon. It’s an Arduino project!


Laser Shooting Game (Star Wars)

As Han told us, there’s no match for having a good blaster at your side. Ismail took that quite literally, and built a Star Wars laser shooting range that lets you take out those pesky Stormtroopers with a homemade blaster.


Arduino-Based Lightsaber with Light and Sound Effects

A great lightsaber build isn’t just about the colorful blade. It’s about the audio combinations, and the lighting effects when the blade makes contact. Bring all these things together, like Mad Gyver did, and you have an elegant weapon, of a more civilized age.


Prank Your Friends with Talking Darth Vader

Perfect for Halloween, as well as Star Wars Day, this motion activated Darth Vader head is just as creepy as its inspiration. It can be programmed with as many voice clips as you like, and wouldn’t it make a great option for a dark side Alexa?


Droid Build D-O

To be honest, D-O didn’t get nearly as much screen time or plot involvement as he deserved. But the latest addition to the growing line-up of Star Wars droids has been lovingly recreated by Matt Denton using a MKR WiFi 1010. No bad motivators here!

We want to hear about your Arduino Star Wars projects, so tell us all about them in the comments. May the force be with you!

The post The DIY force is strong with these 10 Arduino Star Wars projects appeared first on Arduino Blog.

There’s a brand new device-to-device communication feature available now in the Arduino IoT Cloud. It’s something we’ve been working on for a long time. So we’re excited to see how it’ll add a whole new connected dimension to your Arduino projects.

Arduino IoT Cloud thing to thing communication

What is “Device-to-Device”? Communication?

Internally we’ve been looking at this feature as “device-to-device” communication. It will allow your Arduino devices to send wireless messages to each other, without writing a single line of code or spending time with radio modules and network protocols.

Using this feature you can link variables of the same data type between two or more cloud-enabled devices. For example, one button could set three smart bulbs to the same color. Or you could turn on a heater when temperature sensors in your room or outside in your weather station drop below a certain level. Being able to sync variables gives you an intelligent way to control multiple devices very easily.

Whether you use an Oplà IoT Kit, a MKR WiFi 1010, a Nano 33 IoT or an (upcoming!) Nano RP2040 Connect, you can configure everything from the web interface. After configuration, any changes you make to variables on one device will be reflected promptly on the other(s). This creates a seamless, powerful and secure two-way communication with almost no effort on your part, and no code required. The Arduino IoT Cloud handles authentication, security, network disruptions and any other tricky parts. 

What Does This Mean For Your Projects and Devices?

It means there are lots of options with thing-to-thing communication (also known as variable synchronization):

  • Collect sensor readings from remote devices.
  • Actuate devices remotely. For instance, pressing a button on one Arduino turns on an LED or motor on another.
  • Create a distributed algorithm where multiple devices collaborate with each other.

Are you thinking about home automation? Interactive installations? Monitoring and controlling machines from a wireless panel? This powerful new feature makes all those things easy to achieve for makers of all abilities.

Arduino Cloud thing to thing dashboard.

Combined with IoT Cloud’s dashboards this delivers a powerful new way to build incredible automations with minimal (if any) changes. Furthermore, it gives you smartphone control of your connected boards via the existing Arduino IoT Remote iOS and Android apps.

If you want to be one of the first to try it out, grab an Arduino IoT Cloud subscription. After that, just make sure you’re signed up to the Arduino newsletter to hear about other new features.

The post It’s easier than ever to add two-way communication to Arduino devices appeared first on Arduino Blog.


  • Newsletter

    Sign up for the PlanetArduino Newsletter, which delivers the most popular articles via e-mail to your inbox every week. Just fill in the information below and submit.

  • Like Us on Facebook