Posts | Comments

Planet Arduino

Archive for the ‘lights’ Category

Strobe Remote

If you want to take a photograph with a professional look, proper lighting is going to be critical. [Richard] has been using a commercial lighting solution in his studio. His Lencarta UltraPro 300 studio strobes provide adequate lighting and also have the ability to have various settings adjusted remotely. A single remote can control different lights setting each to its own parameters. [Richard] likes to automate as much as possible in his studio, so he thought that maybe he would be able to reverse engineer the remote control so he can more easily control his lighting.

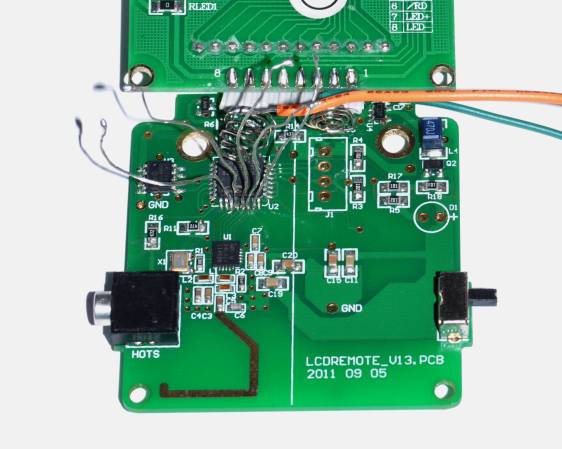
[Richard] started by opening up the remote and taking a look at the radio circuitry. He discovered the circuit uses a nRF24L01+ chip. He had previously picked up a couple of these on eBay, so his first thought was to just promiscuously snoop on the communications over the air. Unfortunately the chips can only listen in on up to six addresses at a time, and with a 40-bit address, this approach may have taken a while.

Not one to give up easily, [Richard] chose a new method of attack. First, he knew that the radio chip communicates to a master microcontroller via SPI. Second, he knew that the radio chip had no built-in memory. Therefore, the microcontroller must save the address in its own memory and then send it to the radio chip via the SPI bus. [Richard] figured if he could snoop on the SPI bus, he could find the address of the remote. With that information, he would be able to build another radio circuit to listen in over the air.

Using an Open Logic Sniffer, [Richard] was able to capture some of the SPI communications. Then, using the datasheet as a reference, he was able to isolate the communications that stored information int the radio chip’s address register. This same technique was used to decipher the radio channel. There was a bit more trial and error involved, as [Richard] later discovered that there were a few other important registers. He also discovered that the remote changed the address when actually transmitting data, so he had to update his receiver code to reflect this.

The receiver was built using another nRF24L01+ chip and an Arduino. Once the address and other registers were configured properly, [Richard's] custom radio was able to pick up the radio commands being sent from the lighting remote. All [Richard] had to do at this point was press each button and record the communications data which resulted. The Arduino code for the receiver is available on the project page.

[Richard] took it an extra step and wrote his own library to talk to the flashes. He has made his library available on github for anyone who is interested.


Filed under: Arduino Hacks, radio hacks

Sep
13

City Lights Telling Stories

arduino, arduino hacks, Art, lights, Morse Code Comments Off on City Lights Telling Stories 

morse code lights

If you’re walking around town and you see a light suddenly start to switch on and off seemingly at random, don’t discount it as a loose wire so quickly. [René] has been hard at work on a project to use city lights of all shapes and sizes for Morse messages, and a way for anyone to easily decode these messages if they happen upon one while out and about.

The lights can tell any story that is programmed into them. The code on the site is written for an Arduino-style microcontroller but it could be easily exported to any device that can switch power to turn a light on and off. Any light can work, there’s even video of a single headlight on a van blinking out some dots and dashes.

The other part of this project is a smartphone app that can decode the messages using the camera, although any Morse code interpreter can translate the messages, or if you’re a ham radio enthusiast you might recognize the messages without any tools whatsoever!

The great thing about this project is that it uses everyday objects to hide messages in plain sight, but where only some will be able to find them. This is indeed true hacker fashion! If you’re interested in making your own Morse code light, the code is available on the project site.


Filed under: Arduino Hacks
Oct
07

remoteServoLightSwitch

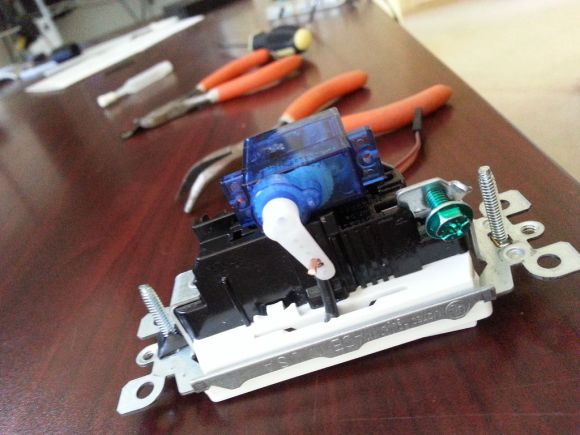
We frequently get home automation tips, many of which have simple circuit-based on/off control for lights. [Paulo Borges] has created something quite different, however, with his in-the-wall servo-controlled light switch. This build forgoes the need of any relay to switch mains power, and because it’s physically flipping your switch, provides a distinct advantage over other builds that require a phone or tablet interface: you can use your switches as you normally would.

[Paulo] picked up a rocker-type switch at the local hardware store and carefully pried off the large, flat switch plate to notch out a small hole at its fulcrum. He then carefully shaped a piece of 12 gauge wire to provide a pivot point for the servo. His choice to use wire here seems to be entirely to provide a sturdy yet bendable component that functions mechanically rather than electrically. A small 9G servo fits to the back of the switch’s housing, and the servo’s arm connects up to the previously attached 12 gauge wire. He pieced together the remote control feature with an RF link kit with an inexpensive 433mhz Code duplicator from eBay.

[Paulo] explains that his Instructable is simply an overview rather than a step-by-step guide, so if you’re eager to reproduce this hack you’ll have to work out the code and the remote control portion yourself. He also acknowledges the biggest remaining hurdle: finding space in the wall to shove all the microcontroller guts. Check out a couple of videos of the switch after the break, and remember, there’s always the option of doing away with all light switches.


Filed under: Arduino Hacks, home hacks, Microcontrollers


  • Newsletter

    Sign up for the PlanetArduino Newsletter, which delivers the most popular articles via e-mail to your inbox every week. Just fill in the information below and submit.

  • Like Us on Facebook