This hacker has been wanting to design an Enigma machine simulator for a while, but didn’t take the leap until they realized there was a compact Arduino with a surplus of I/O.
The logs go through all sort of variations on the machine. Everything from a plug board variation similar to the original to a 16 segment LED tester are covered. In one of the posts you can even see it decode a real U-Boat message.
The earlier revisions are housed in very attractive laser cut cases but the latest designs employ an even more elegant casing solution. The simulator uses 16 segment displays and momentary push buttons for the keys. At its core is a 2560 Pro mini. The write-up contains a lot of detail about the code behind the Enigma and is interesting to read. Interestingly, the PCB was designed in Fritzing, the EDA software many love to hate.
We love the craftsmanship and attention going into this project and can see it turning into a very appealing kit as it goes through its design cycles.
Even if you wouldn’t describe yourself as a history buff, you’re likely familiar with the Enigma machine from World War II. This early electromechanical encryption device was used extensively by Nazi Germany to confound Allied attempts to eavesdrop on their communications, and the incredible effort put in by cryptologists such as Alan Turing to crack the coded messages it created before the end of the War has been the inspiration for several books and movies. But did you know that there were actually several offshoots of the “standard” Enigma?
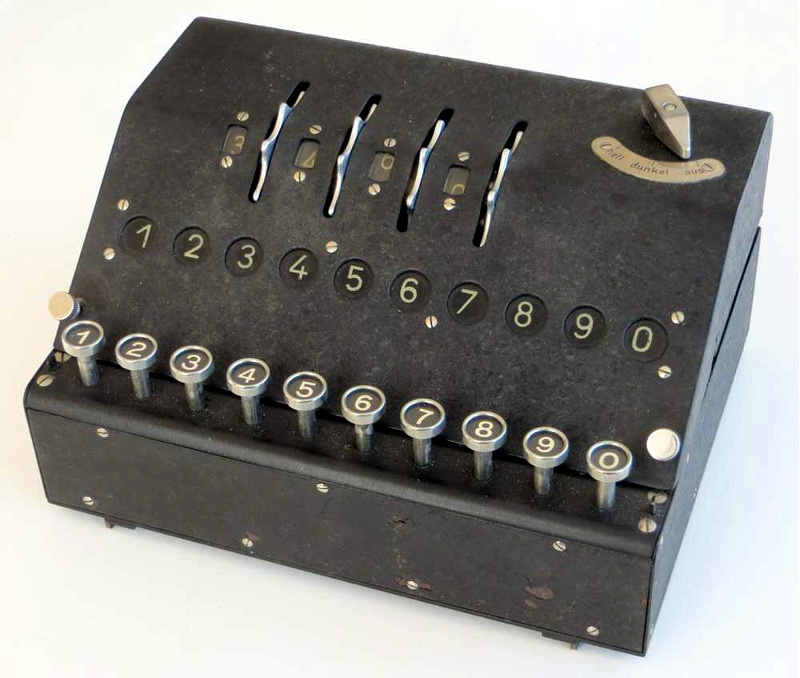
For their entry into the 2019 Hackaday Prize, [Arduino Enigma] is looking to shine a little light on one of these unusual variants, the Enigma Z30. This “Baby Enigma” was intended for situations where only numerical data needed to be encoded. Looking a bit like a mechanical calculator, it dropped the German QWERTZ keyboard, and instead had ten buttons and ten lights numbered 0 through 9. If all you needed to do was send off numerical codes, the Z30 was a (relatively) small and lightweight alternative for the full Enigma machine.
Creating an open source hardware simulator of the Z30 posses a rather unique challenge. While you can’t exactly order the standard Enigma from Digi-Key, there are at least enough surviving examples that they’ve been thoroughly documented. But nobody even knew the Z30 existed until 2004, and even then, it wasn’t until 2015 that a surviving unit was actually discovered in Stockholm.
Of course, [Arduino Enigma] does have some experience with such matters. By modifying the work that was already done for full-scale Enigma simulation on the Arduino, it only took a few hours to design a custom PCB to hold an Arduino Nano, ten buttons with matching LEDs, and of course the hardware necessary for the iconic rotors along the top.
The Z30 simulator looks like it will make a fantastic desk toy and a great way to help visualize how the full-scale Enigma machine worked. With parts for the first prototypes already on order, it shouldn’t be too long before we get our first good look at this very unique historical recreation.
Even if you wouldn’t describe yourself as a history buff, you’re likely familiar with the Enigma machine from World War II. This early electromechanical encryption device was used extensively by Nazi Germany to confound Allied attempts to eavesdrop on their communications, and the incredible effort put in by cryptologists such as Alan Turing to crack the coded messages it created before the end of the War has been the inspiration for several books and movies. But did you know that there were actually several offshoots of the “standard” Enigma?
For their entry into the 2019 Hackaday Prize, [Arduino Enigma] is looking to shine a little light on one of these unusual variants, the Enigma Z30. This “Baby Enigma” was intended for situations where only numerical data needed to be encoded. Looking a bit like a mechanical calculator, it dropped the German QWERTZ keyboard, and instead had ten buttons and ten lights numbered 0 through 9. If all you needed to do was send off numerical codes, the Z30 was a (relatively) small and lightweight alternative for the full Enigma machine.
Creating an open source hardware simulator of the Z30 posses a rather unique challenge. While you can’t exactly order the standard Enigma from Digi-Key, there are at least enough surviving examples that they’ve been thoroughly documented. But nobody even knew the Z30 existed until 2004, and even then, it wasn’t until 2015 that a surviving unit was actually discovered in Stockholm.
Of course, [Arduino Enigma] does have some experience with such matters. By modifying the work that was already done for full-scale Enigma simulation on the Arduino, it only took a few hours to design a custom PCB to hold an Arduino Nano, ten buttons with matching LEDs, and of course the hardware necessary for the iconic rotors along the top.
The Z30 simulator looks like it will make a fantastic desk toy and a great way to help visualize how the full-scale Enigma machine worked. With parts for the first prototypes already on order, it shouldn’t be too long before we get our first good look at this very unique historical recreation.
The German Enigma device has always been a fascinating gadget for hackers. We’ve seen various replicas and emulators created over the years, and it was recently even the subject of our weekly Hack Chat. But if you think about it it’s not really a surprise; the Enigma has the perfect blend of historical significance and engineering wizardry, with a healthy dash of mystery thrown in. Why do the bad guys always have the coolest toys?
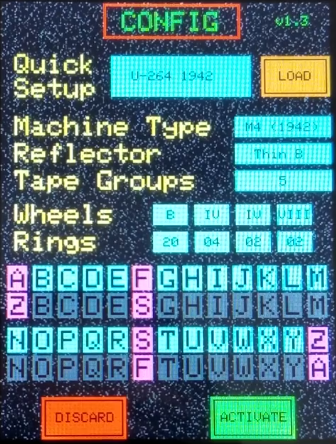
Thanks to the relatively high-resolution touch screen, [Mark] was able to develop a user interface for his Enigma that really gives you a feel for how the original machine worked. Obviously it’s considerably simplified from the real-world version, but using a stylus to tap the rotors you want to spin or the wires you want plugged in makes for a more immersive experience than many of the previous attempts we’ve seen. With a tap you’re even able to load historical machine configurations, such as how the Enigma aboard the submarine U-262 was configured when the Allies intercepted its encoded messages in 1942.
[Mark] says this project was always about developing the software, and he leaves the actual hardware implementation as an exercise for the user. Just to play around with the software it’s enough to hook up an Arduino and the touch screen, but we’d love to see somebody really take the idea and run with it. Add some batteries, a charging circuit, and put it all in a little wooden box for that authentic Enigma look. Can’t forget that iconic wrinkle finish paint, either.
We don’t find smartwatches to be supremely usable yet. This one sets a definition for usefulness. The Enigma machine is of course the cipher process used by the Germans during World War II. This Enigma Machine wristwatch is not only functional, but the appearance is modelled after that of the original machine. With the speckled gray/black case and the Enigma badge branding [Asciimation] has done a fine job of mimicking the original feel.
Driving the machine is an Arduino Pro Mini. We’ve seen Arduino Enigma Machines in the past so it’s not surprising to see it again here. The user interface consists of an OLED display at 128×64 resolution, three buttons, with a charging port to the right and on/off switch on the left.
The device is demonstrated after the break. Quite a bit of button presses are used to set up each of the three encoder wheels. But that’s hardly avoidable when you’re not committing to a full keyboard. We’re pretty impressed by the functionality of [Asciimation’s] interface considering it’s hardware simplicity.
This seems perfect for kids that are proving to have an interest in engineering. They learn about ciphers, embedded programming, and mechanical design and crafting (this is a hand-sewn leather wristband). Of course if you build one and start wearing it into the office we won’t judge.
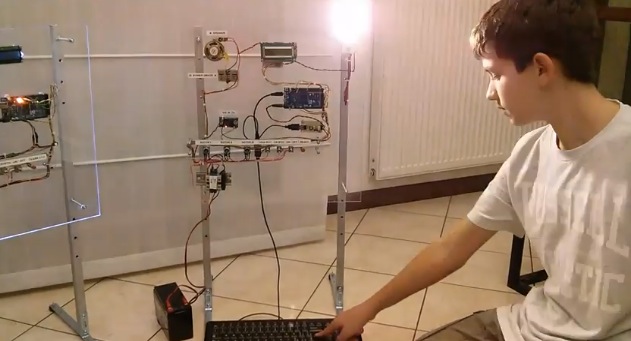
Light Crytpalk is an Enigma machine implemented by Michele Lizzit with Arduino Due. Enigma machines have an historical meaning as they were used in 20th century to enciphering and deciphering secret messages and were adopted by military and government services of several countries.
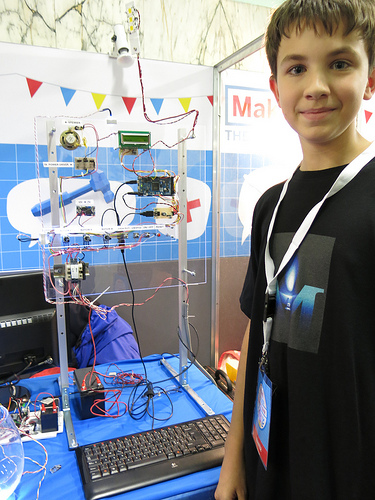
We met Michele during Maker Faire Rome and he received a Maker of Merit badge directly from Massimo Banzi:
The idea of the Maker Faire project came to me when Google dedicated a doodle to Alan Turing. Reading on Wikipedia his story I’ve learned about the Enigma machine. This project was initially realized to be presented as final project of Middle School (junior high – seventh grade). In the first version I used Xbee to transmit and cryptography was just a table substitution.
He chose to use the Arduino DUE because it allows hosting a USB keyboard in order to write the messages to be sent.
Michele did a great job and also shared documentation on his website, it’s pretty cool for his age and we asked him a couple of questions to know more about his experience as a young maker:
How do your friends see your projects? Do you share them with people of your age or is it more a family activity?
Until now, I have not had the possibility to share this passion with other people of my age: even when I went to my regional hacklab or to the linux day, I did not find anybody of my age. Soon after returning from Maker Faire Rome, my English teacher asked me to tell to my class mates (in English) how my experience have been; after a general description of the faire, I started to explain my project. But at a certain point, my teacher interrupted me saying: “ Explain it to poor mortals”: and yet I thought I had been clear enough!
Probably, if I had have the possibility of bringing the Light Cryptalk in my class and let my friends try it, it would have been better.
You did a lot of work to share documentation of Enigma hardware and software on the website and translating it also in english. Do you think it’s important to share? Do you think you are contributing to the open source community?
I use Linux for everything I do with my computer and I am very grateful to the open source community and to Arduino for making available online for free a huge amount of documentation. I believe that it is important to share your ideas freely and for free so that others like me can learn and so that the opportunities to know, learn and make do not remain available only to those who can spend more. I know that so far I have contributed only in minimal part to the open source community but I am just at the beginning.
Have you got any plan yet for your next project?
Now I’ve in mind the idea of building a 3d printer and I’m finishing up my quadcopter which I made using as a controller a joystick connected to Arduino and Xbee and for which I wrote the whole code by myself.
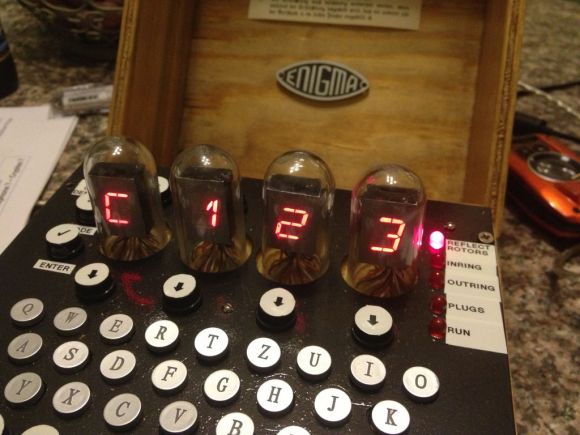
This open-source Enigma replica by the folks at [ST-Geotronics] is simply stunning. They drew their inspiration from a hilarious build we saw a few years ago that hacked a children’s toy into an Enigma machine. Their project is instead modeled on the original Enigma M4 cipher machine, and aside from a bit of artistic license, we think they nailed the visual style. As for functionality, the guide claims everything works, right down to the plugboard.
Rather than try to immediately cram everything into the final enclosure, the [ST-Geotronics] gang painstakingly worked out a prototype to be sure the four 16-segment LED displays had been wired correctly and functioned properly. The next step was laying out a swarm of buttons and resistors on a 6″x8″ perfboard. They used charlieplexing to handle the 16-segment displays (which actually have 17 LEDs each), and deceptively disguised each display as a nixie tube by mounting them vertically and encasing them in a transparent dome. The case follows the M4′s original dimensions and consists of a plywood box with scrap steel for the top plate.
Swing by their Instructables page for more details. There you can find several Arduino sketches to test functionality and the code for five different M4 operation modes.
Planet Arduino is, or at the moment is wishing to become, an aggregation of public weblogs from around the world written by people who develop, play, think on Arduino platform and his son. The opinions expressed in those weblogs and hence this aggregation are those of the original authors. Entries on this page are owned by their authors. We do not edit, endorse or vouch for the contents of individual posts. For more information about Arduino please visit www.arduino.cc
You are currently browsing the archives for the enigma category.