Posts | Comments

Planet Arduino

Archive for the ‘enigma machine’ Category

This hacker has been wanting to design an Enigma machine simulator for a while, but didn’t take the leap until they realized there was a compact Arduino with a surplus of I/O.

The logs go through all sort of variations on the machine. Everything from a plug board variation similar to the original to a 16 segment LED tester are covered. In one of the posts you can even see it decode a real U-Boat message. 

The earlier revisions are housed in very attractive laser cut cases but the latest designs employ an even more elegant casing solution. The simulator uses 16 segment displays and momentary push buttons for the keys. At its core is a 2560 Pro mini. The write-up contains a lot of detail about the code behind the Enigma and is interesting to read.  Interestingly, the PCB was designed in Fritzing, the EDA software many love to hate.

We love the craftsmanship and attention going into this project and can see it turning into a very appealing kit as it goes through its design cycles.

Enigma machines are fascinating devices, especially for young Makers looking to explore the world of electronics. Awhile back we featured a similar project from Italy, and we’re once again amazed by the work of 14-year-old Andy Eggebraaten, who built a retro-modern gadget of his own. The project, which was for his high school’s science fair, took nine months to complete.

These electro-mechanical rotor cipher machines were developed  in the early 20th century to protect commercial, diplomatic and military communication, used especially by German military intelligence during World War II.

In the video below, Andy opens the machine to show its inner workings: the unit runs on Arduino Mega along with 1,800 other parts and 500 color-coded wires. We can see that he evolved the rotors into electronic modules that plug into D-Sub sockets, and the interface is made using a 16-segment display showing the rotor position as well as an LCD screen to read the plain- and the encoded text.

The World War II German Enigma encoding machine is something of an icon in engineering circles not just for its mechanical ingenuity but for the work of the wartime staff at Bletchley Park in decoding its messages. Without it we would not have had Colossus, the first programmable digital electronic computer, and subsequent technological developments might have taken a slower pace towards what we take for granted today.

Sadly for the Enigma enthusiast though, real machines are now few and far between. Our grandparents’ generation saw to that through the chaos and bombing of the fight across Europe. If you want to handle one you will have to either have an outrageous amount of money, work for a museum, or maybe for the GCHQ archivist.

This has not stopped our community building Enigma replicas, and the latest one to come to our attention here at Hackaday shows some promise. [lpaseen]’s meinEnigma is an electronic Enigma driven by an Arduino Nano, with rotary encoders to represent the Enigma rotors and multi-segment alphanumeric displays standing in for the lighted letters in the original. It supports all the different variations of rotors from the original in software, has a physical plugboard, and a serial port over USB through which all machine functions can be controlled. The machine as it stands is a fully working prototype, the plan is that a final machine will resemble the original as closely as possible.

All the code used in the project can be found on GitHub, along with [lpaseen]’s Arduino library for the Holtek HT16K33 keyboard/display chip used to handle those tasks.

We’ve featured a few Enigma machines on Hackaday over the years. One was built into a wristwatch, another into a hacked child’s toy, but the closest in aim to [lpaseen]’s offering is this rather attractive replica also driven by an Arduino. It is also worth mentioning that should your travels ever take you to Buckinghamshire you can visit the Bletchley Park Museum and neighboring  National Museum of Computing, to get the Enigma and Colossus story from the source.


Filed under: Arduino Hacks

We don’t find smartwatches to be supremely usable yet. This one sets a definition for usefulness. The Enigma machine is of course the cipher process used by the Germans during World War II. This Enigma Machine wristwatch is not only functional, but the appearance is modelled after that of the original machine. With the speckled gray/black case and the Enigma badge branding [Asciimation] has done a fine job of mimicking the original feel.

Driving the machine is an Arduino Pro Mini. We’ve seen Arduino Enigma Machines in the past so it’s not surprising to see it again here. The user interface consists of an OLED display at 128×64 resolution, three buttons, with a charging port to the right and on/off switch on the left.

The device is demonstrated after the break. Quite a bit of button presses are used to set up each of the three encoder wheels. But that’s hardly avoidable when you’re not committing to a full keyboard. We’re pretty impressed by the functionality of [Asciimation’s] interface considering it’s hardware simplicity.

This seems perfect for kids that are proving to have an interest in engineering. They learn about ciphers, embedded programming, and mechanical design and crafting (this is a hand-sewn leather wristband). Of course if you build one and start wearing it into the office we won’t judge.


Filed under: Arduino Hacks, clock hacks, wearable hacks
Oct
08

Arduino-based Enigma Replica is Fully Functional

arduino hacks, arduino mega, charlieplexing, enigma, enigma machine, led hacks Comments Off on Arduino-based Enigma Replica is Fully Functional 

diyEnigmaMachine

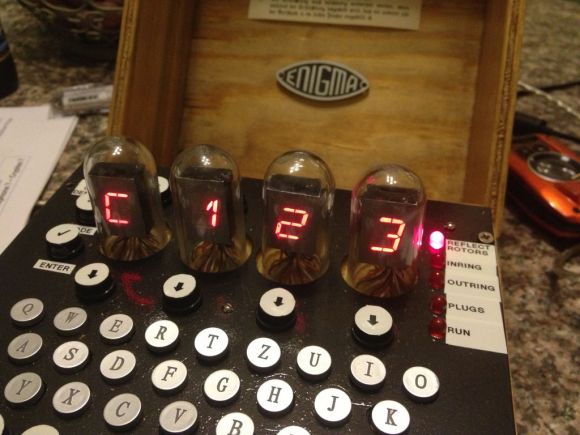
This open-source Enigma replica by the folks at [ST-Geotronics] is simply stunning. They drew their inspiration from a hilarious build we saw a few years ago that hacked a children’s toy into an Enigma machine. Their project is instead modeled on the original Enigma M4 cipher machine, and aside from a bit of artistic license, we think they nailed the visual style. As for functionality, the guide claims everything works, right down to the plugboard.

Rather than try to immediately cram everything into the final enclosure, the [ST-Geotronics] gang painstakingly worked out a prototype to be sure the four 16-segment LED displays had been wired correctly and functioned properly. The next step was laying out a swarm of buttons and resistors on a 6″x8″ perfboard. They used charlieplexing to handle the 16-segment displays (which actually have 17 LEDs each), and deceptively disguised each display as a nixie tube by mounting them vertically and encasing them in a transparent dome. The case follows the M4′s original dimensions and consists of a plywood box with scrap steel for the top plate.

Swing by their Instructables page for more details. There you can find several Arduino sketches to test functionality and the code for five different M4 operation modes.


Filed under: Arduino Hacks, led hacks


  • Newsletter

    Sign up for the PlanetArduino Newsletter, which delivers the most popular articles via e-mail to your inbox every week. Just fill in the information below and submit.

  • Like Us on Facebook