Posts | Comments

Planet Arduino

Archive for the ‘3d printed’ Category

Small synth held in two hands

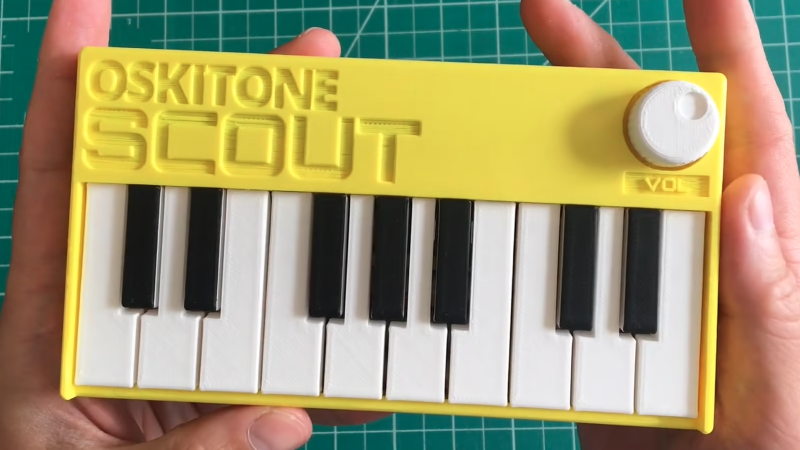
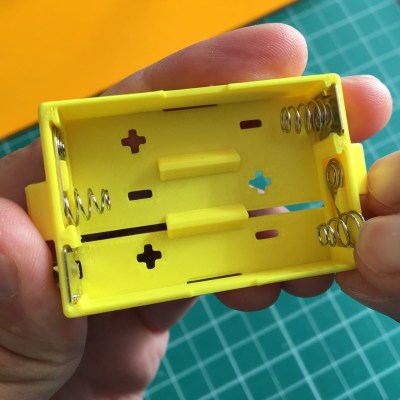
We’ve always been delighted with the thoughtful and detailed write-ups that accompany each of [Tommy]’s synth products, and the background of his newest instrument, the Scout, is no exception. The Scout is specifically designed to be beginner-friendly, hackable, and uses 3D printed parts and components as much as possible. But there is much more to effectively using 3D printing as a production method than simply churning out parts. Everything needed to be carefully designed and tested, including the 3D printed battery holder, which we happen to think is a great idea.

3d printed battery holder, showing inserted spring contacts
3D printed battery holder, with spring contacts inserted by hand.

[Tommy] also spends some time explaining how he decided which features and design elements to include and which to leave out, contrasting the Scout with his POLY555 synth. Since the Scout is designed to be affordable and beginner-friendly, too many features can in fact be a drawback. Component costs go up, assembly becomes less straightforward, and more complex parts means additional failure points when 3D printing.

[Tommy] opted to keep the Scout tightly focused, but since it’s entirely open-sourced with a hackable design, adding features is made as easy as can be. [Tommy] designed the PCB in KiCad and used OpenSCAD for everything else. The Scout uses the ATmega328, and can be easily modified using the Arduino IDE.

STL files can be downloaded here and all source files are on the project’s GitHub repository, which also contains detailed assembly and modification guides. Watch it in action in the video, embedded below.

Ever wanted your own gesture-controlled robot arm? [EbenKouao]’s DIY Arduino Robot Arm project covers all the bases involved, but even if a robot arm isn’t your jam, his project has plenty to learn from. Every part is carefully explained, complete with source code and a list of required hardware. This approach to documenting a project is great because it not only makes it easy to replicate the results, but it makes it simple to remix, modify, and reuse separate pieces as a reference for other work.

[EbenKouao] uses a 3D-printable robotic gripper, base, and arm design as the foundation of his build. Hobby servos and a single NEMA 17 stepper take care of the moving, and the wiring and motor driving is all carefully explained. Gesture control is done by wearing an articulated glove upon which is mounted flex sensors and MPU6050 accelerometers. These sensors detect the wearer’s movements and turn them into motion commands, which in turn get sent wirelessly from the glove to the robotic arm with HC-05 Bluetooth modules. We really dig [EbenKouao]’s idea of mounting the glove sensors to this slick 3D-printed articulated gauntlet frame, but using a regular glove would work, too. The latest version of the Arduino code can be found on the project’s GitHub repository.

Most of the parts can be 3D printed, how every part works together is carefully explained, and all of the hardware is easily sourced online, making this a very accessible project. Check out the full tutorial video and demonstration, embedded below.

3D printing has been a boon for many projects, especially those involving robotic arms. All kinds of robotic arm projects benefit from the advantages of 3D printing, from designs that focus on utility and function, to clever mechanical designs that reduce part count in unexpected ways.

We’ve all seen videos of blisteringly fast SCARA arms working on assembly lines, and more than a few of us have fantasied about having that same kind of technology for the home shop. Unfortunately, while the prices for things like 3D printers and oscilloscopes have dropped lower than what many would have believed possible a decade ago, high-performance robotics are still too pricey for the home player.

Unless of course, you’re willing to build it yourself. The PyBot designed by [jjRobots] is an open source robotic arm that should be well within the means of the average hardware hacker. One could argue that this is a project made entirely possible by desktop 3D printing; as not only are most of the structural components printed, but most of the mechanical elements are common 3D printer parts. Smooth rods, linear bearings, lead screws, and NEMA 17 motors are all exceptionally cheap these days thanks to the innumerable 3D printer kits that make use of them.

A custom control board keeps the wiring tight.

Those who’ve researched similar projects might notice that the design of this arm has clearly been influenced by the Mostly Printed SCARA (MPSCARA). But while that robot was designed to carry an extruder and act as a 3D printer, [jjRobots] intends for the PyBot to be more of a general purpose platform. By default it features a simple gripper, but that can easily be changed out for whatever tool or gadget you have in mind.

In the base of the arm is a custom control board that combines an Arduino M0, an ESP8266, and a trio of stepper motor drivers. But if you wanted to build your own version from the parts bin, you could certainly wire up all the principle components manually. As the name implies, the PyBot is controlled by Python tools running on the computer, so it should be relatively easy to get this capable arm to do your bidding.

We’ve seen some impressive 3D printed robotic arms over the years, but the simplicity of the PyBot is particularly compelling. This looks like something that you could reasonably assemble and program over a weekend or two, and then put to work in your ad-hoc PPE factory.

We have seen quite a few DIY joystick designs that use Hall effect sensors, but [Akaki]’s controller designs (YouTube video, embedded below) really make the most of 3D printing to avoid the need for any other type of fabrication. He’s been busy using them to enhance his Microsoft Flight Simulator 2020 experience, and shares not just his joystick design, but makes it a three-pack with designs for throttle and pedals as well.

Hall effect sensors output a voltage that varies in proportion to the presence of a magnetic field, which is typically provided by a nearby magnet. By mounting sensors and magnets in a way that varies the distance between them depending on how a control is moved, position can be sensed and communicated to a host computer. In [akaki]’s case, that communication is done with an Arduino Pro Micro (with ATmega32U4) whose built-in USB support allows it to be configured and recognized as a USB input device. The rest is just tweaking the physical layouts and getting spring or elastic tension right. You can see it all work in the video below.

Hall effect sensors have featured in DIY joystick builds, but for something as delightful as it is different, don’t miss this fantastic high-speed magnetic imager based on them.

You don’t have to be an extinct mammal or a Millennial to enjoy the smooth, buttery taste of an avocado. Being psychic on the other hand is definitely an advantage to catch that small, perfect window between raw and rotten of this divaesque fruit. But don’t worry, as modern problems require modern solutions, [Eden Bar-Tov], [Elan Goldberg], and [Mizpe Ramon] built the AvoRipe, a device to notify you when your next avocado has reached that window.

Taking both the firmness and color of an avocado as indicators of its ripeness into account, the team built a dome holding a TCS3200 color sensor as stand for the avocado itself, and 3D printed a servo-controlled gripper with a force sensor attached to it. Closing the gripper’s arms step by step and reading the force sensor’s value will determine the softness the avocado has reached. Using an ESP8266 as centerpiece, the AvoRipe is turned into a full-blown IoT device, reporting the sensor readings to a smartphone app, and collecting the avocado’s data history on an Adafruit.IO dashboard.

There is unfortunately one big drawback: to calibrate the sensors, a set of nicely, ripe avocados are required, turning the device into somewhat of a chicken and egg situation. Nevertheless, it’s a nice showcase of tying together different platforms available for widescale hobbyist projects. Sure, it doesn’t hurt to know how to do each part from scratch on your own, but on the other hand, why not use the shortcuts that are at our disposal to remove some obstacles — which sometimes might include programming itself.

If everything goes according to plan, Elon Musk says the first generation of SpaceX’s massive Starship will make an orbital flight before the end of 2020. That’s a pretty bold claim, but when you’ve made landing rockets on their tails as in the old science fiction pulp magazines seem routine, we suppose you’ve earned the right to a bit of bravado. We’re excited to see the vehicle evolve over the next several months, but even if the real one stays grounded, we’ll gladly take this “flying” Starship model from [Chris Chimienti] as a consolation prize.

A magnetic levitation module, we’re officially in the future.

Feeling a bit let down by the 3D printable models of the Starship he found online, [Chris] set out to build his own. But it wasn’t enough to just make his bigger, stronger, and more accurate to Starship’s current design; he also wanted to make it a bit more exciting. Some RGB LEDs an Arduino embedded in the “cloud” stand the rocket sits on was a good start, and the landing pad inspired by SpaceX’s real autonomous spaceport drone ship Just Read the Instructions looks great all lit up.

But this is Starship we’re talking about, a vehicle that could literally push humanity towards being a multi-planet species. To do it justice, you’ve really got to knock it out of the park. So [Chris] found a magnetic levitation module online that could support a few hundred grams, and set to work on making his plastic Starship actually hover over the landing pad.

As you might imagine, it was a bit tricky. The first versions of the rocket looked great but came out too heavy, so he switched over to printing the model in so-called “spiral vase mode” which made it entirely hollow. Now far lighter and with a magnetic plate fit into the bottom, it was stable enough to float on its own. For the final touch, [Chris] added some red LEDs and a coin cell battery to the base of the Starship so it looks like the sleek craft is performing a last-second landing burn with its “impossible” full-flow staged combustion engines.

This isn’t the first time we’ve seen a model rocket with an electronic glowing cloud under it, but it’s certainly the first one we’ve seen that could levitate in mid-air. While this little rocket might not make it all the way to Mars, we wouldn’t be surprised to see it touching down on the desks of other hackers and makers in the near future.

For Game of Thrones fans, it’s an awkward time. The show has ended its run on HBO (not without a certain level of controversy), the planned prequel is still years away, and who knows when George R. R. Martin will actually get around to writing the final books in the series. Fans have no choice but to entertain themselves while waiting for further tales of adventure from Westeros, which is how we get things like this motorized clock from [Techarge].

Inspired by the now iconic opening sequence from the HBO series, elements of the 3D printed model spin around while the theme song is played courtesy of a DFPlayer Mini MP3 player module and small 2 watt speaker. The audio hardware, motor, and four digit LED display module in the front are all connected to an Arduino with a custom PCB shield, giving the inside of the clock a very clean and professional appearance.

Around the back side [Techarge] has two small push buttons to set the hour and minutes, and a large toggle to control the music and movement. As of right now it needs to be switched on and off manually, but a future enhancement could see it kick on hourly.  We’d also like to see an RTC module added to the PCB, or better yet, switch over to the ESP8266 and just pull the time down from NTP.

Who knows? By the time you’ve built one of these clocks for yourself, and the hand-made Iron Throne phone charger stand to go with it, maybe ol’ George will have slipped out a new book. But don’t count on it.

Anansi in African folktale is a trickster and god of stories, usually taking physical form of a spider. Anansi’s adventures through oral tradition have adapted to the situation of people telling those stories, everything ranging from unseasonable weather to living a life in slavery. How might Anansi adapt to the twenty-first century? [odd_jayy] imagined the form of a cyborg spider, and created Asi the robot companion to perch on his shoulder. Anyone who desire their own are invited to visit Asi’s project page.

Asi was inspired by [Alex Glow]’s Archimedes, who also has a project page for anyone to build their own. According to [Alex] at Superconference 2018, she knew of several who have done so, some with their own individual customization. [odd_jayy] loved the idea of a robot companion perched on his shoulder but decided to draw from a different pool of cultural folklore for Asi. Accompanying him to various events like Sparklecon 2019, Asi is always a crowd pleaser wherever they go.

Like every project ever undertaken, there is no shortage of ideas for Asi’s future and [odd_jayy] listed some of them in an interview with [Alex]. (Video after the break.) Adding sound localization components will let Asi face whoever’s speaking nearby. Mechanical articulation for legs would allow more dynamic behaviors while perched, but if the motors are powerful enough, Asi can walk on a surface when not perched. It’s always great to see open source projects inspire even more projects, and watch them as they all evolve in skill and capability. If they all become independently mobile, we’ll need clarification when discussing the average velocity of an unladen folklore robot companion: African or European folklore?

Sometimes it’s necessary to make do with whatever parts one has on hand, but the results of squashing a square peg into a round hole are not always as elegant as [Juan Gg]’s programmable DC load with rotary encoder. [Juan] took a design for a programmable DC load and made it his own in quite a few different ways, including a slick 3D-printed enclosure and color faceplate.

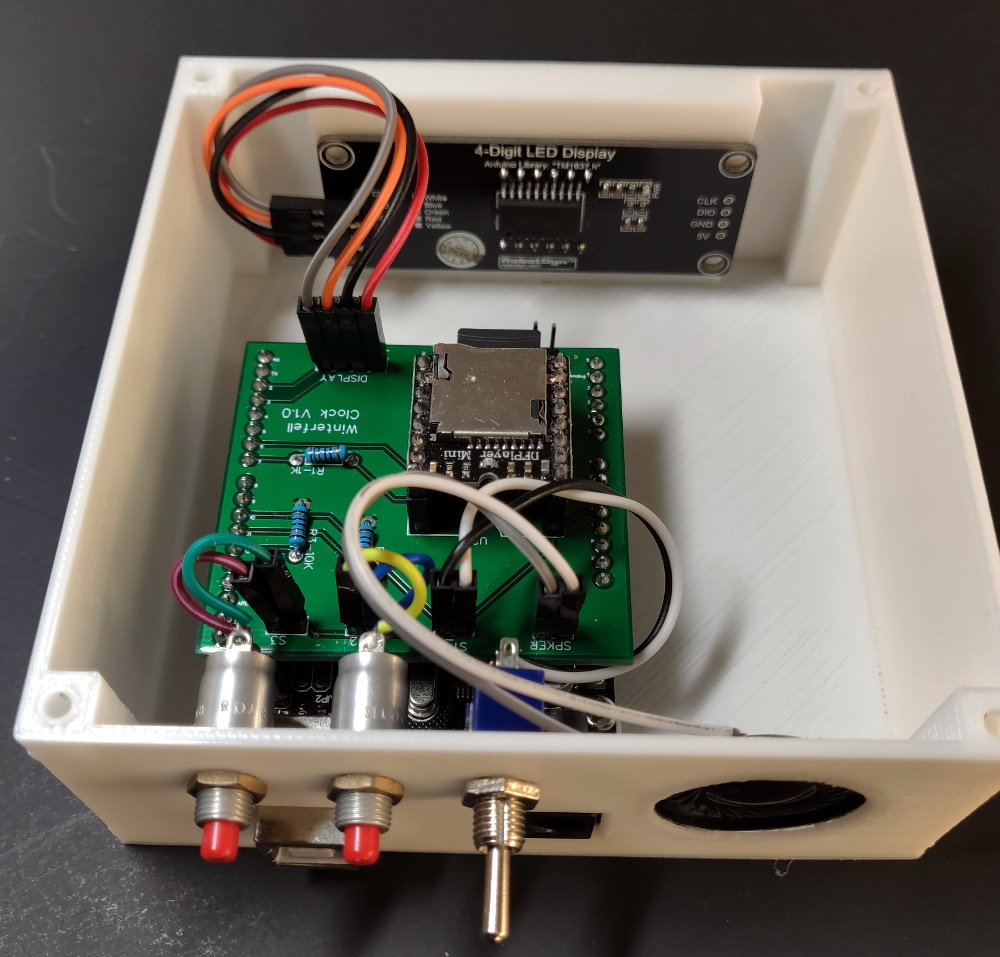
The first thing to catch one’s eye might be that leftmost seven-segment digit. There is a simple reason it doesn’t match its neighbors: [Juan] had to use what he had available, and that meant a mismatched digit. Fortunately, 3D printing one’s own enclosure meant it could be gracefully worked into the design, instead of getting a Dremel or utility knife involved. The next is a bit less obvious: the display lacked a decimal point in the second digit position, so an LED tucked in underneath does the job. Finally, the knob on the right could reasonably be thought to be a rotary encoder, but it’s actually connected to a small DC motor. By biasing the motor with a small DC voltage applied to one lead and reading the resulting voltage from the other, the knob’s speed and direction can be detected, doing a serviceable job as rotary encoder substitute.

The project’s GitHub repository contains the Arduino code for [Juan]’s project, which has its roots in a design EEVblog detailed for an electronic load. For those of you who prefer your DIY rotary encoders to send discrete clicks and pulses instead of an analog voltage, a 3D printed wheel and two microswitches will do the job.

Digitizing an object usually means firing up a CAD program and keeping the calipers handy, or using a 3D scanner to create a point cloud representing an object’s surfaces. [Dzl] took an entirely different approach with his DIY manual 3D digitizer, a laser-cut and 3D printed assembly that uses rotary encoders to create a turntable with an articulated “probe arm” attached.

Each joint of the arm is also an encoder, and by reading the encoder values and applying a bit of trigonometry, the relative position of the arm’s tip can be known at all times. Manually moving the tip of the arm from point to point on an object therefore creates measurements of that object. [Dzl] successfully created a prototype to test the idea, and the project files are available on GitHub.

We remember the earlier version of this project and it’s great to see how it’s been updated with improvements like the addition of a turntable with an encoder. DIY 3D digitizing takes all kinds of approaches, and one example was this unit that used four Raspberry Pi Zeros and four cameras to generate high quality 3D scans.


  • Newsletter

    Sign up for the PlanetArduino Newsletter, which delivers the most popular articles via e-mail to your inbox every week. Just fill in the information below and submit.

  • Like Us on Facebook