This project displays live traffic conditions between two locations on a physical map, using an Adafruit Feather Huzzah that gathers data from the Google Maps API and then sets the color of a string of NeoPixels
Once you have a track and a kart to race on it, what’s missing? A lap counter that can give your lap times in hardcopy, obviously! That’s what led [the_anykey] to create the Arduino-based Lap Timer to help him and his kids trim those precious seconds off their runs, complete with thermal printer for the results.
The hardware uses an infrared break-beam sensor module (a Velleman PEM10D) to detect when a kart passes by. This module is similar to a scaled-up IR reflective object sensor; it combines an IR emitter and receiver on one end, and is pointed at a reflector placed across the track, up to 10 meters away. When a kart breaks the beam, the module reports the event to the rest of the hardware. Only needing electronics on one side allows the unit to be self-contained.
An obvious shortcoming of this system is the inability to differentiate between multiple karts, but for timing a single driver’s performance it does the trick. What’s great about this project is it showcases how accessible hardware is today; a device like this is possible to put together with what are essentially off-the-shelf components available to any hobbyist, using an Arduino as the glue to hold it together. We’d only comment that a red-tinted piece of plastic as an overlay for the red display (and a grey-tinted one for the green) would make the LED displays much easier to read. Still, this is a very clean and well-documented build. See it in action in the video embedded below.
Infinity mirrors are some far-out table mods and make a great centerpiece. Instructables user [bongoboy23] took a couple steps beyond infinity when designing this incredible table tailor-made for our modern age.
Poplar and pine wood make up the framing, and red oak — stained and engraved — make for a chic exterior. Programmed with Arduino and run on a Teensy 3.1, the tabletop has 960 LEDs in forty sections. There are, four USB ports hidden behind sliding panels, as well as a two-port AC outlet and an inductive charging pad and circuit. A hidden Adafruit TFT touchscreen display allows the user to control the table’s functions. Control is limited to changing lighting functions, but Pac-Man, Snake, and text features are still to come!
Weighing in at $850, it’s not a cheap build, but it looks amazing.
This is one of the most extensive Instructables you may happen across, containing dozens of pictures, CAD files, diagrams, appendices, and a change log, with tips besides; if you want one just like this at home, you are in good hands, here. Or try an easier build, we won’t judge. However, maker beware — you may be stepping through a portal that’s difficult to return from.
Did you forget about Valentine’s Day? Do you need a quick project to get ready for Valentine’s Day? [Becky Stern] has you covered. She’s whipped up a neat Internet-enabled Valentine project which should be pretty quick to put together.
At its heart (pun intended) is an ESP8266 microcontroller, in this case an Adafruit Feather Huzzah. Several layers of tissue paper heart are stitched together and cut out into a heart shape and then attached to a spring. A vibrating pager motor is used to shake the it when a signal comes in. Two buttons are used to send the message and a red LED is used to light the heart up. The whole thing is enclosed in a shadow box. [Becky] also put together another controller with a similar setup in a plastic enclosure. When the buttons are pressed on either controller, the other gets a signal and the heart shakes and lights up.
These projects send and receive Valentines, but they could be programmed to send whatever information you’d like. If you’re looking for a quick Valentine’s Day project, this is a great one, and you might have all you need already in your component drawer. Break out the soldering iron and send your Valentine a message! If you’re still looking for a quick Valentine’s Day project, check out this animated heart or this PCB Valentine.
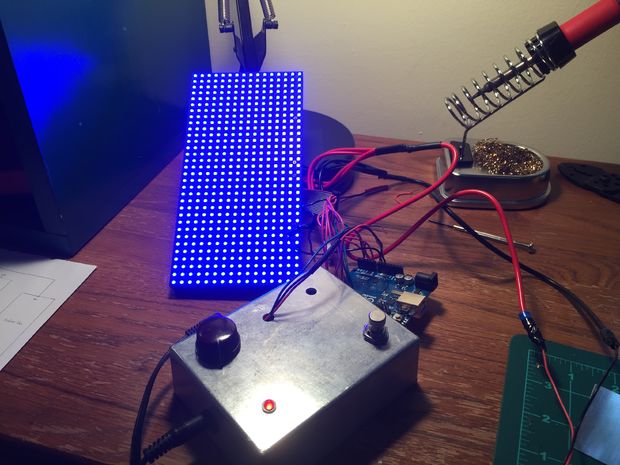
Have you ever wanted to have a light show that reacts to what you play through you’re favorite electric instrument? Georgia Tech grad student Wil Roberts has, and so he created a guitar-controlled LED display–an impressive project that combines both his Maker and musical chops.
To accomplish this, Roberts used an Arduino Uno along with an Adafruit 16×32 RGB LED matrix panel that responds to the guitar’s signal. The bottom rows are always blue, while the top ones progress from green to red the louder he shreds. The top rows remain red depending on the length of the note being played.
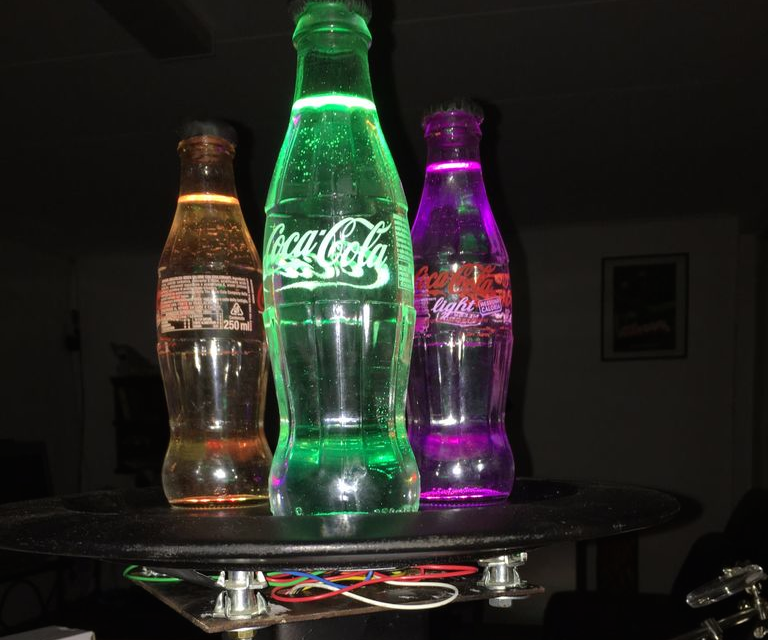
With school just about out for the summer, Brian Fitzgerald’s son was throwing a party to celebrate the end of exam week. Like any cool Maker dad would, he decided to build awesome lights made out of a few old soda bottles, the “gooey innards” of glow sticks, and some other supplies he had lying around the basement.
Fitzgerald used a wooden plate for the base and a playground post bracket for the mount, along with an Arduino Leonardo (though any Arduino would do) and three NeoPixel rings for the colorful effects.
Fill the Coke bottles with water. Alternatively, you can add a drop of milk to get a cloudy effect — it makes the liquid translucent and gives the impression of solid light, but you loose the little bubble and scratch effects that clear water highlights, which we thought was cooler. We put a black Sugru cap on the bottles to avoid a drunken accident involving water and electronics. And filled the countersunk bolt holes with Sugru to hide the bolt heads as well.
I attached the plastic Arduino casing with double-sided velcro to the base unit for easy removal. It’d look nicer if I’d put the whole unit inside the base, but as we’re planning to pull the board out and modify for music sensitivity, I opted for convenience over beauty. If anybody has any cool Arduino code that gets an Adafruit auto-gain mic and NeoPixels jamming via FFT, I’d love to see it. There are some great color organ projects out there, but I can’t seem to find this particular combo. So we may have to write it ourselves!
Plug the 9v wall wart into the Arduino and BOOM. You got yourself a classic party light that’s mesmerizing to look at, throws patterns on the ceiling that look like Hubble images of distant nebulae, a fine conversation piece, and a bunch of cast off junk transformed into a thing of beauty.
We thought the construction was really neat; suspending a wooden ball in the middle of three retractable key rings. By moving the ball around you can control the motion of a cube displayed on the computer. We first thought this was done by encoders or potentiometers measuring the amount of string coming out of the key fobs. However, what’s actually happening is a little bit cleverer.
[Nicolas] has joined each string with its own 2 axis joystick from Adafruit. He had some issues with these at first because the potentiometers in the joysticks weren’t linear, but he replaced them with a different module and got the expected output. He takes the angle values from each string, and a Python program numerically translates the output from the mouse into something the computer likes. The code is available on his GitHub. A video of the completed mouse is after the break.
Planet Arduino is, or at the moment is wishing to become, an aggregation of public weblogs from around the world written by people who develop, play, think on Arduino platform and his son. The opinions expressed in those weblogs and hence this aggregation are those of the original authors. Entries on this page are owned by their authors. We do not edit, endorse or vouch for the contents of individual posts. For more information about Arduino please visit www.arduino.cc
You are currently browsing the archives for the adafruit category.

 We sit down to talk with Scott Shawcroft, an engineer at Adafruit, to discuss their hardware transition to CircuitPython.