Posts | Comments

Planet Arduino

Archive for the ‘Load’ Category

How do you tell how much load is on a CPU? On a desktop or laptop, the OS usually has some kind of gadget to display the basics. On a microcontroller, though, you’ll have to roll your own CPU load meter with a few parts, some code, and a voltmeter.

We like [Dave Marples]’s simple approach to quantifying something as complex as CPU load. His technique relies on the fact that most embedded controllers are just looping endlessly waiting for something to do. By strategically placing commands that latch an output on while the CPU is busy and then turn it off again when idle, a PWM signal with a duty cycle proportional to the CPU load is created. A voltage divider then scales the maximum output to 1.0 volt, and a capacitor smooths out the signal so the load is represented by a value between 0 and 1 volt. How you display the load is your own choice; [Dave] just used a voltmeter, but anything from an LED strip to some kind of audio feedback would work too.

Still just looking for a load meter for your desktop? Take your pick: an LED matrixold-time meters, or even Dekatrons.


Filed under: Arduino Hacks
Jun
04

Arduino based programmable load

arduino, electronic load, Load Comments Off on Arduino based programmable load 

2014-04-23 14.52.49

Jasper @ jasper.sikken.nl writes:

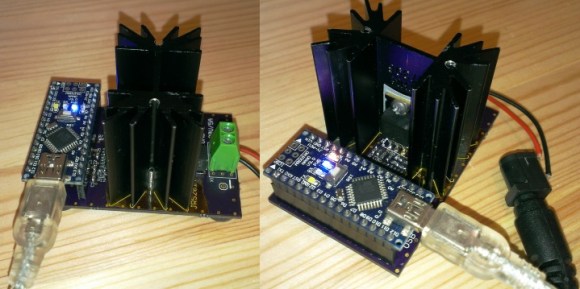
I designed an electric load. Using an Arduino Nano, the load can be programmed, and the voltage and current are measured. You can set a constant current (CC), a constant power (CP), or a constant resistance (CR) load by simply typing it in to the Arduino Serial Monitor. The circuit is designed for up to 30V, 5A, and 15W. An opamp, a mosfet, and a small sense resistor form the constant current circuit. The current is set using a DAC. Two other opamps measure the power supply voltage and the current. The circuit is powered from the Arduino USB voltage. I reflow soldered the board using the hacked toaster oven at the hackerdojo. Here are pictures of the reflow soldering process

Arduino based programmable load - [Link]

Arduino Electronic Load

Some projects are both educational and useful. We believe that [Jasper's] Arduino based electronic load is one of those project.

[Jasper's] electronic load can not only act as a constant current load, but also as a constant power and constant resistive load as well. The versatile device has been designed for up to 30V, 5A, and 15W. It was based on a constant current source that is controlled by a DAC hooked up to the Arduino. By measuring both the resulting voltage and current of the load, the system can dynamically adapt to achieve constancy. While we have seen other Arduino based constant loads before, [Jasper's] is very simple and straight forward compartively. [Jasper] also includes both the schematic and Arduino code, making it very easy to reproduce.

There are tons of uses for a voltage controlled current source, and this project is a great way to get started with building one. It is an especially great project for putting together your knowledge of MOSFET theory and opamp theory!


Filed under: Arduino Hacks

load

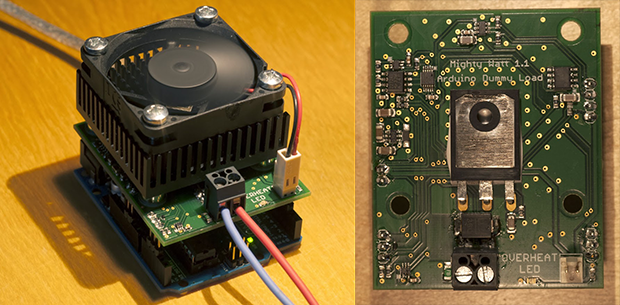
Having a big block of hot to dump current into is a very useful thing to have if you’re testing batteries, power supplies, high power LEDs, electroplating, or any thing else that would normally require a huge resistor. [Jakub] found himself in need of an electronic load, and instead of a transistor and a pot, decided to make something more automatic: a programmable load built around an Arduino shield.

The idea behind this load is pretty simple: connect a device to a FET and shunt resistor to measure current. Drive the gate of the FET with an op-amp that maintains either constant current or constant voltage. Control everything with a DAC, and you have a programmable load controlled by an Arduino.

With such a small form factor, getting rid of all that heat was bound to be a problem. For this, [Jakub] is using a 50×50 mm BGA style heat sink with a 5V fan. If it’s good enough for a big CPU, it should be able to handle dumping 70 Watts into a FET. There’s also a conservative application of thermal paste and a very small thermistor underneath the FET that’s able to be read by the Arduino. It might slowly heat up your room, but it’s not going to catch fire.

With the Arduino sketches [Jakub] wrote for his load he was able to characterize a pair of Idea batteries and figure out how much charge a three-year-old recyclable battery had. It’s a great piece of work, and if [Jakub] is willing to go through the hassle of a Kickstarter, it would make a fine crowdfunded product.


Filed under: Arduino Hacks, tool hacks
Oct
28

Building a constant current/constant power electronic load

arduino, ATmega328P, current, Load, power, Test/Measurements Comments Off on Building a constant current/constant power electronic load 

ElectronicLoad200W-600x450

Kerry Wong built a DIY constant current/constant power electronic load. It can sink more than 200W of power:

A while back I built a simple constant current electronic load using an aluminum HDD cooler case as the heatsink. While it was sufficient for a few amps’ load under low voltages, it could not handle load much higher than a few dozen watts at least not for a prolonged period of time. So this time around, I decided to build a much beefier electronic load so it could be used in more demanding situations.
One of the features a lot of commercial electronic loads has in common is the ability to sink constant power. Constant power would come in handy when measuring battery capacities (Wh) or testing power supplies for instance. To accommodate this, I decided to use an Arduino (ATmega328p) microcontroller.

[via]

Building a constant current/constant power electronic load - [Link]


  • Newsletter

    Sign up for the PlanetArduino Newsletter, which delivers the most popular articles via e-mail to your inbox every week. Just fill in the information below and submit.

  • Like Us on Facebook